Mutable Instruments Braids - Macro Oscillator Manual
- User manual (9 pages) ,
- Manual (2 pages)
Advertisement
Installation
Braids requires a -12V / +12V power supply (2x5 pin connector). The ribbon cable connector must be aligned so that the red stripe of the ribbon cable (-12V) is on the same side of the module's power header as the "Red stripe" marking on the board.
The module draws 15mA from the -12V rail and 100mA from the +12V rail.
Help
For help and discussions, head to mutable-instruments.net/forum
Calibration
Calibrating Braids is as easy as playing a C2 and a C4 note from an accurate MIDI to CV interface, sequencer or other CV source.
More information about this optional step is provided in the online manual.
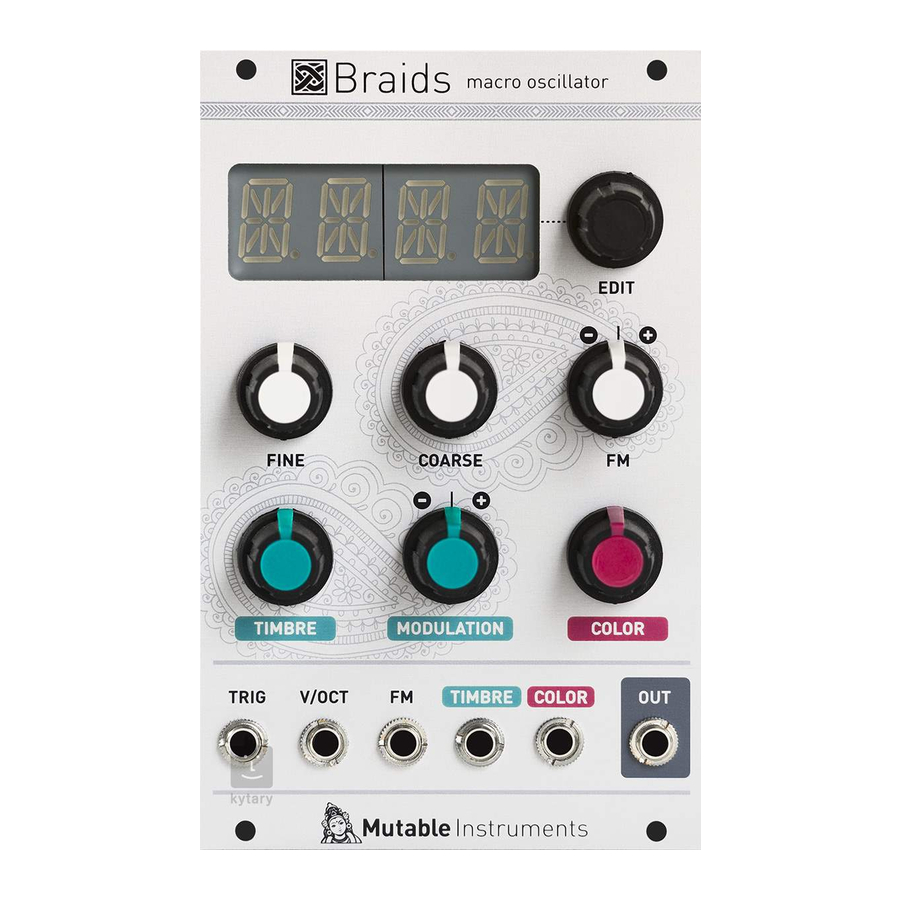
Front panel

Controls
- Display and encoder. When the module is powered on, the encoder selects the active synthesis model.
- Fine frequency control.
- Coarse frequency control.
- FM attenuverter. Adjusts the amount and polarity of frequency modulation from the FM input.
- Timbre control. Primary dimension of waveform control.
- Timbre modulation attenuverter. Primary dimension of waveform control.
- Color. Secondary dimension of waveform control. Depending on the active oscillator model, TIMBRE and COLOR will modify the sound in different ways. Please refer to the table on the other side.
Inputs and Outputs
- Trigger input. Resets the oscillator phase or generates an excitation signal. Physical or percussive models like PLUK or KICK need this trigger signal to start playing a note! The trigger input can also be used to trigger an internal AD envelope.
- V/Oct. Main frequency control input, with V/Oct scale.
- Frequency CV input.
- Timbre CV input.
- Color CV input.
- Audio output. The synthesis model or the position of TIMBRE and COLOR may have an impact on output level.
Settings
Click the encoder to display a list of settings. Scroll through the settings and click to modify one of them. Once the value has been modified, click to confirm and go back to the menu. Selecting the first option (WAVE) saves all the current settings in memory and brings you back to the module's initial state (oscillator model selection).
Here is an overview of the most important settings:
 repurposes the FM input: when
  , the FM CV input can be used to control the active synthesis model.
 and
and  control the bit-depth and sample rate of the audio output, for more digital grit and crunchiness!
 , when set to
  , automatically generates a trigger on the TRIG input when a sharp note change is detected on the V/OCT input.
 and
and  are the attack and decay time of an internal AD envelope generator.
 ,
,  ,
,  and
and  control the amount of frequency, timbre, color, and amplitude modulation from the internal AD envelope. When one of these settings is not null, the TRIG input actually triggers the AD envelope instead of resetting the oscillator phase.
 quantizes the V/Oct input to one of 50 preset scales, the root note of which is selected by
  .
.
 ,
,  ,
,  emulate various analog-style quirks.
Synthesis models
Classic analog waveforms

Digital synthesis


Physical simulations

Percussions


Wavetables

Noise


Documents / ResourcesDownload manual
Here you can download full pdf version of manual, it may contain additional safety instructions, warranty information, FCC rules, etc.
Download Mutable Instruments Braids - Macro Oscillator Manual
Advertisement

Need help?
Do you have a question about the Braids and is the answer not in the manual?
Questions and answers