Orbis ASTRO NOVA CITY - Digital Astronomical Timer Manual
- Instructions for use (2 pages) ,
- Instructions for use (2 pages) ,
- Instructions for use (5 pages)
Advertisement
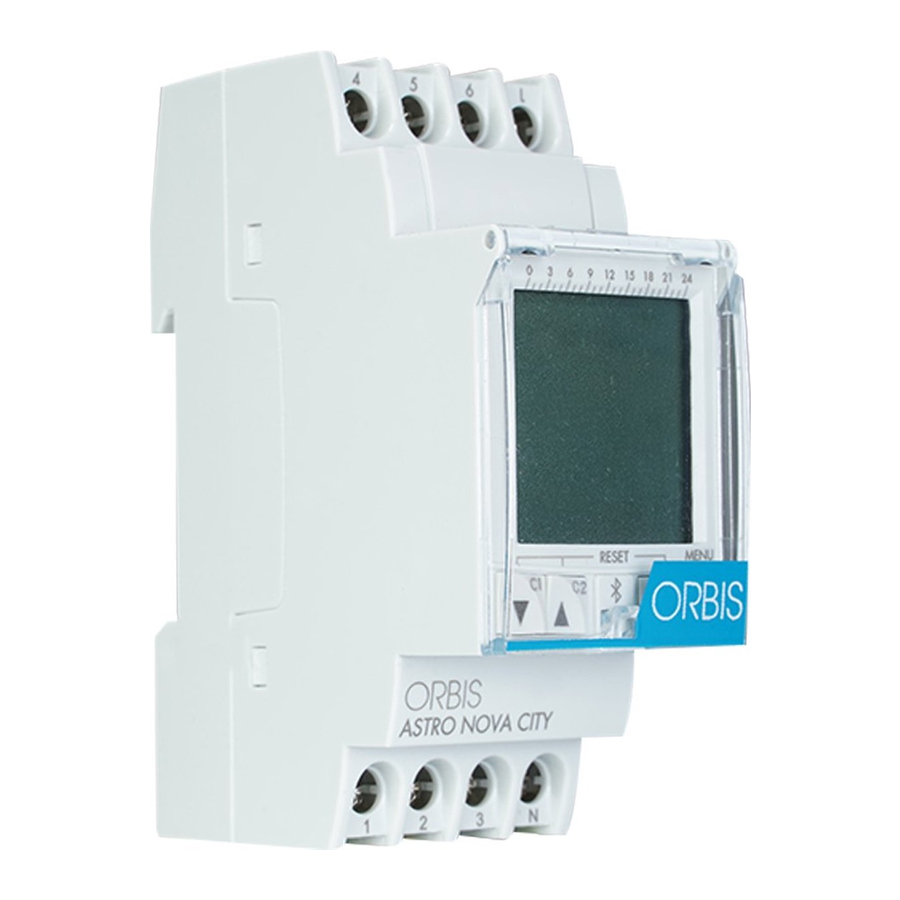
OVERVIEW

- Time scale
- Timetables
- Text line
- Sunrise symbol
- Low battery symbol
- Time / Date
- C1 relay status symbol
- Go down the menu / C1 manual operation
- Go up the menu / C2 manual
- Bluetooth dongle connector operation
- Cancel option / Go back in the menu
- Accept option / Enter the menu / Turn on the device without power supply
- C2 relay status symbol
- Manual operation (blinking) / Permanent manual (fixed)
- 12 H / 24 H
- Transfer symbol
- Sunset symbol
- Days of the week
INSTRUCTIONS FOR USE
ASTRO NOVA CITY is a digital time switch of astronomical update designed for the control of any electrical installation that requires a solar reference, particularly of the sunrise and nightfall time in a specific location every day of the year. It incorporates the possibility of performing manoeuvres at a fixed time of the day, as well as switching on and off at sunrise and sunset. In the astronomical manoeuvres, it is possible to set a correction of up to ± 9 hours 59 minutes to both C1 and C2 channels. In addition, it has a series of extra functions such as: automatic change to daylight saving / standard time, 4 holiday periods, adjustable screen brightness and programming from Smartphone / Tablet.
Menus can be displayed in several languages and show a timetable on screen with the current day's schedule.
It has 2 independent and voltage-free switched circuits that allow programming of up to 40 manoeuvres between channel 1 and/or channel 2.
INSTALLATION

Installation and mounting of electrical devices must be carried out by an authorised fitter.
TURN OFF THE POWER SUPPLY PRIOR TO INSTALLATION.
The device is internally protected against interference by a security circuit. However, some particularly strong fields may alter its functioning. Interference can be avoided if the following installation rules are taken into account:
- The device must not be installed near inductive loads (engines, transformers, contactors, etc.)
- It is advisable to plan a separate supply line (with a network filter where appropriate).
- The inductive loads must be provided with interference suppressors (varistor, RC filter).
If the time switch is used in combination with other devices in an installation, it should be made sure that the constituted unit does not generate extraneous disturbances.
RESTORE SUPPLY ONCE THE DEVICE IS FULLY INSTALLED.
MOUNTING
Electronic control device of independent mounting in distribution cabinet, with symmetric profile of 35 mm. in accordance with EN 60715 standard (DIN Rail).
CONNECTION
Connect power according to the diagram in FIG. 2.

Phase and Neutral positions must be respected, checking the connections made. A wrong connection may destroy the device.
START-UP
THE DEVICE MUST BE POWERED to be able to execute the installation control.
The display will light up and the MAIN screen will appear.
When the device is not powered the display remains turned off, keeping all the date and time programming, during the power-reserve period (10 years) thanks to the incorporated lithium battery. In the event of being installed without the battery, the device has a security power-reserve of approx. 48 hours.
With no power supply, press the MENU button, the display temporarily lights to allow programming. If no button is pressed after 5 seconds, the display will turn off again.
These devices have four keys for their setting and programming.
The display shows the following information:
- Timetable with the day's manoeuvres (it disappears when it gets to a holiday period). A timetable for each channel with 24 divisions in which each segment represents 1 hour ON.
- The display has a text line that will show the following information alternatively:
- SUNRISE and SUNSET times for that day with associated symbol:
Sun![]() = SUNRISE / Moon
= SUNRISE / Moon ![]() = SUNSET
= SUNSET - Selected city
- Current date
- PERMANENT operation
- Active HOLIDAY period
- SUNRISE and SUNSET times for that day with associated symbol:
- Complete time
- Manual manoeuvre symbol
![]() . It blinks when a manual switching is activated and if the switching is PERMANENT the symbol is fixed.
. It blinks when a manual switching is activated and if the switching is PERMANENT the symbol is fixed. - State of C1 / C2 circuits: ON
![]() , OFF
, OFF ![]()
 = SUNRISE / Moon
  = SUNSET
 . It blinks when a manual switching is activated and if the switching is PERMANENT the symbol is fixed.
  , OFF
, OFF 
SETTINGS
ASTRO NOVA CITY switches are factory programmed with the current date and time as follows:
- Time: GMT +1
- Zone: In accordance with commercial order
- Astronomical corrections: Disabled
- Change Standard to Daylight Saving: Automatic
- Change Daylight Saving to Standard: Automatic
- Holidays: NO (4 periods disabled)
- Programs: C1 to C2 On at sunset / C1 and C2 Off at sunrise (see FIG. 4)


MANUAL OPERATION
Activate or disable, manually reversing the state of the circuits temporarily from the main screen, by pressing keys ▼ C1 or ▲ C2.
The symbol will appear blinking on screen over the manipulated channel until we press ▼ C1 or ▲ C2 again, returning to the previous state.
PROGRAMMING
Programming is based on menus and submenus through which we can move to program manoeuvres or adjust the device. The main menu can be accessed from the standby screen pressing the ✓ key. With keys ▼ and ▲ we will move through the different menus and pressing ✓ we will access them. To go back to the previous menu we press the C key.
The details to be programmed always appear blinking on screen.
The structure of the menus is the following:
MAIN MENU

ZONE. Allows the selection of the country where it is installed and the closest city from a given list. The astronomical switch will calculate the sunrise and sunset time every day of the year based on the geographic position and date.
- Astronomical correction: Once the city is selected, the SUNRISE and SUNSET time can be corrected to adapt it to the different topographical conditions (for example: fences, shadows cast by buildings...). To do this, we can set forward or back the SUNRISE or SUNSET time up to 9h59min, seeing the corrected time on screen as it is being programmed.
We choose the closest city to our location

PROGRAMS. Is the menu where the different manoeuvres are programmed. There are 40 memory spaces (from PROG_01 to PROG_40).
- ENTER: We enter pressing ✓. Once we have accessed, we are informed about the program we are in P-01 ---- to P-40, we have the following options:
- EDIT (if it is already programmed) "P01: EDIT" is shown on screen, validating with ✓ appears on screen.
- TYPE: With keys ▼ and ▲we choose the type of action: ON, OFF. We validate with ✓.
- CHANNEL. We choose the channels to be programmed, C1 and/or C2.
- MANOEUVRE. We choose the type of manoeuvre:
- FIXED: Performs the manoeuvre at a fixed selected time.
- SUNSET: Performs the sunset manoeuvre. The sunset time can be corrected.
- SUNRISE: Performs the sunrise manoeuvre. The sunrise time can be corrected.
- REDUC. START: Performs the manoeuvre at a fixed selected time with priority over the sunset time.
- REDUC. END: Performs the manoeuvre at a fixed selected time as long as it is before sunrise, since the sunrise time has priority.
Next, we choose the manoeuvre's hour, minute and combination of days of the week.
HOLIDAY PERIODS program
If when validating the last day of the week with the![]() key we keep it pressed we select this manoeuvre as holiday, the word HOLIDAYS appears on screen and with keys ▼ and ▲we select one of the 4 holiday periods.
key we keep it pressed we select this manoeuvre as holiday, the word HOLIDAYS appears on screen and with keys ▼ and ▲we select one of the 4 holiday periods.
- DELETE. When validating with ✓ the selected program is deleted. Since all programs are stored in a consecutive order, deleting a program may mean changing each program's assigned number.
- DELETE. Allows the deletion of all the manoeuvres of the 40 programs in only one step.
 key we keep it pressed we select this manoeuvre as holiday, the word HOLIDAYS appears on screen and with keys ▼ and ▲we select one of the 4 holiday periods.
We choose to perform program of switched on at sunset
It already comes with ON at Sunset factory programming.

We choose to perform program of switched off at sunrise
It already comes with OFF at Sunrise factory programming.

We choose to perform program of switched off at 12 am

SETTINGS. The menu where the device is configured.
- CLOCK. Sets the time of the device. The variables to configure are (in this order): Year, month, day, and minute. The day of the week is calculated automatically.
- LANGUAGE. The menu where the language of the device is chosen.
- ADVANCED. The menu where most of the device's configuration can be done.
- BRIGHTNESS. Menu in which we can select the brightness of the display. MINIMUM, LOW, MEDIUM, HIGH, or MAXIMUM. The brightness on screen will be adjusted if we validate the visualised level.
- PERMANENT. The menu through which we can set a permanent operation (On / Off) of channel C1 and channel C2. With keys ▼ and ▲we move through the different options: C1: YES → C1: NO → C2: YES → C2: NO. We validate with ✓ our desired option. The device will not take notice of the manoeuvre programming for the selected channel if we choose the YES OPTION.
- HOLIDAYS. It has 4 PERIODS that can be programmed, to perform the manoeuvres selected in the programming of HOLIDAY PERIODS. If no manoeuvre is programmed in a period, during said period the channels will remain OFF. PERIOD 1...4
- EDIT. The month, day, hour and minute of the beginning of the period and the month, day, hour and minute of the end of the period are programmed. This period will be repeated year after year.
- DELETE. The selected period is deleted.
- COUNTERS. Menu in which the switch-on time of each circuit is indicated (in hours). Accessing the counter of each channel with ✓ it can be set to zero. Select DELETE YES and validate.
- SEASON. Allows to adjust the time change from daylight saving to standard time and vice versa.
- ACTIVE. Automatically makes the time change from daylight saving to standard time or vice versa, in accordance with each country's legislation. (EU the last Sunday of March and the last Sunday of October)
- INACTIVE. Does not make the time change.
- PIN CODE. Menu to activate or disable the keyboard lock to prevent unwanted access to the device settings.
- INACTIVE. Keyboard lock disabled.
- ACTIVE. Keyboard lock activated. And we are required to program a four-figure PIN CODE. This protection will be activated 30 seconds after we come out of the settings and return to the display in standby mode. From that moment on when any key is pressed the message "PIN CODE" will appear on screen. To unblock the access to the device, we will need to enter the PIN CODE programmed in its activation. The device will be unblocked for 10 seconds. During this time we will be able to access the settings menu by pressing ✓. Or any other manipulation. After 30 seconds without manipulating the device it will get locked again.
- 12H – 24H. With keys ▼ and ▲ we select the mode in which we wish to visualise the time. We validate the selection with ✓.
- VERSION. Menu where the device's software version is shown.
If simultaneous manoeuvres are programmed we have to take into account that some have priority over the others. The priority order is as follows:
PERMANENT MODE → MANUAL → PROG_01 → PROG_02 →.... → PROG_40
RESET. SET TO ZERO
Starting on standby mode (main screen), press the C key and keeping it pressed press keys ▼ and ▲ simultaneously for more than 3 seconds, the display turns off, all programming is deleted. The 4 factory pre-established programs will remain in the memory. The device must be powered.
We can also perform a quick deletion that does not affect the programming by pressing the four keys simultaneously. The device must be powered.
BATTERY CHANGE. FIG. 3

The device has a power-reserve of 10 years, by means of a replaceable lithium battery. Battery replacement is made by removing the rotating lid placed on the right side of the device. When the battery is dead and the device is powered the battery symbol appears on screen.
NOTE: When changing the battery the device's programming is not lost, and neither is the current time.
TURN OFF THE POWER SUPPLY TO REPLACE THE BATTERY
To open the battery lid, rotate it counter clockwise (marked with an arrow) with a coin or a flat object that fits in its slot, until the lid index matches the open position index of the device. Once the battery is replaced, insert the lid so that the lid index matches the open position index of the device and then turn clockwise until the lid index matches the closed position index of the device.
PROGRAMMING VIA SMARTPHONE/TABLET
The Bluetooth dongle is required for the communication with the device. Remove the front cover and insert the dongle.
This type of programming requires an Android (Bluetooth 4.0) or iPhone (4S or superior) device and the download of the "ORBIS ASTRO NOVA" app from the corresponding Market. Once installed, follow the App's instructions.
TECHNICAL FEATURES
| Rated voltage | As indicated in the device |
| Tolerance | ± 10% |
| Breaking capacity: | µ 2x16 (10) A / 250 V~ |
| Maximum recommended loads (N.A): | FIG. 2 |
| Own consumption | Maximum 16 Inductive VA (1,3 W) |
| Contact | AgSnO2 switched. |
| Display screen | Of back-lit liquid crystal |
| Running accuracy | ± 1 s / day at 23 ºC |
| Accuracy variation with temperature | ± 0.15 s / ºC / 24 h |
| Power reserve | 10 years (without connection to mains) 48 h (without battery and without connection to mains) |
| Type of action | 1S, 1T, 1U |
| Software class and structure | Class A |
| Memory spaces | 40 |
| No. of channels | 2 |
| Types of manoeuvres | SUNRISE, SUNSET, FIXED TIME: ON/OFF, REDUC. |
| Astronomical adjustment | Daily |
| Operating temperature | -10 ºC to +45 ºC |
| Transport and storage temperature | -20 ºC to +60 ºC |
| Pollution situation | 2 |
| Protection level | IP 20 in accordance with EN60529 |
| Protection class | II under correct mounting conditions |
| Transient impulse voltage | 2.5 kV |
| Temperature for the ball test | + 80 ºC for 21.2.5 |
| Keyboard access cover | Sealable |
| Connection | With screw terminal for section conductors of 4mm² maximum section |
| Battery | ½ AA – 3.6 V – 1000 mAh – Li/SOCi2 |
| Wrapping size | 2 DIN modules (35 mm) FIG. 5 |

This time switch includes a battery whose contents may be damaging to the environment. Do not get rid of the product without taking the precaution of dismantling the battery and placing it in an appropriate recycling container, or sending the product back to the factory.
Subject to technical changes – for further information: www.orbis.es

Documents / Resources
References
Download manual
Here you can download full pdf version of manual, it may contain additional safety instructions, warranty information, FCC rules, etc.
Download Orbis ASTRO NOVA CITY - Digital Astronomical Timer Manual
Advertisement


Need help?
Do you have a question about the ASTRO NOVA CITY and is the answer not in the manual?
Questions and answers