
Related Manuals for CabCAM CDW7M1C


Summary of Contents for CabCAM CDW7M1C
- Page 1 Operating Instructions 2.4G Digital 7" Wireless Color LCD Monitor Please read this manual thoroughly before operating the device, keep it for future reference. V 1.2...
-
Page 2: Table Of Contents
Contents 1. Precautions ....................1 2. Features ....................3 3. Technical Specifications ................3 4. Accessories ....................4 5. Parts Identification ..................5 6. Remote Control Operation ................. 6 7. Basic Operation ..................8 8. Menu ....................... 10 9. Recording Time ..................16 10. -
Page 3: Precautions
1. Precautions ● Storage and Keeping (1) Do not expose the monitor to excessive heat or cold. The storage temperature of this device is -30~+80℃, and the operating temperature is -20~+70 ℃. The humidity is RH90%. (2) Never use this device near a bathtub, wash basin, kitchen, damp basement, swimming pool or similar places. - Page 4 Maintenance ● Remove all the cable connections from the monitor before cleaning the device. Use a mild household detergent and clean the unit with a slightly damp, soft cloth. Never use strong solvents such as thinner or benzine, as they might damage the finish of the device. RISK OF ELECTRIC SHOCK DO NOT OPEN CAUTION: TO REDUCE THE RISK OF ELECTRIC SHOCK...
-
Page 5: Features
2. Features ① TFT LCD monitor with wide angle view and high resolution display. ② NORMAL, MIRROR, FLIP and MIR-FLIP viewing available. ③ Split mode, auto-scan mode and single-display mode available. ④ Auto pairing: Auto pairing happens when camera is activated. ⑤... -
Page 6: Accessories
4. Accessories U-Support Bracket Center Mount Bracket Sun Shield Power Cable Angle Adjustment Screws IR Remote Control Special Notice Accessory supply may be different for different application. -
Page 7: Parts Identification
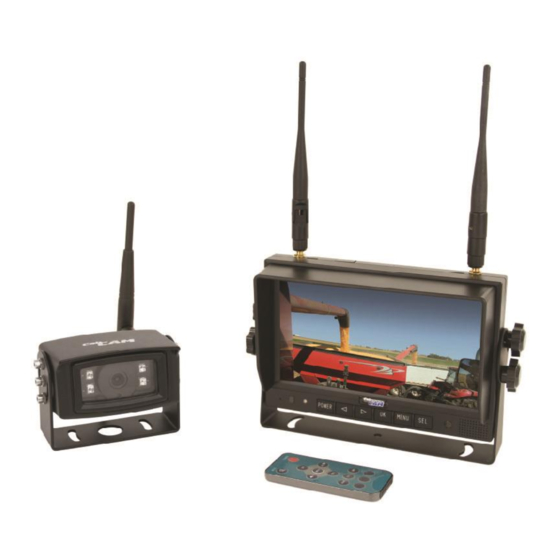
5. Parts Identification Press OK button to enter menu item or save user settings. Press OK button - shortcut for start/stop recording. Digital Color LCD screen Menu Power indicator Remote control sensor Loudspeaker Light level Select channels ● Press OK button to enter Power switch Volume decrease Volume increase... -
Page 8: Remote Control Operation
6. Remote Control Operation Press to select MUTE Press to turn on/off or enable sound the monitor Press OK button to enter menu item or save user Press to show menu or settings. exit menu Press OK button – shortcut for start/stop recording. - Page 9 ● MUTE (Mute) Press to select MUTE or enable sound ● POWER (Power switch) Press to turn on / off the monitor. ● Press OK button to enter menu item or save user settings. Press OK button - shortcut for start / stop recording.
-
Page 10: Basic Operation
7. Basic Operation 7.1 Installation of Center Mounting Bracket: ① Adjust monitor level by sliding the support to the desired height. ② Adjust the angle of the monitor and tighten the knob on the center mounting bracket. Support attaching piece Knob 7.2 Installation of U-support Bracket Angle adjustment... - Page 11 7.3 Reversing Display: CAM1 7.3.1 When the green wire is activated, the monitor automatically switches to CAM1. 7.3.2 When the white wire is connected to the positive wire of the CAM2 left turn light , the monitor automatically switches to CAM2(left side camera) when the left light is activated.
-
Page 12: Menu
8. Menu MENU is only allowed for operation under single image mode, not quad mode. ● Press MENU to display the following options and settings: ● ① MODE ② PICTURE ③ MIR-FLIP ④ RECORD ⑤ AUTOSCAN ⑥ SYSTEM ⑦ PLAY ⑧... - Page 13 Press to select PICTURE, press OK to enter. Press to select BRIGHTNESS / CONTRAST / HUE / VOLUME, press OK to enter. Press to adjust. Press OK to exit. Press MENU return to main menu. (3) Press to select MIR-FLIP, press OK to select Press to select NORMAL / MIRROR / MIR-FLIP / FLIP.
- Page 14 (4) Press to select RECORD. Press OK to enter. Press to select OVERWRITE / FORMAT, press OK to enter. When the icon turns yellow, press to select ON or OFF. Press OK to exit. Press MENU return to main menu. ...
- Page 15 SCANTIME frame is between 5 and 45 seconds, with a step time of 5s. (6) Press to select SYSTEM, Press OK to enter TIME:Press to select TIME, Press OK to set. Press adjust. Press OK to continue setting. ...
- Page 16 Press to select PLAY, Press OK to enter. Press to select video file, Press OK to enter playback mode. Video folder is named in format of YYMMDD. 130903 means the folder is created on Sep3 2013. Video files can be searched under daily folder.
- Page 17 Press to select PAIRING, press OK to enter. Press OK for 3 seconds to enter PAIRING. Auto pairing: ① Choose the channel that needs to be set up, the monitor will display the message “ PAIRING START 50” . ②...
-
Page 18: Recording Time
9. Recording Time With Micro SD cards in different capacities, please refer to the table below for recording time under 3 different image modes. This table is for reference only. Data may vary under different environments. 128G MODE SINGLE (640x480x1) 110h 220h 172h... -
Page 19: Troubleshooting
11. Troubleshooting The symptoms described below do not necessarily mean a failure within the display. Please check the following items before you initiate request for repair. Symptoms Possible Causes/Solutions Improper connection of automobile adapter. No picture Use of improper power supply. Power switch is set OFF. Check whether the camera has power supply.
Need help?
Do you have a question about the CDW7M1C and is the answer not in the manual?
Questions and answers