Table of Contents

Related Manuals for Salamander Designs Webex Board Pro


Summary of Contents for Salamander Designs Webex Board Pro
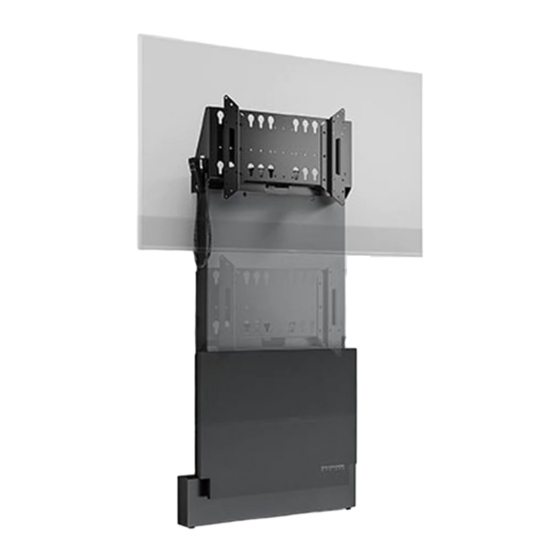
- Page 1 Electric Lift Wall Stand Designed for Cisco Webex Board Pro 55” COMPLIANT SOLUTIONS Salamander Designs - Electric Lift Wall Display Stands 55” www.salamandercommercial.com 501-673 [6.22] page 1 of 24...
- Page 2 Lag screw 5/16” x 2.5 301-055 Plastic wall anchor 301-730 Washer 5/16” flat washer 305-078 Display Interface Brackets - 55” PHK-735 (bag) Wall mount screw set Salamander Designs - Electric Lift Wall Display Stands 55” www.salamandercommercial.com 501-673 [6.22] page 2 of 24...
-
Page 3: Important Safety Instructions
Return the device to a service center for examination and repair. Electrical Specifications: Input: 90V - 240V ~, 48 Hz - 63HZ Operation: 10% Max 2min./18min. Salamander Designs - Electric Lift Wall Display Stands 55” www.salamandercommercial.com 501-673 [6.22] page 3 of 24... - Page 4 • There are no user-serviceable components within this device. Removal of the cover from this device may present a shock hazard, and void the warranty. Accessories and Spare Parts Please contact your nearest Salamander Designs dealer or www.salamandercommercial.com Salamander Designs - Electric Lift Wall Display Stands 55” www.salamandercommercial.com 501-673 [6.22]...
- Page 5 1. Slide outer panel away from base and then up and off the unit. 2. Remove inner panel by unscrewing it from stand (save screws). 3. Install leveler feet Salamander Designs - Electric Lift Wall Display Stands 55” www.salamandercommercial.com 501-673 [6.22]...
- Page 6 WOOD STUDS 16” min. MASONRY Using a level, adjust leveler feet until unit is level. For wood studs, use stud finder. Mark hole position. Salamander Designs - Electric Lift Wall Display Stands 55” www.salamandercommercial.com 501-673 [6.22] page 6 of 24...
- Page 7 Reposition stand and secure unit to wall using the four lag screws (S) and washers (L) supplied and a 1/2” (or 13mm) driver to tighten. For masonry, install lag shields (T) prior to bolting in position. Salamander Designs - Electric Lift Wall Display Stands 55” www.salamandercommercial.com 501-673 [6.22]...
- Page 8 Manage cables carefully. Use cable ties to keep wires away from pinch points. Route cables between the back of display and the hole on the front of stand. Use supplied split loom cable manager to route cables. Salamander Designs - Electric Lift Wall Display Stands 55” www.salamandercommercial.com 501-673 [6.22]...
-
Page 9: Operation: Remote Control
• Hold down the “down” button continuously for several seconds to reset unit • More troubleshooting and repair information found on page four of this manual Salamander Designs - Electric Lift Wall Display Stands 55” www.salamandercommercial.com 501-673 [6.22] page 9 of 24... -
Page 10: Display Installation
Salamander product, let us know. We are here to make it right. 1.800.535.5659 - 860.761.9500 Full warranty including limitations and warranty claim information may be found at: www.salamandercommercial.com/warranty Salamander Designs - Electric Lift Wall Display Stands 55” www.salamandercommercial.com 501-673 [6.22]... - Page 11 Lag screw 5/16” x 2.5 301-055 Plastic wall anchor 301-730 Washer 5/16” flat washer 305-078 Display Interface Brackets - 55” PHK-735 (bag) Wall mount screw set Salamander Designs - Electric Lift Wall Display Stands 55” www.salamandercommercial.com 501-673 [6.22] page 11 of 24...
-
Page 12: Instrucciones Importantes De Seguridad
Lleve el dispositivo a un centro de servicio para su examen y reparación. Especificaciones eléctricas: Entrada: 90V - 240V ~, 48 Hz - 63HZ Operación: 10% Max 2min./18min. Salamander Designs - Electric Lift Wall Display Stands 55” www.salamandercommercial.com 501-673 [6.22] page 12 of 24... - Page 13 Accesorios y piezas de repuesto Por favor, contacte a su vendedor de Salamander Designs más cercano o visite www.salamandercommercial.com para mayor información. Salamander Designs - Electric Lift Wall Display Stands 55”...
-
Page 14: Consignes De Sécurité Importantes
Renvoyez l’appareil à un centre agréé pour examen et réparation. Caractéristiques électriques: Entrée: 90V - 240V ~, 48 Hz - 63 Hz Durée d’utilisation :. 10% Max 2min / 18min. Salamander Designs - Electric Lift Wall Display Stands 55” www.salamandercommercial.com 501-673 [6.22] page 14 of 24... - Page 15 Accessoires et pièces détachées Veuillez contacter votre revendeur Salamander Designs le plus proche ou www.salamandercommercial.com pour toute information. Salamander Designs - Electric Lift Wall Display Stands 55”...
-
Page 16: Wichtige Sicherheitshinweise
Sie sofort die Stromzufuhr. Bringen Sie das Gerät zur Überprüfung und Reparatur in ein Servicezentrum. Elektrische Spezifikationen: Eingang: 90V - 240V ~, 48 Hz - 63HZ Betrieb: 10% Max 2min./18min. Salamander Designs - Electric Lift Wall Display Stands 55” www.salamandercommercial.com 501-673 [6.22] page 16 of 24... - Page 17 Abdeckung von diesem Gerät kann eine Stromschlaggefahr verursachen und zum Verfall der Garantie führen. Zubehör und Ersatzteile Bitte wenden Sie sich an Ihren nächstgelegenen Salamander Designs Händler oder www.salamandercommercial.com Salamander Designs - Electric Lift Wall Display Stands 55” www.salamandercommercial.com 501-673 [6.22]...
- Page 18 Gerät herunter. 2. Entfernen Sie die innere Platte, indem Sie sie vom Ständer abschrauben (bewahren Sie die Schrauben auf). 3. Montieren Sie die Ausgleichsfüße Salamander Designs - Electric Lift Wall Display Stands 55” www.salamandercommercial.com 501-673 [6.22] page 18 of 24...
- Page 19 A. Verwenden Sie einen Pegel, stellen Sie die Füllstandsfüße ein, bis die Einheit waagerecht ist. B. Für Holzstollen verwenden Sie den Schneider. Markieren Sie die Lochposition. Salamander Designs - Electric Lift Wall Display Stands 55” www.salamandercommercial.com 501-673 [6.22] page 19 of 24...
- Page 20 (R) und den Unterlegscheiben (L); nutzen Sie einen 13mm Schraubenschlüssel zum Festziehen. Auf Mauerwerk montieren Sie die Abstandsschilder (T), bevor Sie es in der Position festschrauben. Salamander Designs - Electric Lift Wall Display Stands 55” www.salamandercommercial.com 501-673 [6.22] page 20 of 24...
- Page 21 Verlegen Sie die Kabel zwischen der Rückseite des Displays und dem Loch auf der Vorderseite des Ständers. Verwenden Sie den mitgelieferten Split-Kabelmanager, um die Kabel zu verlegen. Salamander Designs - Electric Lift Wall Display Stands 55” www.salamandercommercial.com 501-673 [6.22] page 21 of 24...
- Page 22 2. Setzen Sie die Platte wieder ein, indem Sie alle 4 Schrauben, die von der Platte vorstehen, durch die Schlüssellochformen am Ständer ausrichten. Hinweis: Die Außenverkleidung kann durch Anziehen der Befestigungselemente auf der Rückseite der Platte befestigt werden. Salamander Designs - Electric Lift Wall Display Stands 55” www.salamandercommercial.com 501-673 [6.22]...
- Page 23 Steckplätze (Punkt 4) im Display-Header. Schließen Sie die Installation durch Einfügen ab und ziehen Sie die beiden Feststellschrauben (Punkt H) durch den Display-Header und an in die Display- Klammern. Salamander Designs - Electric Lift Wall Display Stands 55” www.salamandercommercial.com 501-673 [6.22]...
-
Page 24: Solución De Problemas
Salamander-Produkt haben, lassen Sie es uns wissen. Wir stehen Ihnen bei allen Anliegen kompetent zur Seite. Alle Informationen zu Garantien, inklusive Einschränkungen und Gewährleistungsansprüchen finden Sie unter: www.salamandercommercial.com/warranty COMPLIANT www.salamandercommercial.com SOLUTIONS 1-800-535-5659 Salamander Designs - Electric Lift Wall Display Stands 55” www.salamandercommercial.com 501-673 [6.22] page 24 of 24...
Need help?
Do you have a question about the Webex Board Pro and is the answer not in the manual?
Questions and answers