DISCOVER LYNK II Manual
Hide thumbs
Also See for LYNK II:
- Installation and operation manual (47 pages) ,
- Manual (28 pages) ,
- User manual (28 pages)
Table of Contents
Advertisement
Quick Links
Advertisement
Table of Contents

Related Manuals for DISCOVER LYNK II


Summary of Contents for DISCOVER LYNK II
- Page 1 (950-0025) MORNINGSTAR MANUAL READ AND SAVE THESE INSTRUCTIONS 805-0053 REV A...
-
Page 2: Table Of Contents
Networking Discover Lithium Batteries with LYNK II ......11 Connecting LYNK II to the Morningstar Network ....... 12 6 . -
Page 3: Introduction
INTRODUCTION This Application Note provides information about integrating LYNK and AEbus network-enabled Discover Lithium Batteries using the LYNK II Communication Gateway with Morningstar power conversion devices. 1 . AUDIENCE, WARNINGS, MESSAGES, GENERAL SAFETY, PERSONAL PROTECTIVE EQUIPMENT 1 .1 Audience Configuration, installations, service, and operating tasks should only be performed by qualified personnel in consultation with local authorities having jurisdiction and authorized dealers. -
Page 4: General Warnings
1 .3 General Warnings WARNING ELECTRIC SHOCK AND FIRE HAZARD • This equipment must only be installed as specified. • Do not disassemble or modify the battery. • If the battery case has been damaged, do not touch exposed contents. •... -
Page 5: Personal Protective Equipment
Morningstar Documentation Visit https://www.morningstarcorp.com for the most recent version of published documents. Discover Energy Systems Documentation Visit https://www.discoverlithium.com for the most recent version of published documents, including Discover Lithium battery user manuals and the LYNK II Installation and Operation Manual (805-0033). -
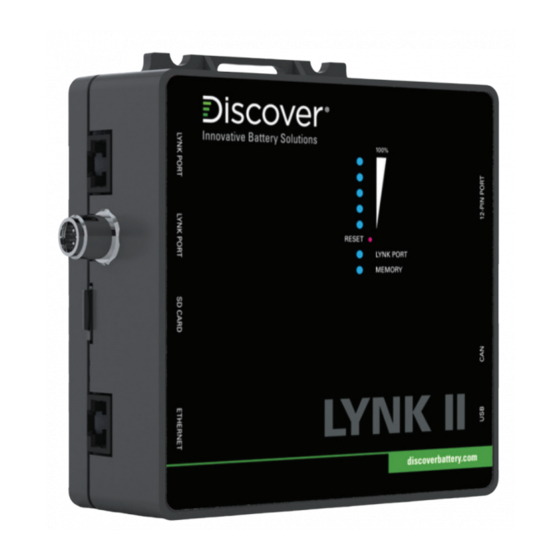
Page 6: Overview
• Review and confirm equipment compatibility and correct sizing. • Configure the LYNK II CAN out pins to match the CAN in pins of the power conversion equipment. • Mount the LYNK II, connect the battery communication network to either the LYNK Port or AEbus Port, and then connect the CAN Out Port to the power conversion equipment’s communication network. -
Page 7: Compatibility
LYNK II Communication Gateway is compatible with the following: Discover Lithium Batteries To communicate with a LYNK II device, a Discover Energy Systems battery must have a compatible network port, such as a LYNK Port or AEbus Port. • AES LiFePO : 44-24-2800, 44-48-3000, 42-48-6650 •... -
Page 8: Minimum Battery System Capacity
Discover 42-48-6650 Battery, Max Continuous Charge Current: 130 Adc, as published in Operating Manual For Solar Applications (805-0015 Rev C). Discover DLP-GC2-48V Battery, Max Charge Current (1 hour): 29 A, as published in AES PROFESSIONAL Installation and Operation Manual (805-0027 Rev I). -
Page 9: Can Hardware Termination And Can Out Pin Configuration
LYNK II Installation and Operation Manual (805-0033) to access and configure the header board with jumpers. Detailed pin configurations are included in the LYNK II manual and are repeated here for convenience. NOTE The LYNK II Communication Gateway terminates the AEbus and LYNK Network by default. -
Page 10: Lynk Ii Can Out - Rj45 Pin Assignments For Morningstar Integration
4 .2 LYNK II CAN Out - RJ45 Pin Assignments for Morningstar Integration CAN signals (CAN H, CAN L, CAN GND) can be assigned to any pin of the RJ45 connector by adjusting the jumpers on the header board. CAN Out... -
Page 11: Installing And Connecting Lynk Ii To The Morningstar Network
• Do not plug an AEbus RJ45 network cable or terminator into the 10/100 Ethernet port of the LYNK II. • Do not connect a CAT5 cable from the AEbus, LYNK, or Ethernet ports of the LYNK II to a WAN or MODEM port of a network router. -
Page 12: Connecting Lynk Ii To The Morningstar Network
NOTE AES LiFePO 48 V batteries sold before Jan 1, 2020, will not supply power to LYNK II using the network cable connection. An external 13-90 VDC power source connected to the Phoenix 12-pin connector on LYNK II is required for the AES LiFePO battery listed below. - Page 13 2. Insert a terminator into one of the RJ45 receptacles of the ReadyBMS module, and in the other RJ45 receptacle, insert one end of a CAT5 communication cable, and insert the opposite end of the CAT5 cable into the LYNK II CAN out port. Figure 7. ReadyBMS RJ45 ports NOTICE •...
-
Page 14: Enabling Lynk Ii To Communicate With Morningstar Devices
2. Connect the 64-bit Windows 10 device running LYNK ACCESS software to the USB port on LYNK II using a USB cable with a Type-B mini-plug. Ensure LYNK II is powered and connected to the correct end of the Morningstar network. -
Page 15: Genstar Mppt Configuration Settings
The following setup prepares the GenStar MPPT for operation or further programming. Initial commissioning, including specifying the battery, is only possible from the meter interface. 1. Connect the batteries to the GenStar MPPT through the LYNK II as per Figure 1. LYNK II with GenStar MPPT using a ReadyBMS Module. -
Page 16: Setting Up From The Liveview Web Interface
4. Main Menu > Installer Setup > Charger > Battery Info > Battery Bank Size > Edit (Hold) Confirm the size is correctly set as the Rated Capacity (Ah) of the battery times the number of batteries. Change the battery bank size if required. 5. - Page 17 3. INSTALLER SETUP > Charger > Battery Info > Battery Size Confirm the size is correctly set as the Rated Capacity (Ah) of the battery times the number of batteries. Change the battery size if required. Figure 9. Battery Info 4.
- Page 18 Load HVD — — — — Load HVR — — — — Low SoC Disconnect — — — — Low SoC Reconnect — — — — 24 V 44-24-2800 DLP-GC2-24V Low Voltage Disconnect 24 V (25 V) Low Voltage Reconnect 26.4 V (26.3 V) Load | Compensation LVD/LSoCD Warning Time...
-
Page 19: Verifying The Connection
LEDs should display green or yellow, and the lower LED on the ReadyBMS module should blink green. 5. If any displays indicate an issue, confirm all the connections (cables and connectors), confirm LYNK II is configured correctly, and confirm the settings on the GenStar MPPT. -
Page 20: Open-Loop Configuration
7 .5 Open-Loop Configuration There may be instances when closed-loop communication is not possible, such as when either the ReadyBMS module or LYNK II Communication Gateway has failed. Whenever possible, use a closed-loop configuration. When the only option is to use open loop, follow the steps below to reset the MPPT controller and commission it to use open-loop charge settings. - Page 21 Figure 13. Battery Charge Settings 48 V 44-48-3000 42-48-6650 DLP-GC2-48V 48-48-5120 Absorption Voltage 54.4 V 54.4 V 55.2 V 55.2 V Absorption Time 3 hours Float Voltage 53.6 V Equalization Voltage Disable Equalization Time — — — — Equalization Interval —...
- Page 22 15. INSTALLER SETUP > Charger > Battery Charge Settings > Installer Setup Set the Temperature Compensation Coefficient to Disabled. 16. Reboot the MPPT and start using it with the batteries. NOTE Rebooting the MPPT is required to update the MPPT with the edited settings.
Need help?
Do you have a question about the LYNK II and is the answer not in the manual?
Questions and answers