JVC XV-THS3 Instructions Manual
Dvd digital cinema system
Hide thumbs
Also See for XV-THS3:
- Instructions manual (172 pages) ,
- Instructions manual (44 pages) ,
- Instructions manual (45 pages)
Table of Contents
Advertisement
Quick Links
Advertisement
Table of Contents

Related Manuals for JVC XV-THS3


Summary of Contents for JVC XV-THS3
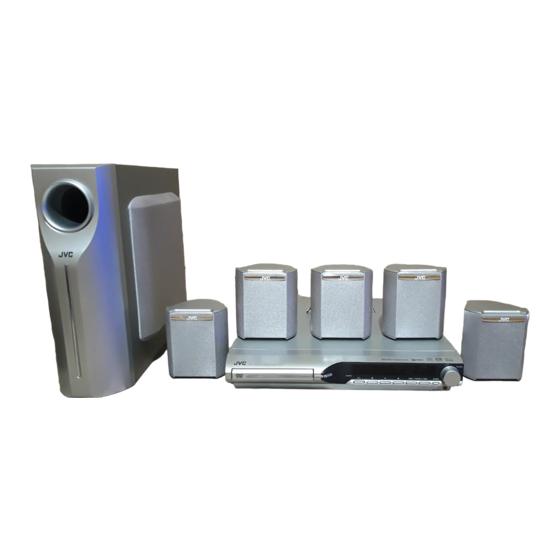
- Page 1 DVD DIGITAL CINEMA SYSTEM SYSTEMA DVD DIGITAL CINEMA SISTEMA DE CINEMA DE DVD DIGITAL TH-S3 Consists of XV-THS3, SP-WS3, and SP-THS3F Consta de XV-THS3, SP-WS3 y SP-THS3F Consta do XV-THS3, SP-WS3 e SP-THS3F INSTRUCTIONS MANUAL DE INSTRUCCIONES INSTRUÇÕES GVT0133-013A [UW]...
- Page 2 CAUTION— button! (XV-THS3) • No ponga sobre el aparato ninguna llama al descubierto, Disconnect the mains plug to shut the power off completely como velas encendidas.
- Page 3 Para prevenir o risco de choque elétrico ou incêndio e para proteger o aparelho contra danos. Localize-o da seguinte maneira: Wall or obstructions Front Pared u obstrucciones Wall or 8 cm XV-THS3 Frente Parede ou obstáculo obstructions 3 cm 3 cm...
-
Page 4: Table Of Contents
Table of contents Introduction ........2 Playback ........16 Notes on handling ..............2 Basic playback ..............16 Supplied accessories ............2 One Touch Replay ...............18 Fast-forward/fast-reverse search ........18 About discs ........3 Skip to the beginning of a desired selection .......18 Playable disc types ...............3 Locating a desired title/group using number buttons ..19 Playing back a bonus group ..........19 Index of parts and controls .... -
Page 5: Introduction
Introduction 7 Safety precautions Notes on handling Avoid moisture, water and dust Do not place the system in moist or dusty places. 7 Important cautions Avoid high temperatures Installation of the system Do not expose the system to direct sunlight and do not place it near •... -
Page 6: About Discs
About discs Region code of DVD VIDEO Playable disc types DVD VIDEO players and DVD VIDEO discs have their own Region Code numbers. This system can play back DVD VIDEO discs whose Region Code numbers include the system’s Region This system has been designed to play back the following discs: Code, which is indicated on the rear panel. - Page 7 About discs Notes on CD-R and CD-RW Notes on MP3/WMA files • User-edited CD-Rs (Recordable) and CD-RWs (Rewritable) can • Tag information (album name, artist name, and track name) can be played back only if they are already “finalized”. be shown on the TV. (See page 24.) •...
-
Page 8: Index Of Parts And Controls
Index of parts and controls The numbers in the figures indicate the pages where the details of the parts are described. Front panel (center unit) Display window 35 35 Disc tray (inside): Remote sensor: Rear panel (center unit) See below. Setting the VOLTAGE SELECTOR Before plugging, set the correct voltage for your area with the Use a screwdriver to rotate the voltage selector so that the voltage... - Page 9 Index of parts and controls Remote control Putting batteries in the remote control R6P (SUM-3)/AA (15F) type dry-cell batteries (supplied) 11 – 36 18, 35 16, 36 If the range or effectiveness of the remote control decreases, replace both batteries. 15, 31 CAUTION •...
-
Page 10: Connections
Connections Do not connect the power cord until all other connections have been made. If reception is poor Connecting the FM and Center unit AM antennas AM loop antenna 7 AM loop antenna Setting up supplied AM loop antenna Outdoor single vinyl-covered wire antenna (not supplied) If the antenna cord is covered with the insulation 7 FM antenna... -
Page 11: Connecting The Satellite (Front, Center, Surround) Speakers And The Subwoofer
Do not connect the power cord until all other connections have been made. Connections Connecting the satellite (front, center, surround) speakers and the subwoofer Center speaker Front speakers Speaker cord • Connect the black cords to the black (-) terminals. •... -
Page 12: Speaker Layout
Do not connect the power cord until all other connections have been made. Connections Speaker layout Connecting a TV • Distortion of picture may occur when connecting the TV via a Center speaker VCR, or to a TV with a built-in VCR. Front left Front right •... -
Page 13: Connecting To An Analog Component
Do not connect the power cord until all other connections have been made. Connections Connecting to an analog Connecting to a digital component component You can enjoy the sound of an analog component. You can enjoy the sound of a digital component. Center unit Center unit tuner... -
Page 14: Operating External Components With The Remote Control
• Set the codes again after replacing the batteries of the remote control. Operating the TV 7 To set the manufacturer’s code You can operate a JVC TV without setting the manufacturer’s code. Slide the remote control mode selector to TV. -
Page 15: Operating The Vcr
See page 11 for button locations. Operating external components with the remote control 7 Operation Operating the VCR Aim the remote control at the VCR. IMPORTANT 7 To set the manufacturer’s code Before using the remote control to operate a VCR; Set the remote control mode selector to VCR. -
Page 16: Basic Operations
Basic operations The buttons on the remote control are used to explain most of the Turning the system on/off operations in this manual. You can use the buttons on the center unit same as on the remote control for operations unless On the remote control: otherwise noted. -
Page 17: Selecting The Source To Play
See page 13 for button locations. Basic operations Selecting the source to Listening with headphones play (not supplied) On the remote control: CAUTION Press one of the source selecting buttons Be sure to turn down the volume; • Before connecting or putting on headphones as high volume may (DVD, FM/AM, AUX or AUX DIGITAL). -
Page 18: Sleep Timer [Sleep]
“PAL” or “NTSC.” mode. In such a case, change the scan mode to Press SURR.-R +/– to adjust the surround To check the compatibility of your TV, contact your local JVC customer service center. right speaker. • All JVC progressive TVs and High-Definition TVs are fully compatible with this system. -
Page 19: Playback
Playback • The mark shows the types of discs the operation is available Basic playback for. Press OPEN/ IMPORTANT CLOSE. Before using the remote control for the following operation; • The system turns on and the AUDIO 1 Set the remote control mode selector to disc tray comes out. - Page 20 Playback See page 16 for button locations. 7 Playback information on the display window MP3/WMA disc Example: DVD VIDEO When an MP3 disc is played back Example: Signal and speaker When a DVD VIDEO encoded with Dolby Digital 5.1ch is played indicators Track number Elapsed playing time...
Need help?
Do you have a question about the XV-THS3 and is the answer not in the manual?
Questions and answers