Envirovent HEATSAVA Installation Manual
Hide thumbs
Also See for HEATSAVA:
- Installation manual (32 pages) ,
- User manual (4 pages) ,
- Installation manual (24 pages)
Advertisement
Quick Links
AFTER INSTALLATION THE END USER SHOULD
KEEP THIS GUIDE FOR FUTURE REFERENCE
DO NOT THROW AWAY
20
19
18
17
HEATSAVA
INSTALLATION GUIDE
20
19
18
17
16
15
14
13
16
15
14
13
12
11
10
9
12
11
10
9
8
7
6
5
8
7
6
5
4
3
UNLESS OTHERWISE SPECIFIED:
FINISH:
DEBURR AND
DO
DIMENSIONS ARE IN MILLIMETERS
BREAK SHARP
SURFACE FINISH:
~
EDGES
TOLERANCES:
LINEAR:
ANGULAR:
NAME
SIGNATURE
DATE
TITLE:
RV
DRAWN
PAH
CHK'D
APPV'D
MFG
Q.A
MATERIAL:
Front
DWG NO.
~
WEIGHT:
SCALE:1:5
4
3
Advertisement

Related Manuals for Envirovent HEATSAVA


Summary of Contents for Envirovent HEATSAVA
- Page 1 AFTER INSTALLATION THE END USER SHOULD KEEP THIS GUIDE FOR FUTURE REFERENCE DO NOT THROW AWAY HEATSAVA INSTALLATION GUIDE UNLESS OTHERWISE SPECIFIED: FINISH: DEBURR AND DIMENSIONS ARE IN MILLIMETERS BREAK SHARP SURFACE FINISH: EDGES TOLERANCES: LINEAR: ANGULAR: NAME SIGNATURE DATE...
- Page 2 Introduction Designed for through the wall installation, the heatSava is ideal for both refurbishment and new build properties. The outside diameter of the heat exchange casing is smaller than a standard wall sleeve and can therefore utilize an existing one already in place.
- Page 3 Do not remove or tamper with any electronic components inside the unit. Wiring Regulations All wiring must comply with Building Regulations and the current IET Wiring Regulations (BS7671 in the UK) or equivalent standards for other countries. The final installation should be examined and tested by a qualified electrician.
- Page 4 Children should be supervised to ensure they do not play with the unit. Cleaning and user maintenance must not be performed by children. SHOULD YOU ENCOUNTER ANY PROBLEMS 01423 810 810 INSTALLING THIS UNIT, CALL US ON: heatSava...
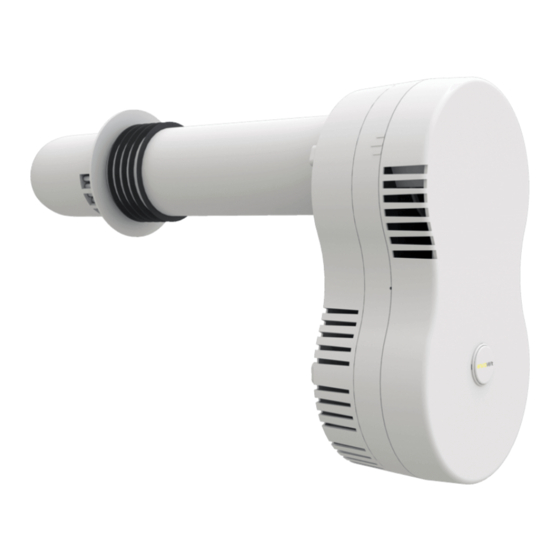
- Page 5 Technical Specifications Unit Dimensions Rear Assembly (Extract Fan) Cowl End Centre Assembly (Electronics) Heat Cell Front Cover Fan Adaptor Assembly (Supply Fan) DO NOT AFTER INSTALLATION THE END USER SHOULD KEEP THIS GUIDE FOR FUTURE REFERENCE THROW AWAY...
- Page 6 Technical Specifications Heat Cells Options Wall Depth Cell Order mm (A) Size mm (B) 100 - 330 331 - 430 431 - 500 501 - 600 SHOULD YOU ENCOUNTER ANY PROBLEMS 01423 810 810 INSTALLING THIS UNIT, CALL US ON: heatSava...
- Page 7 Wiring Diagrams - Mains NOTE: This unit is supplied as a mains version (option 1). See next page for SELV (option 2). NOTE: Discard Connect SELV box if 2 core installing cable into mains version existing (option 1) wiring Fan Board Fan Board Power Supply DO NOT...
- Page 8 SELV Box must be secured using the 4 fixing points Use tags to restrain cable Make electrical Power Supply connections as shown Secure the lid with screw. SHOULD YOU ENCOUNTER ANY PROBLEMS 01423 810 810 INSTALLING THIS UNIT, CALL US ON: heatSava...
- Page 9 Controls Pullcord (Manual) The heatSava comes complete with a pull cord to activate the boost if required. Pull once to activate the boost and once to deactivate. Summer Mode (Automatic) During warmer days, the heatSava prevents warm air from entering the room and switches to provide extract ventilation only.
- Page 10 The heatSava should not be installed in the corner of a room to prevent the short circuiting of airflows. The supply airflow is provided to the right side of the unit, and should this be blocked then the heatSava will not run as intended.
- Page 11 (option 1). If installing into an existing wall sleeve which is located near to the ceiling, the heatSava can be installed horizontally or vertically (options 2-4). Ceiling...
- Page 12 When fitting the heat cell into a wall, ensure that the cowl end is correctly orientated with the end always facing down. (Fig 4.) Cowl Cell Fig.4 Fig.3 Solvent Cement (not supplied) SHOULD YOU ENCOUNTER ANY PROBLEMS 01423 810 810 INSTALLING THIS UNIT, CALL US ON: heatSava...
- Page 13 Installation Select core drill size 107mm Wall Sleeve 117mm Wall Seal 158mm Wall Sleeve 162mm Wall Seal Template Drill X3 holes ‘ A ’ or ‘B’. Use either holes ‘ A ’ or ‘B’ 107, 117, 158, 162mm DO NOT AFTER INSTALLATION THE END USER SHOULD KEEP THIS GUIDE FOR FUTURE REFERENCE THROW AWAY...
- Page 14 100mm or 150mm Ø internal (min) 107mm or 158mm Ø Use existing sleeve or insert new sleeve into wall. Wall sleeve Cement Apply cement around sleeve and insert through wall. SHOULD YOU ENCOUNTER ANY PROBLEMS 01423 810 810 INSTALLING THIS UNIT, CALL US ON: heatSava...
- Page 15 Installation Rubber Wall Seal Mark the wall thickness onto the heat cell. Using solvent cement secure the wall seal in line with the mark. Wiping away any excess solvent. Push the unit through the hole ensuring the seal is compressed in the hole & the unit is flush against the wall. wall thickness = X DO NOT AFTER INSTALLATION THE END USER SHOULD...
- Page 16 Installation Pullcord - See page 11 for pullcord options. Option 3 & 4 Option 1 & 2 SHOULD YOU ENCOUNTER ANY PROBLEMS 01423 810 810 INSTALLING THIS UNIT, CALL US ON: heatSava...
- Page 17 Installation X3, A or B Make electrical connection - See pages 7 and 8 DO NOT AFTER INSTALLATION THE END USER SHOULD KEEP THIS GUIDE FOR FUTURE REFERENCE THROW AWAY...
- Page 18 Installation Completed RF Controller (Optional) Trickle LED Boost LED Button LED 1 Button LED 2 Remote control button Summer Bypass LED Humidity LED Frost LED SHOULD YOU ENCOUNTER ANY PROBLEMS 01423 810 810 INSTALLING THIS UNIT, CALL US ON: heatSava...
- Page 19 To pair an additional RF controller 1. Turn the unit off at the isolation point. 2. Restore power; for 20 seconds from restart the unit will be in pairing mode. 3. Press the remote button once within the 20 seconds and the control will pair to the unit.
- Page 20 5 Year Service The heat exchange cell and all components and parts should be inspected every 5 years. SHOULD YOU ENCOUNTER ANY PROBLEMS 01423 810 810 INSTALLING THIS UNIT, CALL US ON: heatSava...
- Page 21 Cleaning & Maintenance Disconnect 2 clips and remove fan adaptor by using 4 screws DO NOT AFTER INSTALLATION THE END USER SHOULD KEEP THIS GUIDE FOR FUTURE REFERENCE THROW AWAY...
- Page 22 Cleaning & Maintenance SHOULD YOU ENCOUNTER ANY PROBLEMS 01423 810 810 INSTALLING THIS UNIT, CALL US ON: heatSava...
- Page 23 Cleaning & Maintenance Damp cloth Soft brush Vacuum DO NOT AFTER INSTALLATION THE END USER SHOULD KEEP THIS GUIDE FOR FUTURE REFERENCE THROW AWAY...
- Page 24 Guarantee The EnviroVent heatSava is covered by a full 5 year warranty which will benefit the occupier over many years. What should I do if I have a problem? If, after thoroughly reading this booklet, you feel that your heatSava is...
- Page 25 Warranty We appreciate you choosing this quality EnviroVent product, which is designed and manufactured to the highest specification in Harrogate, North Yorkshire. We are confident that you will be delighted with the performance of the system and the resulting improvement in air quality in your home after the installation of the unit.
- Page 26 SHOULD YOU ENCOUNTER ANY PROBLEMS 01423 810 810 INSTALLING THIS UNIT, CALL US ON: heatSava...
- Page 27 DO NOT AFTER INSTALLATION THE END USER SHOULD KEEP THIS GUIDE FOR FUTURE REFERENCE THROW AWAY...
- Page 28 Your feedback is important to us as we strive to improve our and improvement EnviroVent reserves the products, services, and overall customer experience. Please email right to alter products specification and us to help us serve you better: feedback@envirovent.com appearance without notice.
Need help?
Do you have a question about the HEATSAVA and is the answer not in the manual?
Questions and answers