Table of Contents
Advertisement
Quick Links
Advertisement
Table of Contents

Related Manuals for Epson V11H389020


Summary of Contents for Epson V11H389020
- Page 1 ® PowerLite 92/93/95/96W/905/915W/1835 User's Guide...
-
Page 3: Table Of Contents
Contents Introduction to Your Projector ........................9 Projector Features..........................9 Product Box Contents........................10 Additional Components ........................ 12 Optional Equipment and Replacement Parts................. 12 Registration and Warranty Information ..................13 Notations Used in the Documentation ....................14 Where to Go for Additional Information ....................14 Projector Parts Locations ........................ - Page 4 Connecting to a Video Source for Sound .................. 33 Connecting to an External Computer Monitor................34 Connecting to External Speakers ....................34 Connecting a Microphone......................35 Connecting to External USB Devices .................... 36 USB Device Projection......................36 Connecting a USB Device or Camera to the Projector.............. 36 Selecting the Connected USB Source ..................
- Page 5 Using Basic Projector Features ....................... 65 Turning On the Projector ........................65 Turning Off the Projector ........................67 Selecting the Language for the Projector Menus................69 Adjusting the Image Height ........................ 71 Image Shape............................72 Correcting Image Shape With Quick Corner.................. 72 Correcting Image Shape With the Keystone Buttons..............
- Page 6 Zooming Into and Out of Images ......................94 Projector Security Features........................ 95 Password Security Types ......................96 Setting a Password ........................96 Selecting Password Security Types..................98 Entering a Password to Use the Projector ................99 Saving a User's Logo Image to Display................... 100 Locking the Projector's Buttons ....................
- Page 7 Solving Problems ............................ 142 Projection Problem Tips ........................142 Projector Light Status ........................142 Using the Projector Help Displays ....................145 Solving Image or Sound Problems ....................145 Solutions When No Image Appears..................... 146 Solutions When Image is Incorrect Using the USB Display Function .......... 147 Solutions When "No Signal"...
- Page 8 Notices ..............................168 Important Safety Information ......................168 Important Safety Instructions......................168 FCC Compliance Statement......................171 Trademarks ............................172 Software Copyright........................... 172 Copyright Notice..........................199 Copyright Attribution ........................200...
-
Page 9: Introduction To Your Projector
• Optional wireless network support, including video and audio transfer (PowerLite 95/96W/905/915W/1835) • PC Free presentations via connected USB memory devices or Epson document camera • Dual VGA ports for connections by multiple presenters • Port for connecting an external monitor or second projector... -
Page 10: Product Box Contents
• Tall projector foot for increased positioning flexibility • Powerful 16 W speaker system with audio out port for connecting external speakers • Epson Instant Off and Direct Power On features for quick setup and shut down • Support for Crestron RoomView network monitoring systems (PowerLite 93/95/96W/905/915W/1835) •... - Page 11 Projector Remote control Remote control batteries (two AA alkaline) Power cord VGA computer cable Password Protected sticker Projector documentation CD-ROM Projector software CD-ROM Parent topic: Projector Features...
-
Page 12: Additional Components
Parent topic: Projector Features Optional Equipment and Replacement Parts You can purchase screens, other optional accessories, and replacement parts from an Epson authorized reseller. To find the nearest reseller, call 800-GO-EPSON (800-463-7766). Or you can purchase online www.epsonstore.com (U.S. sales) or www.epson.ca... -
Page 13: Registration And Warranty Information
In addition, Epson offers free Extra Care Road Service. In the unlikely event of an equipment failure, you won’t have to wait for your unit to be repaired. Instead, Epson will ship you a replacement unit anywhere in the United States or Canada. See the Extra Care Road Service brochure for details. -
Page 14: Notations Used In The Documentation
95/96W/905/915W/1835), see the EasyMP Network Projection Operation Guide installed with this manual from your projector CD. • If you still need help after checking this manual and the sources listed above, you can use the Epson PrivateLine Support service to get help fast. For details, see "Where to Get Help". -
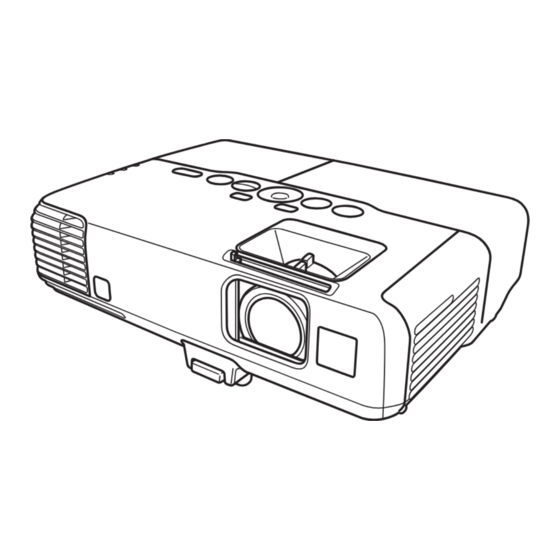
Page 15: Projector Parts - Front/Top
Projector Parts - Base Projector Parts - Control Panel Projector Parts - Remote Control Parent topic: Introduction to Your Projector Projector Parts - Front/Top Exhaust vent Remote receiver A/V Mute slide lever Foot release lever Front adjustable foot A/V Mute slide (lens cover) Focus ring Air intake vent (air filter) Air filter cover latch... -
Page 16: Projector Parts - Rear
Wireless LAN module indicator light (PowerLite 95/96W/905/915W/1835) Zoom ring Control panel Lamp cover Projector status lights Parent topic: Projector Parts Locations Projector Parts - Rear HDMI port A/C input port S-Video port Video port L-Audio-R audio ports Audio1 port Monitor Out port Audio Out port Audio2 port RS-232C port... -
Page 17: Projector Parts - Base
Security lock port Speaker Remote receiver Network (LAN) port (PowerLite 93/95/96W/905/915W/1835) USB TypeA port USB TypeB port Computer2 port Computer1 port Parent topic: Projector Parts Locations Projector Parts - Base... -
Page 18: Projector Parts - Control Panel
Mounting bracket holes Rear feet Front adjustable foot Security lock slot Parent topic: Projector Parts Locations Projector Parts - Control Panel Power button Source Search button (searches for connected video sources) Enter button (selects options) Vertical keystone adjustment buttons (adjust screen shape) and arrow buttons Volume adjustment buttons (adjust speaker volume) Help button (accesses projector help information) Esc button (cancels/exits functions) -
Page 19: Projector Parts - Remote Control
Parent topic: Projector Parts Locations Related references Projector Light Status Projector Parts - Remote Control... - Page 20 Power button Computer button (cycles through connected computer sources) Video button (cycles through connected video sources) Numeric buttons (enter numbers) A/V Mute button (turns off picture and sound) Freeze button (stops video action) Auto button (automatically adjusts position, tracking, and sync settings) Aspect button (selects the image aspect ratio) Page Up/Down buttons (control presentation slides) E-Zoom +/-buttons (zoom into and out of the image)
-
Page 21: Setting Up The Projector
Setting Up the Projector Follow the instructions in these sections to set up your projector for use. Projector Placement Projector Connections Installing Batteries in the Remote Control Opening the Lens Cover Projector Placement You can place the projector on almost any flat surface to project your presentation. You can also install the projector in a ceiling mount if you want to use it in a fixed location. - Page 22 Rear Ceiling...
-
Page 23: Projection Distance
Rear Ceiling Wherever you set up the projector, make sure to position it squarely in front of the center of the screen, not at an angle, if possible. If you project from the ceiling or from the rear, be sure to select the correct Projection option in the projector's menu system. - Page 24 PowerLite 92/93/95 4:3 Aspect Ratio Image or Screen Screen or Projection distance image size Wide to Tele 50 inches 59 to 71 inches (150 to 180 cm) 80 inches 95 to 114 inches (241 to 290 cm) 100 inches 119 to 143 inches (302 to 363 cm) 150 inches 179 to 215 inches (454 to 546 cm) PowerLite 96W...
-
Page 25: Projector Connections
• If your presentation or video includes sound, you can connect audio input cables, if necessary. • For presentations or slide shows without a computer, you can connect USB devices (such as a flash drive or camera) or an optional Epson document camera. -
Page 26: Connecting To Computer Sources
Caution: If you will use the projector at altitudes above 4921 feet (1500 m), turn on High Altitude Mode to ensure the projector's internal temperature is regulated properly. Connecting to Computer Sources Connecting to Video Sources Connecting to an External Computer Monitor Connecting to External Speakers Connecting a Microphone Connecting to External USB Devices... - Page 27 • Macintosh: The USB Display setup folder appears on your screen. Select USB Display Installer and follow the on-screen instructions to install the Epson USB Display software. You need to install this software only the first time you connect the projector to the computer.
-
Page 28: Connecting To A Computer For Vga Video
Related references Projector Setup Settings - Extended Menu Connecting to a Computer for VGA Video You can connect the projector to your computer using a VGA computer cable. Note: To connect a Macintosh that includes only a Mini DisplayPort or Mini-DVI port for video output, you need to obtain an adapter that allows you to connect to the projector's VGA video port. -
Page 29: Connecting To A Computer For Usb Mouse Control
3. Connect the other end to the projector's HDMI port. HDMI port Parent topic: Connecting to Computer Sources Connecting to a Computer for USB Mouse Control If you connected your computer to a Computer or HDMI port on the projector, you can set up the remote control to act as a wireless mouse. -
Page 30: Connecting To A Computer For Sound
4. If necessary, configure your computer to work with an external USB mouse. See your computer documentation for details. Parent topic: Connecting to Computer Sources Related references Projector Setup Settings - Extended Menu Projector Parts - Remote Control Connecting to a Computer for Sound If your computer presentation includes sound and you did not connect it using the projector's USB TypeB or HDMI port, you can still play sound through the projector's speaker system. -
Page 31: Connecting To An Hdmi Video Source
Connecting to an HDMI Video Source If your video source has an HDMI port, you can connect it to the projector using an optional HDMI cable. 1. Make sure the projector and your video source are turned off. 2. Connect the HDMI cable to your video source's HDMI output port. 3. -
Page 32: Connecting To A Composite Video Source
Computer1 or Computer2 port If your image colors appear incorrect, you may need to change the Input Signal setting in the projector's Signal menu. Parent topic: Connecting to Video Sources Related references Input Signal Settings - Signal Menu Connecting to a Composite Video Source If your video source has a composite video port, you can connect it to the projector using an optional RCA-style video or A/V cable. -
Page 33: Connecting To A Video Source For Sound
3. Connect the other end to the projector's S-Video port. S-Video port Parent topic: Connecting to Video Sources Connecting to a Video Source for Sound You can play sound through the projector's speaker system if your video source has audio output ports. If you are projecting video using a Computer port, connect the projector to the video source using an optional stereo mini-jack audio cable. -
Page 34: Connecting To An External Computer Monitor
Audio1 or Audio2 port L-Audio-R ports Parent topic: Connecting to Video Sources Connecting to an External Computer Monitor If you connected the projector to a computer using a Computer port, you can also connect an external monitor to the projector. This lets you see your presentation on the external monitor even when the projected image is not visible. -
Page 35: Connecting A Microphone
2. Locate the appropriate cable to connect your external speakers, such as a stereo mini-jack-to-pin- jack cable, or another type of cable or adapter. 3. Connect one end of the cable to your external speakers as necessary. 4. Connect the stereo mini-jack end of the cable to your projector's Audio Out port. Audio Out port Parent topic: Projector Connections... -
Page 36: Connecting To External Usb Devices
Related references Projector Setup Settings - Extended Menu Connecting to External USB Devices Follow the instructions in these sections to connect external USB devices to the projector. USB Device Projection Connecting a USB Device or Camera to the Projector Selecting the Connected USB Source Disconnecting a USB Device or Camera From the Projector Parent topic: Projector Connections... -
Page 37: Selecting The Connected Usb Source
2. Connect the USB cable (or USB flash drive or USB memory card reader) into the projector's USB TypeA port shown below. USB TypeA port Note: Do not connect a USB hub or a USB cable longer than 10 feet (3 m), or the device may not operate correctly. -
Page 38: Connecting To A Document Camera
Connecting to External USB Devices Connecting to a Document Camera You can connect a compatible Epson document camera to your projector's USB Type A port to project images viewed by the camera. Note: You may be able to connect different Epson document camera models to your projector's Computer ports. - Page 39 1. Open the battery cover as shown. 2. Insert the batteries with the + and – ends facing as shown.
-
Page 40: Opening The Lens Cover
3. Close the battery cover and press it down until it clicks into place. Parent topic: Setting Up the Projector Opening the Lens Cover 1. To open the projector's lens cover, slide the A/V Mute slide lever. - Page 41 2. To cover the lens or temporarily turn off the projected picture and sound, slide the A/V Mute slide cover closed. Parent topic: Setting Up the Projector...
-
Page 42: Using The Projector On A Network
95/96W/905/915W/1835). See the EasyMP Network Projection Operation Guide installed from your projector CD for instructions. • EasyMP Monitor software (Windows only) lets you monitor and control your projector through the network. You can download the latest software and documentation from the Epson web site. Go to www.epson.com/support (U.S.) or www.epson.ca/support... -
Page 43: Selecting Wired Network Settings
1. Connect one end of the network cable to your network router. 2. Connect the other end of the cable to the projector's LAN port. LAN port Parent topic: Wired Network Projection Selecting Wired Network Settings Before you can project from multiple computers on your network, you must select the network settings for the projector using its menu system. - Page 44 PowerLite 95/96W/905/915W/1835 6. Select the following basic options as necessary: • Projector Name lets you enter a name up to 16 alphanumeric characters long to identify the projector over the network.
-
Page 45: Wireless Network Projection
Wireless Network Projection You can send images to your projector through a wireless network (PowerLite 95/96W/905/915W/1835). To do this, you must install the optional Epson 802.11g/b/n wireless LAN module, and then set up your projector and computer for wireless projection. -
Page 46: Installing The Wireless Lan Module
After installing the module and setting up the projector, install the network software from the Epson Projector Software for Meeting & Presentation CD on your computer. Use the following software and documentation to set up, control, and monitor wireless projection: •... - Page 47 2. Slide the air filter cover latch and open the air filter cover. 3. Remove the screw securing the wireless LAN module stopper, then remove the stopper.
- Page 48 4. Insert the wireless LAN module into the port. 5. Replace the wireless LAN module stopper and secure it using the screw you removed. 6. Close the air filter cover. 7. Plug in and turn on the projector.
-
Page 49: Using Quick Wireless Connection (Windows Only)
Optional Equipment and Replacement Parts Using Quick Wireless Connection (Windows Only) You can use the optional Epson Quick Wireless Connection USB key to quickly connect the projector to a Windows computer wirelessly (PowerLite 95/96W/905/915W/1835). Then you can project your presentation and remove the key when you are done. - Page 50 3. Select the Network menu and press Enter. 4. Select Network Configuration and press Enter. 5. Select the Basic menu and press Enter. 6. Select the following basic options as necessary: • Projector Name lets you enter a name up to 16 alphanumeric characters long to identify the projector over the network.
- Page 51 • PJLink Password lets you enter a password up to 32 alphanumeric characters long for using the PJLink protocol for projector control. • Web Control Password lets you enter a password up to 8 alphanumeric characters long for accessing the projector over the web. •...
-
Page 52: Wireless Lan Menu Settings
Selects the type of wireless connection: Advanced Quick: lets you quickly connect to one computer or use the optional Epson Quick Wireless Connection USB key to connect Advanced: lets you connect to multiple computers via a wireless network access point... -
Page 53: Selecting Wireless Network Settings In Windows
Setting Options Description IP Settings DHCP (On or Off) Selects DHCP if your network assigns addresses automatically, IP Address or turns off DHCP so you can Subnet Mask enter the network's IP address, subnet mask, and gateway Gateway Address address as needed SSID Display Selects whether to display the SSID on the network standby... -
Page 54: Setting Up Wireless Network Security
Parent topic: Wireless Network Projection Setting Up Wireless Network Security You can set up security for your projector to use on the wireless network (PowerLite 95/96W/905/915W/1835). Set up one of the following security options to match the settings used on your network: •... -
Page 55: Wireless Security Menu Settings
Parent topic: Wireless Network Projection Wireless Security Menu Settings Settings on the Security menu let you select the type of security and security settings that match the network you are connecting the projector to. Setting Options Description Security WEP and WPA types available Selects the type of security used on the wireless network WEP Encryption... -
Page 56: Setting Up Projector Network E-Mail Alerts
Parent topic: Setting Up Wireless Network Security Setting Up Projector Network E-Mail Alerts You can set up the projector to send you an e-mail alert over the network if there is a problem with the projector. 1. Press the Menu button on the remote control. 2. - Page 57 5. Turn on Mail Notification. 6. Enter the IP address for the SMTP Server option. Note: Do not use these addresses: 127.x.x.x or 224.0.0.0 through 255.255.255.255 (where x is a number from 0 to 255). 7. Select a number for the SMTP server Port Number, from 1 to 65535 (default is 25). 8.
-
Page 58: Network Projector E-Mail Alert Messages
When a problem occurs with a networked projector, and you selected to receive e-mail alerts, you receive an e-mail containing the following information: • EPSON Projector on the subject line • The name of the projector experiencing a problem • The IP address of the affected projector •... - Page 59 PowerLite 95/96W/905/915W/1835 5. Enter up to two IP addresses to receive SNMP notifications, using 0 to 255 for each address field. Note: Do not use these addresses: 127.x.x.x or 224.0.0.0 through 255.255.255.255 (where x is a number from 0 to 255).
-
Page 60: Controlling A Networked Projector Using A Web Browser
6. If your network environment uses an AMX controller, turn on the AMX Device Discovery setting to allow the projector to be detected. 7. If your network environment uses a Crestron RoomView controller, turn on the RoomView setting to allow the projector to be detected. 8. -
Page 61: Crestron Roomview Support
Power button control Selects Computer port source Selects Video and HDMI port sources Freeze button control A/V Mute button control Page Up and Page Down button controls Searches for sources Selects the network source Selects the USB Display or USB device source Volume button controls 6. -
Page 62: Setting Up Crestron Roomview Support
Note: You cannot use the Epson Web Control feature or the Message Broadcasting plug-in for EasyMP Monitor when you use Crestron RoomView. For additional information on Crestron RoomView, contact Crestron. Setting Up Crestron RoomView Support Controlling a Networked Projector Using Crestron RoomView... -
Page 63: Controlling A Networked Projector Using Crestron Roomview
5. Set the RoomView setting to On to allow the projector to be detected. 6. When you finish selecting settings, select Complete and follow the on-screen instructions to save your settings and exit the menus. 7. Turn off the projector, then turn it on again to enable the RoomView setting. Parent topic: Crestron RoomView Support Controlling a Networked Projector Using Crestron RoomView... - Page 64 3. Select the input source that you want to control in the Sources List box. You can scroll through available sources using the up and down arrows in the box. 4. To control projection remotely, click the on-screen buttons that correspond to the projector's remote control buttons.
-
Page 65: Using Basic Projector Features
Using Basic Projector Features Follow the instructions in these sections to use your projector's basic features. Turning On the Projector Turning Off the Projector Selecting the Language for the Projector Menus Adjusting the Image Height Image Shape Resizing the Image With the Zoom Ring Focusing the Image Using the Focus Ring Remote Control Operation Selecting an Image Source... - Page 66 1. Open the projector's lens cover. 2. Connect the power cord to the projector's power inlet.
-
Page 67: Turning Off The Projector
3. Plug the power cord into an electrical outlet. The projector's power light turns orange. This indicates that the projector is receiving power, but is not yet turned on. Note: With Direct Power On turned on, the projector turns on as soon as you plug it in. 4. - Page 68 2. Press the power button again. (To leave it on, press any other button.) The projector beeps twice, the lamp turns off, and the power light turns orange. Note: With Epson's Instant Off technology, there is no cool-down period so you can pack up the projector for transport right away.
-
Page 69: Selecting The Language For The Projector Menus
Caution: To avoid damaging the projector or lamp, never unplug the power cord when the power light is green or flashing orange. 4. Close the projector's lens cover. Parent topic: Using Basic Projector Features Selecting the Language for the Projector Menus If you want to view the projector's menus and messages in another language, you can change the Language setting. - Page 70 PowerLite 95/96W/905/915W/1835 Note: The Network menu does not appear on non-network projector models. 4. Press the down arrow button to select the Language setting and press Enter. 5. Select the language you want to use and press Enter. 6. Press Menu or Esc to exit the menus. Parent topic: Using Basic Projector Features...
-
Page 71: Adjusting The Image Height
Adjusting the Image Height If you are projecting from a table or other flat surface, and the image is too high or low, you can adjust the image height using the projector's adjustable feet. 1. Turn on the projector and display an image. 2. -
Page 72: Image Shape
Related references Projector Feature Settings - Settings Menu Image Shape You can project an evenly rectangular image by placing the projector directly in front of the center of the screen and keeping it level. If you place the projector at an angle to the screen, or tilted up or down, or off to the side, you may need to correct the image shape for the best display quality. - Page 73 PowerLite 95/96W/905/915W/1835 4. Select the Keystone setting and press Enter. 5. Select the Quick Corner setting and press Enter. You see the Quick Corner adjustment screen.
-
Page 74: Correcting Image Shape With The Keystone Buttons
6. Use the arrow buttons on the projector or the remote control to select the corner of the image you want to adjust. Then press Enter. 7. Press the arrow buttons to adjust the image shape as necessary. 8. When you are finished, press Esc. Parent topic: Image Shape Correcting Image Shape With the Keystone Buttons... -
Page 75: Resizing The Image With The Zoom Ring
Note: If the projector is installed out of reach, you can also correct the image shape using the Keystone settings in the projector menus. Parent topic: Image Shape Related references Projector Feature Settings - Settings Menu Resizing the Image With the Zoom Ring 1. -
Page 76: Remote Control Operation
Remote Control Operation The remote control lets you control the projector from almost anywhere in the room, up to 19.7 feet (6 m) away. You can point it at the screen, or the front or back of the projector. Make sure that you aim the remote control at the projector's receivers within the angles listed here. 30º... -
Page 77: Using The Remote Control As A Wireless Mouse
Using the Remote Control as a Wireless Mouse You can use the projector's remote control as a wireless mouse so you can control your computer presentation from a distance. Note: You cannot use the remote control's wireless mouse function when you use your projector's USB Type B port to project video. -
Page 78: Using The Remote Control As A Presentation Pointer
Related references Projector Setup Settings - Extended Menu Using the Remote Control as a Presentation Pointer You can use the projector's remote control as a pointer to help you call out important information during a presentation. The default pointer shape is an arrow, but you can select an alternative shape using the Settings menu. -
Page 79: Selecting An Image Source
Related references Projector Feature Settings - Settings Menu Selecting an Image Source If you connected multiple image sources to the projector, such as a computer and DVD player, you may want to switch from one image source to the other. 1. -
Page 80: Projection Modes
• Press the button for the source you want on the remote control. If there is more than one port for that source, press the button again to select the other source. Computer port sources Video and HDMI sources USB port sources (computer display and external devices) Network source (PowerLite 93/95/96W/905/915W/1835) 4. -
Page 81: Changing The Projection Mode Using The Remote Control
• Rear/Ceiling flips the image over top-to-bottom and horizontally to project from the ceiling and the rear. You can change the projection mode using the remote control or by changing a menu setting. Changing the Projection Mode Using the Remote Control Changing the Projection Mode Using the Menus Parent topic: Using Basic Projector Features... - Page 82 2. Press the Menu button. 3. Select the Extended menu and press Enter. PowerLite 92/93 PowerLite 95/96W/905/915W/1835 4. Select the Projection setting and press Enter. 5. Select a projection mode and press Enter. 6. Press Menu or Esc to exit the menus.
-
Page 83: Image Aspect Ratio
Parent topic: Projection Modes Image Aspect Ratio The projector can display images in different width-to-height ratios called aspect ratios. Normally the input signal from your video source determines the image's aspect ratio. However, for certain images you can change the aspect ratio to fit your screen by pressing a button on the remote control. If you always want to use a particular aspect ratio for a certain video input source, you can select it using the projector's menus. -
Page 84: Available Image Aspect Ratios
3. To cycle through the available aspect ratios for your input signal, press the Aspect button repeatedly. Parent topic: Image Aspect Ratio Available Image Aspect Ratios You can select the following image aspect ratios, depending on the input signal from your image source. Note: Black bands and cropped images may project in certain aspect ratios, depending on the aspect ratio and resolution of your input signal. -
Page 85: Color Mode
Parent topic: Image Aspect Ratio Color Mode The projector offers different Color Modes to provide optimum brightness, contrast, and color for a variety of viewing environments and image types. You can select a mode designed to match your image and environment, or experiment with the available modes. If you always want to use a particular color mode for a certain video input source, you can select it using the projector menus. -
Page 86: Available Color Modes
The image quality changes and the name of the Color Mode appears briefly on the screen. 4. To cycle through all the available Color Modes for your input signal, press the Color Mode button repeatedly. Parent topic: Color Mode Available Color Modes You can set the projector to use these Color Modes, depending on the input source you are using: Color Mode Description... -
Page 87: Controlling The Volume With The Volume Buttons
3. Select the Image menu and press Enter. 4. Select the Auto Iris setting and select On. 5. Press Menu or Esc to exit the menus. Parent topic: Color Mode Controlling the Volume With the Volume Buttons You can use the Volume buttons on the projector or the remote control to adjust the volume as you project a presentation with audio. -
Page 88: Projecting A Slide Show
2. To lower or raise the volume, press the Volume buttons on the remote control or these buttons on the control panel. A volume gauge appears on the screen. 3. To set the volume to a specific level for an input source, you can set the volume using a projector menu. -
Page 89: Slideshow Presentations
Related tasks Connecting a USB Device or Camera to the Projector Slideshow Presentations Your projector's Slideshow feature lets you do the following: • Display individual images • Present a slide show of all images in a folder Parent topic: Projecting a Slide Show Supported Slideshow File Types You can project these types of files using the projector's Slideshow feature. - Page 90 Note: You can change the Slideshow operation options or add special effects by highlighting Option at the bottom of the screen and pressing Enter. 1. Press the USB button on the projector remote control. The Slideshow screen appears. 2. If you need to display files in a subfolder on your device, press the arrow buttons to highlight the folder and press the Enter button.
-
Page 91: Slideshow Display Options
Related tasks Disconnecting a USB Device or Camera From the Projector Slideshow Display Options You can select these display options when using the projector's Slideshow feature. Option Available settings Description Display order Name order Displays files in name order Date order Displays files in date order Sort Order In Ascending... - Page 92 Option Available settings Description Effect Wipe Transitions between images with a wipe effect Dissolve Transitions between images with a dissolve effect Random Transitions between images using a random variety of effects Parent topic: Starting a Slide Show or Presentation...
-
Page 93: Adjusting Projector Features
Adjusting Projector Features Follow the instructions in these sections to use your projector's feature adjustments. Shutting Off the Picture and Sound Temporarily Stopping Video Action Temporarily Zooming Into and Out of Images Projector Security Features Creating a User Pattern to Display Shutting Off the Picture and Sound Temporarily You can temporarily turn off the projected picture and sound if you want to redirect your audience's attention during a presentation. -
Page 94: Stopping Video Action Temporarily
Related references Projector Setup Settings - Extended Menu Stopping Video Action Temporarily You can temporarily stop the action in a video or computer presentation and keep the current image on the screen. Any sound or video action continues to run, however, so you cannot resume projection at the point that you stopped it. -
Page 95: Projector Security Features
1. Press the E-Zoom + button on the remote control. You see a crosshair on the screen indicating the center of the zoom area. 2. Use the following buttons on the remote control to adjust the zoomed image: • Use the arrow buttons to position the crosshair in the image area you want to zoom into. •... -
Page 96: Password Security Types
Installing a Security Cable Parent topic: Adjusting Projector Features Password Security Types You can set up these types of password security using one shared password: • Power On Protect password prevents anyone from using the projector without first entering a password. - Page 97 PowerLite 93/95/96W/905/915W/1835 2. Press the down arrow to select Password and press Enter. You see the prompt "Change the password?". 3. Select Yes and press Enter. 4. Hold down the Num button on the remote control and use the numeric buttons to set a four-digit password.
-
Page 98: Selecting Password Security Types
Parent topic: Password Security Types Selecting Password Security Types After setting a password, you see the Password Protect menu. Select the password security types you want to use. PowerLite 92 PowerLite 93/95/96W/905/915W/1835 If you do not see this menu, hold down the Freeze button on the remote control for five seconds until the menu appears. -
Page 99: Entering A Password To Use The Projector
3. To prevent changes to network settings, select Network Protect, press Enter, select On, and press Esc (PowerLite 93/95/96W/905/915W/1835). You can attach the Password Protect sticker to the projector as an additional theft deterrent. Note: Be sure to keep the remote control in a safe place; if you lose it, you will not be able to enter the password required to use the projector. -
Page 100: Saving A User's Logo Image To Display
• If the password is incorrect 30 times in a row, the projector remains locked. You must contact Epson for service and provide the request code displayed with the locking message. Parent topic:... - Page 101 2. Press the Menu button, select the Extended menu, and press Enter. PowerLite 92/93 PowerLite 95/96W/905/915W/1835 3. Select the User's Logo setting and press Enter. You see a prompt asking if you want to use the displayed image as a user's logo. 4.
- Page 102 5. Use the arrow buttons on the remote control to surround the image area you want to use as the User's Logo and press Enter. You see a prompt asking if you want to select this image area. 6. Select Yes and press Enter. (If you want to change the selected area, select No, press Enter, and repeat the last step.) You see the User's Logo zoom factor menu.
-
Page 103: Locking The Projector's Buttons
To prevent anyone from changing the User's Logo settings without first entering a password, set a password and enable User's Logo security. Parent topic: Password Security Types Locking the Projector's Buttons You can lock the buttons on the projector's control panel to prevent anyone from using the projector. You can lock all the buttons or all the buttons except the power button. -
Page 104: Unlocking The Projector's Buttons
3. Select the Control Panel Lock setting and press Enter. 4. Select one of these lock types and press Enter: • To lock all of the projector's buttons, select Full Lock. • To lock all buttons except the power button, select Partial Lock. You see a confirmation prompt. -
Page 105: Creating A User Pattern To Display
• Use the security slot on the back of the projector to attach a Kensington Microsaver Security system, available from Epson. • Use the security cable attachment point on the projector to attach a wire cable and secure it to a room fixture or heavy furniture. - Page 106 PowerLite 95/96W/905/915W/1835 3. Select the Pattern setting and press Enter. 4. Select the User Pattern setting and press Enter. You see a prompt asking if you want to use the displayed image as a User Pattern. 5. Select Yes and press Enter. Note: It takes a few moments for the projector to save the image;...
- Page 107 You see a completion message. 6. Press Esc to exit the message screen. Parent topic: Adjusting Projector Features Related references Projector Feature Settings - Settings Menu...
-
Page 108: Adjusting The Menu Settings
Adjusting the Menu Settings Follow the instructions in these sections to access the projector menu system and change projector settings. Note: The Network menu does not appear on non-network projector models. Using the Projector's Menus Image Quality Settings - Image Menu Input Signal Settings - Signal Menu Projector Feature Settings - Settings Menu Projector Setup Settings - Extended Menu... - Page 109 You see the menu screen displaying the Image menu settings. 2. Press the up or down arrow buttons to move through the menus listed on the left. The settings for each menu are displayed on the right. Note: The available settings depend on the current input source. 3.
-
Page 110: Image Quality Settings - Image Menu
8. Press Menu or Esc to exit the menus. Parent topic: Adjusting the Menu Settings Image Quality Settings - Image Menu Settings on the Image menu let you adjust the quality of your image for the input source you are currently using. -
Page 111: Input Signal Settings - Signal Menu
Setting Options Description Sharpness Varying levels available Adjusts the sharpness or softness of image details Abs. Color Temp (absolute color 5000 to 10000 ºK (Kelvin) Sets the color tone based on temperature) color temperature Color Adjustment Slider bars for each color Adjusts the intensity of red, green, and blue hues in the image... - Page 112 Note: You can restore the default settings of the Position, Tracking, and Sync settings by pressing the Auto button on the remote control. To change settings for an input source, make sure the source is connected and select that source. Setting Options Description...
- Page 113 Setting Options Description Position Up, down, left, right Adjusts the image location on the screen Progressive Sets whether to convert interlaced-to-progressive signals Video for certain video image types Film/Auto Off: for fast-moving video images Video: for most video images Film/Auto: for movies, computer graphics, and animation Noise Reduction Reduces flickering in analog...
-
Page 114: Projector Feature Settings - Settings Menu
Setting Options Description Aspect See the list of available aspect Sets the aspect ratio (width-to- ratios height ratio) for the selected input source Parent topic: Adjusting the Menu Settings Related references Available Image Aspect Ratios Projector Feature Settings - Settings Menu Options on the Settings menu let you customize various projector features. - Page 115 Setting Options Description Keystone H/V Keystone Adjusts image shape to rectangular (horizontally and Quick Corner vertically) H/V Keystone: lets you manually correct horizontal and vertical sides, or turn automatic correction on or off Quick Corner: select to correct image shape and alignment using an on-screen display Control Panel Lock Full Lock...
- Page 116 Setting Options Description Power Consumption Normal Selects the brightness mode of the projector lamp Normal: sets maximum lamp brightness ECO: reduces lamp brightness and fan noise, and saves power and lamp life Volume Varying levels available Adjusts the volume of projector’s speaker system or external speakers Mic Input Level...
-
Page 117: Projector Setup Settings - Extended Menu
Setting Options Description Pattern Pattern Display Selects various pattern display options Pattern Type Pattern Display: lets you display User Pattern the selected pattern type on the Test Pattern screen to aid in presentation Pattern Type: selects the type of grid or line pattern to display User Pattern: captures a projected screen and saves it as a pattern for display... - Page 118 PowerLite 95/96W/905/915W/1835...
- Page 119 Setting Options Description Display Messages Selects various display options Display Background Messages: controls whether messages are displayed on the Startup Screen screen A/V Mute Display Background: selects the screen color or logo to display when no signal is received Startup Screen: controls whether a special screen appears when the projector starts A/V Mute: selects the screen...
- Page 120 Setting Options Description Operation Direct Power On Selects various operation options Sleep Mode Direct Power On: lets you turn on the projector without pressing Sleep Mode Timer the power button Lens Cover Timer Sleep Mode: automatically turns High Altitude Mode off the projector after an interval of inactivity Sleep Mode Timer: sets the...
-
Page 121: Projector Network Settings - Network Menu
Setting Options Description Plug-in Power Set to On if you connect a condenser microphone with plug- (PowerLite in power support 95/96W/905/915W/1835) USB Type B USB Display Selects the use of the projector's USB Type B port Wireless Mouse USB Display: select when you connect a computer to the projector's USB TypeB port to display images... - Page 122 PowerLite 95/96W/905/915W/1835...
-
Page 123: Projector Information Display - Info Menu
Setting Options Description Net. Info - Wireless LAN Connection mode Displays wireless network status and details (Not available on PowerLite 93) Antenna level Projector Name SSID DHCP IP Address Subnet Mask Gateway Address MAC Address Region Code Net. Info - Wired LAN Projector Name Displays wired network status and details... - Page 124 Lamp Hours Displays the number of hours (H) the lamp has been used in Normal and ECO Power Consumption modes; if the information is displayed in yellow, obtain a genuine Epson replacement lamp soon Source Displays the name of the port to which the current input source is...
-
Page 125: Event Id Code List
Information item Description Event ID Displays the Event ID number corresponding to a specific projector problem; see the list of Event ID codes (Not available for PowerLite 92) Event ID Code List Parent topic: Adjusting the Menu Settings Related references Optional Equipment and Replacement Parts Projector Lamp Specifications Event ID Code List... -
Page 126: Projector Reset Options - Reset Menu
0899 A communication error has occurred. Try restarting the EasyMP Network Projection program and restarting your projector. If that does not solve the problem, contact Epson for help. Parent topic: Projector Information Display - Info Menu Projector Reset Options - Reset Menu You can reset most of the projector settings to their default values using the Reset All option on the Reset menu. - Page 127 You cannot reset the following settings using the Reset All option: • Input Signal • User's Logo • Language • Network menu items (if available) • Lamp Hours • Password • User Button Parent topic: Adjusting the Menu Settings...
-
Page 128: Maintaining And Transporting The Projector
The only parts you should replace are the lamp, air filter, and remote control batteries. If any other part needs replacing, contact Epson or an authorized Epson servicer. Warning: Before cleaning any part of the projector, turn it off and unplug the power cord. Never open any cover on the projector, except the lamp cover. -
Page 129: Cleaning The Projector Case
• To remove stubborn smudges, moisten a soft, lint-free cloth with lens cleaner and gently wipe the lens. Warning: Do not use a lens cleaner that contains flammable gas. The high heat generated by the projector lamp may cause a fire. Caution: Do not use glass cleaner to clean the lens, or you may damage it. -
Page 130: Replacing The Air Filter
2. Gently remove the dust using a small vacuum designed for computers or a very soft brush (such as a paintbrush). Note: You can remove the air filter so you can clean both sides of it. Do not rinse the air filter in water, or use any detergent or solvent to clean it. - Page 131 2. Slide the air filter cover latch and open the air filter cover. 3. Pull the air filter out of the projector. Note: Air filters contain polyphenylene ether, polystyrene resin, and polypropylene. Dispose of used air filters according to local regulations.
-
Page 132: Projector Lamp Maintenance
4. Place the new air filter in the projector as shown and push gently until it clicks into place. 5. Close the air filter cover. Parent topic: Air Filter and Vent Maintenance Projector Lamp Maintenance The projector keeps track of the number of hours the lamp is used and displays this information in the projector's menu system. -
Page 133: Replacing The Lamp
Projector Information Display - Info Menu Replacing the Lamp Before you replace the lamp, let the projector cool down for at least one hour so the lamp will not be hot. Warning: Let the lamp fully cool before replacing it to avoid injury. You can replace the lamp while the projector is mounted to the ceiling, if necessary. - Page 134 4. Slide the lamp cover out and lift it off. 5. Loosen the screws securing the lamp to the projector. The screws do not come all the way out.
- Page 135 6. Lift up the lamp handle and gently pull the lamp out of the projector. Note: The lamp(s) in this product contain mercury. Please consult your state and local regulations regarding disposal or recycling. Do not put in the trash.
- Page 136 7. Gently insert the new lamp into the projector. If it does not fit easily, make sure it is facing the right way. Press the handle down. Caution: Do not touch any glass on the lamp assembly to avoid premature lamp failure.
- Page 137 8. Push in the lamp firmly and tighten the screws to secure it. 9. Replace the lamp cover and tighten the screw to secure it. Note: Be sure the lamp cover is securely installed or the lamp will not come on. Reset the lamp timer to zero to keep track of the new lamp’s usage.
-
Page 138: Resetting The Lamp Timer
Related tasks Resetting the Lamp Timer Resetting the Lamp Timer You must reset the lamp timer after replacing the projector's lamp to clear the lamp replacement message and to keep track of lamp usage correctly. Note: Do not reset the lamp timer if you have not replaced the lamp to avoid inaccurate lamp usage information. -
Page 139: Replacing The Remote Control Batteries
Replacing the Remote Control Batteries The remote control uses the two AA manganese or alkaline batteries. Replace the batteries as soon as they run out. Caution: Use only the type of batteries specified in this manual. Do not install batteries of different types, or mix new and old batteries. - Page 140 3. Insert the batteries with the + and – ends facing as shown. 4. Close the battery cover and press it down until it clicks into place. Warning: Dispose of used batteries according to local regulations. Do not expose batteries to heat or flame.
-
Page 141: Transporting The Projector
• When shipping the projector for repairs, place it in its original packing materials, if possible, or use equivalent materials with cushioning around the projector. Mark the box "Fragile". Note: Epson shall not be liable for any damages incurred during transportation. Parent topic:... -
Page 142: Solving Problems
• The projector's Help system can display information about common problems, if the projector is operating. • The solutions in this manual can help you solve many problems. If none of these solutions help, you can contact Epson for technical support. Parent topic: Solving Problems... - Page 143 Power light Lamp light Temperature light Power light Lamp light Temperature Status and solution light Green Normal operation. Flashing green Warming up. Wait for an image to appear. Orange Standby or sleep mode. Flashing orange Off Preparing network monitoring or shutting down. (Wait for the light to remain orange before unplugging the projector.) Flashing red...
- Page 144 Replace the lamp soon to avoid damage. Do not orange continue using the projector. Flashing red A fan or sensor has a problem. Turn the projector off, unplug it, and contact Epson for help. Red or flashing Flashing red Flashing red Internal projector error. Turn the projector off, unplug it, and contact Epson for help.
-
Page 145: Using The Projector Help Displays
Related references Projector Setup Settings - Extended Menu Where to Get Help Related tasks Cleaning the Air Filter and Vents Replacing the Air Filter Replacing the Lamp Using the Projector Help Displays You can display information to help you solve common problems using the projector's Help system. 1. -
Page 146: Solutions When No Image Appears
Solutions When There is No Sound or Low Volume Solutions to Microphone Problems Parent topic: Solving Problems Solutions When No Image Appears If no image appears, try the following solutions: • Make sure the lens cover is open or off. •... -
Page 147: Solutions When Image Is Incorrect Using The Usb Display Function
• With Windows Media Center, reduce the screen size from full screen mode. • With Windows DirectX, turn off DirectX functions. • Turn off the Transfer layered window setting in the Epson USB Display Settings program on your computer. Parent topic:... -
Page 148: Displaying From A Mac Laptop
2. To display on both the laptop's monitor and the projector, try pressing the same keys again. 3. If the same image is not displayed by the laptop and projector, check the Windows Display utility to make sure the external monitor port is enabled. (See your computer or Windows manual for instructions.) 4. -
Page 149: Solutions When The Image Is Not Rectangular
• Try adjusting the image position using the Position menu setting. • Press the Aspect button on the remote control to select a different image aspect ratio. • If you zoomed into or out of the image using the E-Zoom buttons, press the Esc button to return to a full display. -
Page 150: Solutions When The Image Is Fuzzy Or Blurry
• Securely connected at both ends • No longer than 9.8 feet (3 m) • Not connected to an extension cable • If you are projecting from a laptop computer, try turning off simultaneous display on the laptop screen to avoid splitting the video signal. •... -
Page 151: Solutions When The Image Brightness Or Colors Are Incorrect
• Turn on automatic keystone adjustment in the projector's menus. • Adjust the Sharpness setting to improve image quality. • If you are projecting from a computer, press the Auto button on the remote control to automatically adjust the tracking and sync. If any bands or overall blurriness remains, display a uniformly patterned image on the screen and manually adjust the Tracking and Sync settings. -
Page 152: Solutions When There Is No Sound Or Low Volume
• Make sure any connected audio cables are labelled "No Resistance". • If you are using the USB Display function, turn on the Output audio from the projector setting in the Epson USB Display Settings program on your computer. Parent topic:... -
Page 153: Solving Projector Or Remote Control Operation Problems
• The projector's buttons may be locked for security. Unlock the buttons or use the remote control to turn on the projector. • The power cord may be defective. Disconnect the cord and contact Epson. • If the projector's lamp shuts off unexpectedly, it may have entered sleep mode after a period of inactivity. -
Page 154: Solutions To Password Problems
• If you have entered an incorrect password too many times and see a message displaying a request code, write down the code and contact Epson. • If you lose the remote control you cannot enter a password. Order a new one from Epson. Parent topic:... -
Page 155: Where To Get Help
To use the Epson PrivateLine Support service, call (800) 637-7661 and enter the PIN on the included Epson PrivateLine Support card. This is the fastest way of speaking to a live representative, and it's free. This service is available 6 AM to 6 PM, Pacific Time, Monday through Friday, for the duration of your warranty period. - Page 156 • Computer or video configuration • Description of the problem Purchase Supplies and Accessories You can purchase screens, other optional accessories, and replacement parts from an Epson authorized reseller. To find the nearest reseller, call 800-GO-EPSON (800-463-7766). Or you can purchase online www.epsonstore.com (U.S.
-
Page 157: Technical Specifications
Technical Specifications These sections list the technical specifications of your projector. General Projector Specifications Projector Lamp Specifications Remote Control Specifications Projector Dimension Specifications Projector Electrical Specifications Projector Environmental Specifications Projector Safety and Approvals Specifications Supported Video Display Formats General Projector Specifications Type of display Poly-silicon TFT active matrix Resolution... - Page 158 Brightness PowerLite 92/93: Normal Power Consumption mode: White light output 2400 lumens (ISO 21118 standard) Color light output 2400 lumens ECO Power Consumption mode: White light output 1920 lumens (ISO 21118 standard) PowerLite 95: Normal Power Consumption mode: White light output 2600 lumens (ISO 21118 standard) Color light output 2600 lumens ECO Power Consumption mode: White light output 2080 lumens (ISO 21118 standard)
- Page 159 ECO Power Consumption mode: White light output 2240 lumens (ISO 21118 standard) PowerLite 1835: Normal Power Consumption mode: White light output 3500 lumens (ISO 21118 standard) Color light output 3500 lumens ECO Power Consumption mode: White light output 2450 lumens (ISO 21118 standard) Contrast ratio 2000:1 with Auto Iris On and Normal Power Consumption mode Image size...
-
Page 160: Projector Lamp Specifications
Horizontal: ± 30º USB Type B port compatibility USB 1.1 and 2.0 compliant for USB display or external mouse USB Type A port compatibility USB 1.1 and 2.0 compliant port for USB device input or Epson document camera display Parent topic:... -
Page 161: Remote Control Specifications
Lamp life PowerLite 92/93/95/96W/905: Normal Power Consumption mode: Up to about 5000 hours ECO Power Consumption mode: Up to about 6000 hours PowerLite 915W/1835: Normal Power Consumption mode: Up to about 4000 hours ECO Power Consumption mode: Up to about 6000 hours Note: Turn off this product when not in use to prolong the life of the projector. -
Page 162: Projector Electrical Specifications
Weight PowerLite 92/93: 6.91 lb (3.13 kg) PowerLite 95: 6.97 lb (3.16 kg) PowerLite 96W: 7.19 lb (3.26 kg) PowerLite 905: 7.39 lb (3.35 kg) PowerLite 915W/1835: 7.42 lb (3.36 kg) Parent topic: Technical Specifications Projector Electrical Specifications Rated frequency 50/60 Hz Power supply 100 to 240 VAC ±10%... - Page 163 Power consumption Operating: (100 to 120 V) PowerLite 92/93/95: Normal Power Consumption mode: 312 W ECO Power Consumption mode: 261 W PowerLite 96W/905: Normal Power Consumption mode: 313 W ECO Power Consumption mode: 264 W PowerLite 915W/1835: Normal Power Consumption mode: 355 W ECO Power Consumption mode: 263 W Standby: PowerLite 92:...
-
Page 164: Projector Environmental Specifications
Power consumption Operating: (200 to 240 V) PowerLite 92/93/95: Normal Power Consumption mode: 299 W ECO Power Consumption mode: 254 W PowerLite 96W/905: Normal Power Consumption mode: 300 W ECO Power Consumption mode: 253 W PowerLite 915W/1835: Normal Power Consumption mode: 337 W ECO Power Consumption mode: 252 W Standby: PowerLite 92:... -
Page 165: Projector Safety And Approvals Specifications
For best results, your computer monitor or video card resolution should be set to display in the projector's native resolution. However, your projector includes Epson's SizeWise chip that supports other computer display resolutions, so your image will be resized to fit automatically. - Page 166 Display format Refresh rate (in Hz) Resolution (in pixels) SXGA 70/75/85 1152 × 864 60/75/85 1280 × 960 60/75/85 1280 × 1024 SXGA+ 60/75 1400 × 1050 WXGA+ 60/75/85 1440 × 900 UXGA 1600 × 1200 WSXGA+* 1680 × 1050 WUXGA (Reduced Blanking) 1920 ×...
- Page 167 Display format Refresh rate (in Hz) Resolution (in pixels) SVGA 800 × 600 1024 × 768 WXGA 1280 × 800 SXGA 1280 × 960 1280 × 1024 SXGA+ 1400 × 1050 UXGA 1600 × 1200 SDTV (480i/480p) 720 × 480 SDTV (576i/576p) 720 ×...
-
Page 168: Notices
Notices Check these sections for important notices about your projector. Important Safety Information Important Safety Instructions FCC Compliance Statement Trademarks Software Copyright Copyright Notice Important Safety Information Caution: Never look into the projector lens when the lamp is turned on; the bright light can damage your eyes. - Page 169 • If the projector is mounted on a ceiling, it should be installed by qualified technicians using mounting hardware designed for use with this projector. • When installing or adjusting a ceiling mount, do not use adhesives to prevent the screws from loosening and do not use oils or lubricants.
- Page 170 • Except as specifically explained in this manual, do not attempt to service this product yourself. Refer all servicing to qualified personnel. Opening or removing covers may expose you to dangerous voltages and other hazards. • Never open any covers on the projector except as specifically explained in this manual. Never attempt to disassemble or modify the projector.
-
Page 171: Fcc Compliance Statement
• If the lamp breaks, ventilate the room to prevent gases contained in the lamp from being inhaled or coming in contact with your eyes or mouth. • If the projector is mounted overhead and the lamp breaks, be careful to prevent pieces of glass from falling into your eyes when you open the lamp cover. -
Page 172: Trademarks
We provide the source code of the GPL Programs until five (5) years after the discontinuation of same model of this projector product. If you desire to receive the source code of the GPL Programs, please see the "EPSON Projector Contact List" in the User's Guide, and contact the customer support of your region. - Page 173 0.9.8 uvc rev.219 wireless_tools 29 EPSON original drivers The GNU General Public License Version 2 is as follows. You also can see the GNU General Public License Version 2 at http://www.gnu.org/licenses/. GNU GENERAL PUBLIC LICENSE Version 2, June 1991 Copyright ©) 1989, 1991 Free Software Foundation, Inc., 51 Franklin Street, Fifth Floor, Boston, MA...
- Page 174 this service if you wish), that you receive source code or can get it if you want it, that you can change the software or use pieces of it in new free programs; and that you know you can do these things. To protect your rights, we need to make restrictions that forbid anyone to deny you these rights or to ask you to surrender the rights.
- Page 175 You may charge a fee for the physical act of transferring a copy, and you may at your option offer warranty protection in exchange for a fee. 2. You may modify your copy or copies of the Program or any portion of it, thus forming a work based on the Program, and copy and distribute such modifications or work under the terms of Section 1 above, provided that you also meet all of these conditions: a) You must cause the modified files to carry prominent notices stating that you changed the files and the...
- Page 176 b) Accompany it with a written offer, valid for at least three years, to give any third party, for a charge no more than your cost of physically performing source distribution, a complete machine-readable copy of the corresponding source code, to be distributed under the terms of Sections 1 and 2 above on a medium customarily used for software interchange;...
- Page 177 For example, if a patent license would not permit royalty-free redistribution of the Program by all those who receive copies directly or indirectly through you, then the only way you could satisfy both it and this License would be to refrain entirely from distribution of the Program. If any portion of this section is held invalid or unenforceable under any particular circumstance, the balance of the section is intended to apply and the section as a whole is intended to apply in other circumstances.
- Page 178 PROVIDE THE PROGRAM "AS IS" WITHOUT WARRANTY OF ANY KIND, EITHER EXPRESSED OR IMPLIED, INCLUDING, BUT NOT LIMITED TO, THE IMPLIED WARRANTIES OF MERCHANTABILITY AND FITNESS FOR A PARTICULAR PURPOSE. THE ENTIRE RISK AS TO THE QUALITY AND PERFORMANCE OF THE PROGRAM IS WITH YOU. SHOULD THE PROGRAM PROVE DEFECTIVE, YOU ASSUME THE COST OF ALL NECESSARY SERVICING, REPAIR OR CORRECTION.
- Page 179 We provide the source code of the LGPL Programs until five (5) years after the discontinuation of same model of this projector product. If you desire to receive the source code of the LGPL Programs, please see the "EPSON Projector Contact List" in the User's Guide, and contact the customer support of your region.
- Page 180 The GNU Lesser General Public License Version 2 is as follows. You also can see the GNU Lesser General Public License Version 2 at http//www.gnu.org/licenses/. GNU LESSER GENERAL PUBLIC LICENSE Version 2.1, February 1999 Copyright ©) 1991, 1999 Free Software Foundation, Inc. 51 Franklin Street, Fifth Floor, Boston, MA 02110-1301 USA Everyone is permitted to copy and distribute verbatim copies of this license document, but changing it is not allowed.
- Page 181 have is not the original version, so that the original author's reputation will not be affected by problems that might be introduced by others. Finally, software patents pose a constant threat to the existence of any free program. We wish to make sure that a company cannot effectively restrict the users of a free program by obtaining a restrictive license from a patent holder.
- Page 182 GNU LESSER GENERAL PUBLIC LICENSE TERMS AND CONDITIONS FOR COPYING, DISTRIBUTION AND MODIFICATION 0. This License Agreement applies to any software library or other program which contains a notice placed by the copyright holder or other authorized party saying it may be distributed under the terms of this Lesser General Public License (also called "this License").
- Page 183 d) If a facility in the modified Library refers to a function or a table of data to be supplied by an application program that uses the facility, other than as an argument passed when the facility is invoked, then you must make a good faith effort to ensure that, in the event an application does not supply such function or table, the facility still operates, and performs whatever part of its purpose remains meaningful.
- Page 184 5. A program that contains no derivative of any portion of the Library, but is designed to work with the Library by being compiled or linked with it, is called a "work that uses the Library". Such a work, in isolation, is not a derivative work of the Library, and therefore falls outside the scope of this License.
- Page 185 library, if the user installs one, as long as the modified version is interface-compatible with the version that the work was made with. c) Accompany the work with a written offer, valid for at least three years, to give the same user the materials specified in Subsection 6a, above, for a charge no more than the cost of performing this distribution.
- Page 186 10. Each time you redistribute the Library (or any work based on the Library), the recipient automatically receives a license from the original licensor to copy, distribute, link with or modify the Library subject to these terms and conditions. You may not impose any further restrictions on the recipients' exercise of the rights granted herein.
- Page 187 14. If you wish to incorporate parts of the Library into other free programs whose distribution conditions are incompatible with these, write to the author to ask for permission. For software which is copyrighted by the Free Software Foundation, write to the Free Software Foundation; we sometimes make exceptions for this.
- Page 188 This library is free software; you can redistribute it and/or modify it under the terms of the GNU Lesser General Public License as published by the Free Software Foundation; either version 2.1 of the License, or (at your option) any later version. This library is distributed in the hope that it will be useful, but WITHOUT ANY WARRANTY;...
- Page 189 1. Redistributions of source code must retain the above copyright notice, this list of conditions and the following disclaimer. 2. Redistributions in binary form must reproduce the above copyright notice, this list of conditions and the following disclaimer in the documentation and/or other materials provided with the distribution. 3.
- Page 190 1. We don't promise that this software works. (But if you find any bugs, please let us know!) 2. You can use this software for whatever you want. You don't have to pay us. 3. You may not pretend that you wrote this software. If you use it in a program, you must acknowledge somewhere in your documentation that you've used the IJG code.
- Page 191 config.sub, ltconfig, ltmain.sh). Another support script, install-sh, is copyright by M.I.T. but is also freely distributable. It appears that the arithmetic coding option of the JPEG spec is covered by patents owned by IBM , AT&T, and Mitsubishi. Hence arithmetic coding cannot legally be used without obtaining one or more licenses.
- Page 192 libpng version 1.2.6, September 12, 2004, is Copyright ©) 2004 Glenn Randers-Pehrson, and is distributed according to the same disclaimer and license as libpng-1.2.5 with the following individual added to the list of Contributing Authors Cosmin Truta libpng versions 1.0.7, July 1, 2000, through 1.2.5 - October 3, 2002, are Copyright ©) 2000-2002 Glenn Randers-Pehrson, and are distributed according to the same disclaimer and license as libpng-1.0.6 with the following individuals added to the list of Contributing Authors Simon-Pierre Cadieux...
- Page 193 For the purposes of this copyright and license, "Contributing Authors" is defined as the following set of individuals: Andreas Dilger Dave Martindale Guy Eric Schalnat Paul Schmidt Tim Wegner The PNG Reference Library is supplied "AS IS". The Contributing Authors and Group 42, Inc. disclaim all warranties, expressed or implied, including, without limitation, the warranties of merchantability and of fitness for any purpose.
- Page 194 zlib This projector product includes the open source software program "zlib" which applies the terms and conditions provided by owner of the copyright to the "zlib". The "zlib" are WITHOUT ANY WARRANTY; without even the implied warranty of MERCHANTABILITY AND FITNESS FOR A PARTICULAR PURPOSE. List of zlib programs zlib-1.1.4 License terms of conditions of each program which are provided by owner of the copyright to the "zlib"...
- Page 195 libmd5-rfc This projector product includes the open source software program "libmd5-rfc" which applies the terms and conditions provided by owner of the copyright to the "libmd5-rfc". The "libmd5-rfc" are WITHOUT ANY WARRANTY; without even the implied warranty of MERCHANTABILITY AND FITNESS FOR A PARTICULAR PURPOSE. List of libmd5-rfc programs libmd5-rfc License terms of conditions of each program which are provided by owner of the copyright to the...
- Page 196 1999-11-04 lpd Edited comments slightly for automatic TOC extraction. 1999-10-18 lpd Fixed typo in header comment (ansi2knr rather than md5); added conditionalization for C++ compilation from Martin Purschke <purschke@bnl.gov>. 1999-05-03 lpd Original version. mDNSResponder This projector product includes the open source software program "mDNSResponder" which applies the following license terms "Apache License Version 2.0, January 2004".
- Page 197 "Work" shall mean the work of authorship, whether in Source or Object form, made available under the License, as indicated by a copyright notice that is included in or attached to the work (an example is provided in the Appendix below). "Derivative Works"...
- Page 198 (b) You must cause any modified files to carry prominent notices stating that You changed the files; and ©) You must retain, in the Source form of any Derivative Works that You distribute, all copyright, patent, trademark, and attribution notices from the Source form of the Work, excluding those notices that do not pertain to any part of the Derivative Works;...
-
Page 199: Copyright Notice
Seiko Epson Corporation. The information contained herein is designed only for use with this Epson product. Epson is not responsible for any use of this information as applied to other products. -
Page 200: Copyright Attribution
Neither Seiko Epson Corporation nor its affiliates shall be liable to the purchaser of this product or third parties for damages, losses, costs, or expenses incurred by purchaser or third parties as a result of: accident, misuse, or abuse of this product or unauthorized modifications, repairs, or alterations to this product, or (excluding the U.S.) failure to strictly comply with Seiko Epson Corporation's operating and...
Need help?
Do you have a question about the V11H389020 and is the answer not in the manual?
Questions and answers