Table of Contents
Advertisement
Available languages
Available languages
Quick Links
Advertisement
Table of Contents

Related Manuals for Harman JBL SW68A-MS


Summary of Contents for Harman JBL SW68A-MS
- Page 1 " " " SUBWOOFER DELGADO 6X8 AMPLIFICADO MANUAL DO PROPRIETÁRIO S ´ MANUAL DEL PROPIETARIO...
- Page 2 EQUIPAMENTO E ESPECIFICAÇÕES DO SISTEMA Parabéns pela sua aquisição e seja bem-vindo à HARMAN! ESPECIFICAÇÕES MODELO: SW68A-MS Potência de saída 100W rms Resposta da Frequência 20Hz - 150Hz 1.0V Sensibilidade de entrada, alto nível 300mV Sensibilidade de entrada, baixo nível...
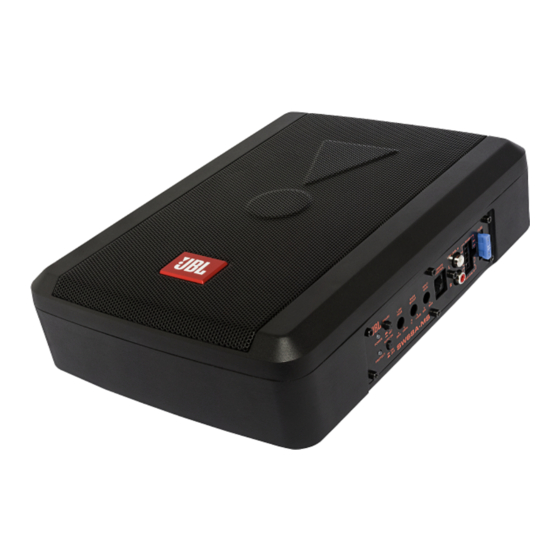
- Page 3 CONTROLES E RECURSOS DO PAINEL A. LED INDICADOR DE ENERGIA F. CONTROLE GANHO ENTRADA Este LED bicolor brilha na cor verde quando está Depois de instalar o sistema, gire esse controle ligado e funcionando sem problemas. Caso algum para o mínimo. dos circuitos de proteção seja ativado, ele muda Ligue a unidade principal (e o subwoofer irá...
-
Page 4: Conexões De Entrada
CONEXÕES DE ENTRADA CONEXÕES DE ENTRADA DE BAIXO NÍVEL Recomenda-se as conexões de entrada de baixo nível (RCA) para melhor desempenho de áudio. A maioria das instalações underseat (embaixo de bancos) irá exigir um cabo RCA de 6-12 pés. Sempre utilize cabos de alta qualidade. -
Page 5: Conexões De Alimentação
CONEXÕES DE ALIMENTAÇÃO Conecte o terminal de aterramento ao ponto mais próximo do chassi do veículo. Utilize cabos com bitola 8 (ou mais grossa) para a conexão do cabo de aterramento. Conecte o terminal remoto à saída remota da unidade principal usando cabos com bitola 16 (ou mais grossa). Conecte um suporte para fusível vazio a 16 "(40 cm) da bateria do carro e utilize um cabo de bitola 8 (ou mais no painel traseiro do subwoofer. - Page 6 CONEXÃO DE CONTROLE DO NÍVEL REMOTO Fig.05 Instale o controle remoto de maneira segura Controle de Nível sob o painel de instrumentos ou em um local Remoto semelhante, de modo que ao utilizá-lo,este não gere distrações ao motorista. 6 PT...
-
Page 7: Resolução De Problemas
RESOLUÇÃO DE PROBLEMAS Se você tiver problemas quanto ao funcionamento ou desempenho deste produto, faça uma comparação entre a sua instalação e o diagrama de conexão elétrica nas páginas anteriores. Se os problemas persistirem, leia abaixo as dicas de resolução de problemas que podem ajudar a solucioná-los. -
Page 8: Specifications
SYSTEM EQUIPMENT AND SPECIFICATIONS Congratulations for your purchase, and welcome to HARMAN! SPECIFICATIONS MODEL: SW68A-MS Power output 100W rms Frequency Response 20Hz - 150Hz Input Sensitivity, high level 1,0V 300mV Input Sensitivity, low level Low Pass Filter 50Hz - 150Hz... -
Page 9: Panel Controls And Features
PANEL CONTROLS AND FEATURES A. POWER STATUS LED F. INPUT GAIN CONTROL After you have installed your system, turn this con- This bi-color LED glows green when power is on and no problems are present. If one of the protect- trol to minimum. -
Page 10: Low Level Input Wiring
INPUT WIRING LOW LEVEL INPUT WIRING Low-level (RCA) input wiring is preferred for best audio performance. Most trunk and underseat installations will require a 6-12 feet RCA cable. Always use a high quality cable. NOTE: Do not connect BOTH the high level and low level inputs from your receiver to your amplifier at the same time! To Audio outputs of head unit or signal processor... -
Page 11: Power Connections
POWER CONNECTIONS Connect the ground terminal to the closest point on the chassis of the vehicle. Use 8 gauge (or heavier) wire to connect the ground cable. Connect the remote terminal to the remote output of head unit using 16 gauge (or heavier) wire. Connect an empty fuse holder within 16"... -
Page 12: Remote Level Control Connection
REMOTE LEVEL CONTROL CONNECTION Fig.05 Remote Install the remote control securely under the Level Control dash or in a similar location where using it will not distract the driver. 6 EN... -
Page 13: Troubleshooting
TROUBLESHOOTING If you experience operation or performance problems with this product, compare your installation with the electrical wiring diagram on the previous pages. If problems persist, read the following troubleshooting tips which may help eliminate the problems. SYMPTOM POSSIBLE REMEDY Check to make sure you have a good ground connection. -
Page 14: Especificaciones
SISTEMA DEL EQUIPO Y ESPECIFICACIONES ¡Felicitaciones por la compra y bienvenido a HARMAN! ESPECIFICACIONES SW68A-MS PARTE INFERIOR 100W rms Potencia de salida Respuesta de frecuencia 20Hz - 150Hz 1,0V Sensibilidad de entrada, nivel alto Sensibilidad de entrada, nivel bajo 300mV... - Page 15 CONTROLES Y CARACTERÍSTICAS DEL PANEL A. LED DE ESTADO DE ALIMENTACIÓN Este LED de dos colores brilla con un color verde Después de que haya instalado su sistema, gire este cuando se activa la alimentación y no se presentan control al mínimo. problemas.
-
Page 16: Cableado De Entrada
CABLEADO DE ENTRADA CABLEADO DE ENTRADA DE NIVEL BAJO El cableado de entrada de nivel bajo (RCA) es el recomendado para obtener un mejor rendimiento del audio. La mayoría de las instalaciones del maletero y debajo de los asientos requieren un cable RCA de 6-12 pies. Use siempre cables de alta calidad. -
Page 17: Conexiones De Potencia
CONEXIONES DE POTENCIA Conecte el terminal de tierra en el punto más cercano en el chasis del vehículo. Use un cable de calibre 8 (o de mayor grosor) para conectar el cable de tierra. Conecte el terminal remoto a la salida remota de la unidad central usando un cable de calibre 16 (o de mayor grosor). - Page 18 CONEXIÓN DEL CONTROL REMOTO DEL NIVEL Fig.05 Instale el control remoto de forma segura debajo del tablero o en un lugar similar, de modo que cuando se use no distraiga al Control remoto del nivel conductor. 6 ESP...
-
Page 19: Resolución De Problemas
RESOLUCIÓN DE PROBLEMAS Si tiene problemas de operación o de rendimiento con este producto, compare la instalación realizada con el diagrama del cableado eléctrico que se encuentra en las páginas anteriores. Si el problema persiste, lea las siguientes resoluciones de problemas, las cuales le podrían ayudar a resolver tales problemas. - Page 20 PRODUZIDO POR HARMAN DA AMAZÔNIA INDÚSTRIA ELETRÔNICA E PARTICIPAÇÕES LTDA. Av. Cupiúba, 401 - Lote 3 77/1 Bairro Distrito Industrial - Manaus - AM CEP.: 69075-060 CNPJ: 88.315.379/0001-70 www.harman.com/brasil Indústria brasileira Made in Brazil Hecho en Brasil Impresso na China...
Need help?
Do you have a question about the JBL SW68A-MS and is the answer not in the manual?
Questions and answers