
Related Manuals for Stealth Cam STC-IR1


Summary of Contents for Stealth Cam STC-IR1
- Page 1 Stealth Cam STC-IR1 User manual Tool Free Customer Support 1-877-269-8490 www.stealthcam.net Version 1.0 June/05...
- Page 2 Stealth Cam Limited Warranty Your Stealth Cam is covered by a One Year Limited Warranty on parts & labor from the date of purchase. The warranty covers defects in workmanship & materials. The warranty does not apply to units, which have been damaged or abused intentionally or unintentionally.
-
Page 3: Table Of Contents
STC-IR1 Manual Contents Camera overview Memory Capacity Camera kit contents Battery and memory Installation Set up and programming Camera use Manual Shooting Mode Viewing & Deleting images Technical Specs General Information www.stealthcam.net Toll Free 877-269-8490... -
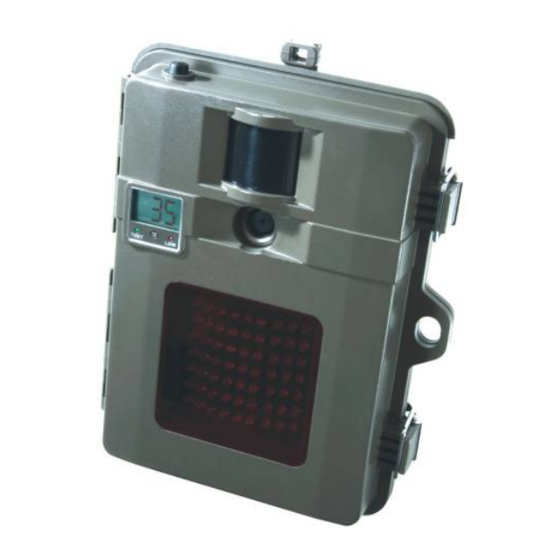
Page 4: Camera Overview
STC-IR1 Camera Overview Stealth Cam [Front Housing] Shutter Button Front LCD Display Test Indicator Light Sensor Low Battery Indicator www.stealthcam.net Viewfinder Passive Infrared Sensor (PIR) Camera Lens IR Light Lock Hole Toll Free 877-269-8490... - Page 5 STC-IR1 Stealth Cam [Bottom View] DC Jack Port Solar Port Tree Screw Mount www.stealthcam.net Toll Free 877-269-8490...
- Page 6 STC-IR1 Stealth Cam [Open View] Status LCD Display Test Button ON/OFF Switch Menu Button DOWN Button Battery Compartment Cover www.stealthcam.net TFT-LCD Display Delete Button Distance Adjust Select Button UP Button Toll Free 877-269-8490...
- Page 7 STC-IR1 Stealth Cam [Side View] CF Card Slot Video-out Jack USB Port Stealth Cam [Back View] Mounting Strap Slots www.stealthcam.net Toll Free 877-269-8490...
-
Page 8: Memory Capacity
STC-IR1 Memory Capacity When "FULL"("F") is displayed on the front LCD screen this indicates that the memory is full. High resolution - 5M 2560 X 1920 Medium resolution - 3.1M 2048 X 1536 Low resolution - 1.3M 1280 X 960... -
Page 9: Camera Kit Contents
STC-IR1 Camera kit contents • Model STC-IR1 Infrared Digital Scouting Camera • CDROM (Contains ArcSoft Photo Impression and camera driver) • User Manual. • 1.5 USB cable. • 1.5 TV out cable for TV (RCA Jack). • 1.5 TV out cable for handheld TV (Mini Jack). - Page 10 Make sure the power cable to the lead acid battery is connected to the correct polarity. Firmly insert barrel plug in the 12V jack on bottom of camera. Only Stealth Cam accessory Lead-Acid Battery is recommended for this unit. Lead-Acid Battery performance is subject to weather conditions, Invisible Infrared Illuminator activity and user settings.
- Page 11 The camera should be in the OFF position when adding or removing memory cards. Make sure to format the CF card prior to use in STC-IR1. New cards are good to use straight from the package. Insert the memory card with the top of the card facing the front of the camera.
- Page 12 STC-IR1 Figure 2 www.stealthcam.net Toll Free 877-269-8490...
-
Page 13: Set Up And Programming
STC-IR1 Set up and Programming Familiarize your self with the location of the different buttons before programming the camera settings as it is helpful to look at the front LCD display while performing the various functions. Setting the continuous capture program Continuous capture is the number of images the camera will record each time the PIR coverage area is intruded. - Page 14 STC-IR1 Note: During the process of each mode setting, it is normal to see the LCD screen figures blink. Press the MENU button four times. The "P" icon will start flashing. Using the "UP" arrow button press until you have reached the desired setting for the number of pictures.
- Page 15 STC-IR1 save your setting and enter the next programming mode - Time out setting. If you do not need to enter the time out setting mode press MENU to return to the main screen. Setting the Time Out Time out is the amount of time the camera will sleep between triggering.
- Page 16 STC-IR1 should see the year number blinking. Using the "UP or DOWN" arrows enter the correct year. Once you have entered the year press MENU the Month will start blinking. Using the UP or DOWN arrows enter the correct month. Once you have entered the month press MENU.
- Page 17 Signal)] or press MENU to return to the main screen. Setting the TV System (NTSC / PAL) NTSC is the correct setting for all of North America. Your Stealth Cam STC-IR1 comes pre-programmed for NTSC. After following above steps to enter the Resolution setting, press SELECT will bring you into the TV System setting.
- Page 18 STC-IR1 or P will be blinking. Using the "UP" or "DOWN" arrows enter the correct TV system (N - NTSC or P - PAL). NTSC is the correct setting for all of North America. Press SELECT once you have entered the correct TV system.
-
Page 19: Using The Camera
STC-IR1 Using the camera Once you have completed the settings listed above, the camera is ready for use. Mounting the camera with the supplied Tree Screw Hand twist the screw into the tree or post at the desired position. Attach the camera to the screw by turning the camera onto the mounting screw to the desired position. - Page 20 STC-IR1 Mounting the camera with the supplied Strap Insert the strap through the strap slots on the rear housing. Wrap the strap around the mounting surface. Secure the strap & tighten the buckle in order to secure the camera. www.stealthcam.net...
- Page 21 STC-IR1 Mounting suggestions Camera should be mounted between 4 to 5 feet from the ground up depending on the subject matter you are trying to capture on the camera. Avoid mounting camera directly facing east or west. The rising & setting of the sun could cause a false trigger of the camera.
- Page 22 Note: In order to obtain proper weather resistance, please make sure that both door latches are securely locked in place. Testing the cameras coverage area One of Stealth Cam's many features is the ability to test the coverage area. After mounting the camera; open front housing & slide the...
- Page 23 STC-IR1 When you have completed the testing the coverage area there are 2 methods for exiting test mode: 1. Open the front housing and press the TEST button to exit test mode. The camera will then enter sleep mode for 1 minute. After one minute the camera will power up and LCD screen will turn on.
- Page 24 STC-IR1 Using the camera in PIR detection mode Mount the camera to tree or other sturdy object using either the supplied tree screw or mounting strap (Please refer to the Mounting Suggestions section in this manual). Open the front housing & move the switch to the ON position. At this point you have 30 seconds to make any program adjustments.
-
Page 25: Manual Shooting Mode
STC-IR1 50Lux) Note: IR lighting, Photo distance is up to 30ft. Video distance is 26ft. Manual Shooting Mode Turn the camera on. When the Front LCD screen turns on press the MENU button once. The camera is now ready to be used as a hand held point &... -
Page 26: Viewing & Deleting Images
STC-IR1 Viewing and deleting images The Stealth Cam STC-IR1 offers the user three different options for viewing the images. Note: Images captured in daytime or high lux environment will be full color. Images taken in nighttime or low lux environment with IR lighting device activated will be black &... - Page 27 STC-IR1 To view the time & date stamp press the button. The time & date will now appear on every image viewed. Using the UP and DOWN buttons navigate through the images one at a time. To view the images as a slide show press SELECT a second time and the camera will begin to scroll from image to image every 3 seconds.
- Page 28 STC-IR1 Front LCD screen on camera. Within a few second the first image will appear on the LCD TV Monitor. At first the image will appear distorted. After 2 seconds the image will clear up. At the bottom of the screen will be an information bar that indicates what picture out of the total stored in memory you are viewing.
- Page 29 STC-IR1 To view the images as a slide show press SELECT a second time and the camera will begin to scroll from image to image every 3 seconds. To stop the slide show press SELECT again. Viewing the images on your home TV equipped with an RCA input jack.
- Page 30 STC-IR1 indicates what picture out of the total stored in memory you are viewing. Also displayed is the battery level of the camera and the resolution of the image. To view the time & date stamp press the SELECT button. The time &...
- Page 31 STC-IR1 Viewing the images on your computer using the provided software Minimum System requirements and compatibility: Win 98SE, Win 2000, Win Operating System CD ROM Drive Microprocessor Intel Pentium MMX 200MHz Color Display Monitor 800 x 600(1024 x 768 Resolution...
- Page 32 STC-IR1 Then with the camera in the OFF position; plug the other end of the USB cord into the camera. The camera will automatically power ON and display a USB icon on the Front LCD screen. See figure 3. A download window will then appear on your computer screen displaying the number of images in the camera.
- Page 33 STC-IR1 Select the images you want to download and click on download box on your computer screen. The default setting will download the images you selected to a file folder in My Documents with the date of the download as the file name.
- Page 34 ArcSoft Photo Impression window. Deleting Images from memory The Stealth Cam STC-IR1 offers the user the ability to delete one image at a time or all at once. Note:...
- Page 35 STC-IR1 images one at a time. To delete the images one at a time press the DELETE . You will be prompted on screen with the following message. o Delete Image? o Yes o No Using the UP or DOWN arrow enter Yes to delete the image or No to keep it.
- Page 36 Do not attempt to open the camera for unauthorized service. This could cause serious damage to the unit and will void the warranty. Remove batteries when camera is not in use for long periods of time. Directions for using the Stealth Cam lock plate www.stealthcam.net Toll Free 877-269-8490...
- Page 37 Tighten the cable or chain snug around the camera & mounting surface. Using a pad lock secure the chain or cable behind the mounting surface. Precautions: The Stealth Cam lock plate is meant to be used in coordination with a www.stealthcam.net Toll Free 877-269-8490...
- Page 38 STC-IR1 user supplied lock, chain or cable. It is designed to be a theft deterrent. Stealth Cam does not guarantee the lock plate will prevent theft or loss of property. Padlock, Cable or Chain not included. www.stealthcam.net Toll Free 877-269-8490...
-
Page 39: Technical Specs
STC-IR1 Technical Specifications Camera Features and Specification • Image sensor: 5.0 mega-pixels RGB color or B&W in IR activity • Built in 1.8” Color TFT display with backlight. • Built in 1.8” B& W LCD programming screen • Built in 32M flash memories for image storage •... - Page 40 STC-IR1 • Battery low indicator • Green Test LED indicator • TV out support for NTSC and PAL system • Focusing: 6 feet to Infinity • High precision 6G glass lens • Effective viewing Angle: 52 degree. • PIR detection angle 48 deg.
-
Page 41: General Information
Remove dirt or stains with a soft cloth dampened with water or neutral detergent. Keep the STC-IR1 cam in a dry and cool dust-free environment or container when it is NOT used. Take the batteries out, when the STC-IR1 cam is NOT to be used over a long period. www.stealthcam.net... - Page 42 STC-IR1 Avoid dropping the STC-IR1 cam on to hard ground. Do not disassemble the STC-IR1 cam. Do not mix new and old batteries. Do not open the camera for unauthorized service. This could cause serious damage to the unit and will void the warranty.
Need help?
Do you have a question about the STC-IR1 and is the answer not in the manual?
Questions and answers