Advertisement
Quick Links
Baby Trend, Inc.
13048 Valley Blvd.
Fontana CA 92335
1-800-328-7363
(8:00 a.m. ~ 4:30 p.m. PST)
www.babytrend.com
RC86XXXC_2L_031323.1_CL
Read all instructions BEFORE assembly and USE of product.
KEEP INSTRUCTIONS FOR FUTURE USE.
LISEZ TOUTES LES INSTRUCTIONS DU MANUEL AVANT
L'ASSEMBLAGE OU L'UTILISATION DE CE PRODUIT. CONSERVEZ
CES INSTRUCTIONS POUR RÉFÉRENCE ULTÉRIEURE.
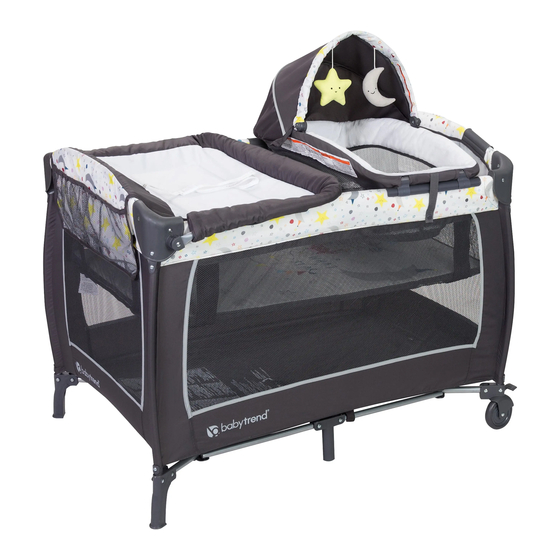
Lil Snooze
™
Center Playard
Instruction Manual
Manuel d'instruction
Deluxe II Nursery
*Toys may vary
*Les jouets peuvent varier
RC86XXXC
Advertisement

Subscribe to Our Youtube Channel
Related Manuals for BABYTREND Lil Snooze Deluxe II RC86 C Series


Summary of Contents for BABYTREND Lil Snooze Deluxe II RC86 C Series
- Page 1 CES INSTRUCTIONS POUR RÉFÉRENCE ULTÉRIEURE. Lil Snooze Deluxe II Nursery ™ Center Playard *Toys may vary *Les jouets peuvent varier Instruction Manual RC86XXXC Manuel d’instruction Baby Trend, Inc. 1-800-328-7363 13048 Valley Blvd. (8:00 a.m. ~ 4:30 p.m. PST) www.babytrend.com Fontana CA 92335 RC86XXXC_2L_031323.1_CL...
-
Page 2: Warranty
Customer Service Department can be contacted at 1 (800) 328-7363 Monday through Friday between 8:00 a.m. and 4:30 p.m. (PST). Return Authorizations are required prior to returning product(s) to Baby Trend®. Please visit http://babytrend.com/ pages/limited-warranty for complete warranty details. GARANTIE NE PAS RETOURNER VOTRE PRODUIT AU MAGASIN. - Page 3 WARNING WARNING In gaps between a mattress too small or too thick and Playard Warnings product sides. DO NOT USE THIS PLAYPEN IF YOU CANNOT EXACTLY FOLLOW On soft bedding THE INSTRUCTIONS THAT COME WITH IT. • • • Do not use this playpen for a child who can climb out of NEVER add a mattress, pillow, comforter, or padding •...
- Page 4 WARNING AVERTISSEMENT • ALWAYS ensure the full-size bassinet is fully assembled LE MOÏSE COMPLET on the playard before using the following accessories: NE PAS UTILISER LE PARC À MOINS D’ÊTRE EN changing table and / or Napper. MESURE DE SUIVRE PRÉCISÉMENT LES •...
- Page 5 AVERTISSEMENT AVERTISSEMENT MISE EN GARDE : MISE EN GARDE : DANGER D'ÉTRANGLEMENT DANGER DE SUFFOCATION : AVERTISSEMENT : NE JAMAIS LAISSER LE BÉBÉ DANS LE PARC LORSQUE LES CÔTÉS SONT ABAISSES. Le bébé peut suffoquer en tombant dans Des enfants ont étouffé : l’espace entre le matelas et le grillage du côté.
- Page 6 AVERTISSEMENT • Quand l’enfant est capable de se tirer à une position • Quand l’enfant est capable de se tirer à une position MAINTENANCE AND CLEANING INSTRUCTIONS: debout, enlever les bordures de protection, les gros debout, enlever les bordures de protection, les gros Use only household mild soap and warm water.
- Page 7 PARTS PIEZAS ASSEMBLY ASSEMBLAGE IMPORTANT ! IMPORTANT ! Check the parts to make sure you have all the parts for this model before assembling To ensure safe operation of your To ensure safe operation of your the playard. product, please follow these instructions carefully. Please product, please follow these instructions carefully.
- Page 8 ASSEMBLY ASSEMBLAGE ASSEMBLY ASSEMBLAGE TO ASSEMBLE PLAYARD 2) • Top rails must be fully erected before lowering center. Pull up one rail at a time, ASSEMBLAGE DU PARC DE BÉBÉ hold one hand on each side of the rail and pull up sharply, do not pull from the middle where the center latch release is located, make sure both tubes latch in place and each rail is rigid (Fig.
- Page 9 ASSEMBLY ASSEMBLAGE ASSEMBLY ASSEMBLAGE 3) • Once all four (4) top rails are locked 4) • Place the Mattress on the floor of the in place, push down on the center Playard with the padded side facing up handle (Fig. 3a). The center mechanism (Fig.
- Page 10 ASSEMBLY ASSEMBLAGE ASSEMBLY ASSEMBLAGE FOLDING PLAYARD 8) • Locate the rail latch release in the center and bottom side of each rail. Squeeze the REPLIER LE PARC A BEBE Center latch lever with two hands until the rail releases Varrou central the two tubes (Fig.
- Page 11 WARNING WARNING 9) • Gather four (4) corners and center all ACCESSORIES together tightly (Fig. 9). Wrap Mattress Full-Size Bassinet around Playard frame with padded side facing inward. Do not use this bassinet if you cannot exactly follow the • Ramenez les quatre (4) coins vers le centre instructions that come with it.
-
Page 12: Fall Hazard
WARNING WARNING • Always place baby on back to sleep to reduce the risk • NEVER leave children unattended. of SIDS and suffocation. • ALWAYS provide the supervision necessary for the continued safety of your child. NEVER leave children • If a sheet is used with the mattress, use only the one provided by the product manufacturer or one unattended. - Page 13 AVERTISSEMENT AVERTISSEMENT ACCESSOIRES plus 3,8 cm et dont la supercie permet d’empêcher, lorsqu’il est poussé fermement contre un côté Avertissements de le moïse complet et de berceaux: quelconque du moïse, qu’un espace de plus de 3 cm soit NE PAS UTILISER LE MOÏSE À MOINS D’ÊTRE EN MESURE créé...
- Page 14 AVERTISSEMENT AVERTISSEMENT DANGER DE CHUTE : • TOUJOURS prendre toutes les mesures nécessaire pour Pour aider à prévenir les assurer la sécurité de votre enfant. NE JAMAIS laisser un chutes, enfant sans surveillance. • Ne pas utiliser le ce produit lorsque le enfant •...
- Page 15 ASSEMBLY ASSEMBLAGE ASSEMBLY ASSEMBLAGE TO ASSEMBLE THE FULL-SIZE BASSINET • Position the Bassinet over and down into the fully assembled POUR ASSEMBLER LE MOÏSE COMPLET Playard. Secure in place by pushing down firmly on each plastic support clip until all are Full- Size Bassinet with metal support tubes snapped into place (Fig.
- Page 16 WARNING WARNING ACCESSORIES Changing Table: Do not use this accessory if you cannot exactly follow • Discontinue use of the changing table when child the instructions that come with it. begins to push up on hands and knees or has reached •...
- Page 17 AVERTISSEMENT AVERTISSEMENT ACCESSOIRES: Table à langer: Ne pas utiliser cet accessoire à moins d’être en Ne pas utiliser cet accessoire à moins d’être en • La table à langer lorsque le bébé commence à mesure de suivre précisément les instructions qui mesure de suivre précisément les instructions qui ramper sur les mains et genoux, mesure plus de 558,8 l’accompagnent.
- Page 18 ASSEMBLY ASSEMBLAGE ASSEMBLY ASSEMBLAGE TO ASSEMBLE CHANGING TABLE • Connect the two (2) Short Bars to each end of the Long Curved Bar (Fig. 14c). ASSEMBLAGE DE LA TABLE À LANGER Make sure that the knobs are both facing down and the same direction on each end (Fig.
- Page 19 ASSEMBLY ASSEMBLAGE ASSEMBLY ASSEMBLAGE 17) • Flip the changing table into its upper • Flip Changing Table over onto Playard position (Fig. 17). (Fig. 15c). • Renverser la table à langer au-dessus • Snap the two (2) buttons on the flap down onto the Playard (Fig.
- Page 20 ASSEMBLY ASSEMBLAGE ASSEMBLY ASSEMBLAGE TO USE THE CHANGING TABLE RESTRAINT SYSTEM TO REMOVE THE CHANGING TABLE POUR UTILISER LE SYSTÈME DE RETENUE DE LA TABLE À LANGER POUR ENLEVER LA TABLE À LANGER 19) • Place child on the changing table, make sure hands and arms are clear of the 20) •...
- Page 21 ASSEMBLY ASSEMBLAGE WARNING ACCESSORIES SIDE POCKET ORGANIZER POCHE DE RANGEMENT LATÉRALE Napper: Do not use this accessory if you cannot exactly follow WARNING: the instructions that come with it. Do not place hot liquids or more • Remove this accessory when a child is in the playpen. than 2 pounds in the Side Pocket Organizer.
- Page 22 WARNING WARNING FALL HAZARD WARNING: WARNING: - To help prevent falls, Failure to follow the instructions Failure to follow the instructions • Do not use this product when the infant begins to push could result in serious injury or death. could result in serious injury or death.
- Page 23 AVERTISSEMENT AVERTISSEMENT ACCESSOIRES: ou un rembourrage supplémentaire et les côtés du De Moïse produit. Ne pas utiliser cet accessoire à moins d’être en • NE JAMAIS de literie ou de rembourrage mesure de suivre précisément les instructions qui l’accompagnent. supplémentaires. •...
- Page 24 AVERTISSEMENT ASSEMBLY ASSEMBLAGE child’s neck. TO ASSEMBLE NAPPER • NEVER leave Napper in place when child is in the POUR ASSEMBLER LA NAPPER Playard. Only one child can use the Napper at any time. • TOUJOURS utiliser le système de retenue si un système de retenue est fourni avec le produit.
- Page 25 ASSEMBLY ASSEMBLAGE ASSEMBLY ASSEMBLAGE 22) • Lay the Napper fabric on a flat surface with • Connect the 2 Napper bars with the bottom side facing up. Locate the 2 Connectors together on both sides after Napper bars with Connectors (Fig. 22a). inserting each through the fabric (Fig.
- Page 26 ASSEMBLY ASSEMBLAGE WARNING ACCESSORIES 23) • Keep the Napper with the clips and leg mounts facing up (Fig. 23a). Pull the flaps of Warnings for Toy Accessories including Toy bar/Mobile the fabric over the bar housing as shown in Canopy with toys the diagram (Fig.
- Page 27 AVERTISSEMENT ASSEMBLY ASSEMBLAGE ACCESSOIRES CANOPY L’AUVENT Canopy Avertissements d’accessoires pour jouets, y compris L'Auvent Bar à jouets / Mobile / Auvent avec jouets: ATTENTION: The canopy is NOT a carry handle. ATTENTION : L'auvent n'est PAS une poignée de ADVERTISSEMENT: transport.
- Page 28 ASSEMBLY ASSEMBLAGE ASSEMBLY ASSEMBLAGE TO SECURE THE NAPPER TO THE PLAYARD • To open the canopy: Push forward on the front edge of the canopy while holding POUR FIXER LA NAPPER AU PARC the rear of canopy in place (Fig. 25b). IMPORTANT! When the Napper is in position, it must •...
- Page 29 ASSEMBLY ASSEMBLAGE ASSEMBLY ASSEMBLAGE TO FOLD REMOVABLE NAPPER POUR PLIER LA COUCHE AMOVIBLE WARNING: Des précautions doivent être prises lors du pliage et du dépliage pour éviter de se coincer les doigts. CAUTION: Do not allow children near while folding and unfolding. AVERTISSEMENT: Se debe ser prudente al ®...
- Page 30 Copyright © 2023, Baby Trend Inc., All Rights Reserved. Tous droits réservés. Copyright © 2023, Baby Trend Inc., All Rights Reserved. Tous droits réservés.
Need help?
Do you have a question about the Lil Snooze Deluxe II RC86 C Series and is the answer not in the manual?
Questions and answers