Table of Contents
Advertisement
Quick Links
ASSEMBLY INSTRUCTIONS
ZSWY-V1
TLCFLS-0009
Pure & Easy
CONTACT US:
If you have any questions about the installation of YITAHOME® products, just contact us
at +1(888)-717-8084 from Mon-Fri 8:00 AM-16:30 PM PST / Saturday 8:00 AM-12:00 PMPST
or E-mail us at: after-sale.cs@hotmail.com
Alternative method to contact us(amazon.com orders only)
1.Log into your amazon account
2.Go to "Your Orders" and find the purchase
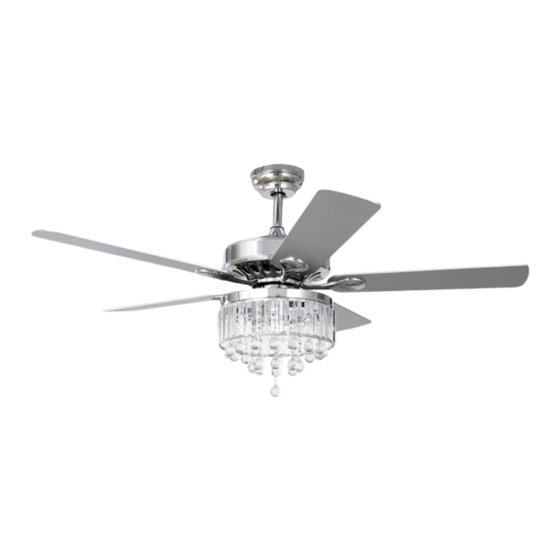
CEILING FAN
3.Click on "Contact Seller"
Advertisement
Table of Contents

Related Manuals for YitaHome TLCFLS-0009


Summary of Contents for YitaHome TLCFLS-0009
- Page 1 TLCFLS-0009 Pure & Easy CONTACT US: If you have any questions about the installation of YITAHOME® products, just contact us at +1(888)-717-8084 from Mon-Fri 8:00 AM-16:30 PM PST / Saturday 8:00 AM-12:00 PMPST or E-mail us at: after-sale.cs@hotmail.com Alternative method to contact us(amazon.com orders only) 1.Log into your amazon account...
-
Page 2: Safety Guidelines
ASSEMBLY INSTRUCTIONS ASSEMBLY INSTRUCTIONS BEFORE YOU START Thank you for purchasing a YITAHOME product. To ensure correct function and safety, please read and follow all the instructions before using the product. Tools and Materials Required SAFETY GUIDELINES Contact a licensed electrician if you are not good at performing electrical work. -
Page 3: Installing The Fan
ASSEMBLY INSTRUCTIONS ASSEMBLY INSTRUCTIONS INSTALLING THE FAN SCREWS BAG Tools Required: Phillips screwdriver, a pair of pliers, straight slot screwdriver, adjustable wrench, step ladder, and wire cutters. Item Item Qty. Qty. Reference Image Reference Image INSTALLING THE MOUNTING BRACKET ×4 ×2 The ceiling fan must be installed in the location where there is 12"(300mm) spacing from the tips of all blades to the nearest objects or walls. -
Page 4: Installing The Blade
ASSEMBLY INSTRUCTIONS ASSEMBLY INSTRUCTIONS INSTALLING THE DOWNROD 4. Refer to the Fig. on the right to mount when the ceiling is angled (Max. 15°). NOTE: The hanger must be able to withstand 100lbs (45kg) or more after the installation. REMEMBER to turn off the power before hanging the fan. Follow the steps below to hang your fan properly. 1) Remove the hair clip pin “1”... -
Page 5: Make The Electric Connections
ASSEMBLY INSTRUCTIONS ASSEMBLY INSTRUCTIONS MAKE THE ELECTRIC CONNECTIONS INSTALLING THE LIGHT KIT WARNING: To avoid possible electrical shock, be sure the electricity is turned off in the main fuse box before wiring. 1.Remove 3 mounting screws from the light kit. 1. -
Page 6: Operating Your Fan
ASSEMBLY INSTRUCTIONS ASSEMBLY INSTRUCTIONS OPERATING YOUR FAN REMOTE CONTROL SETTING AND OPERATION Turn on the power and check the fan's operation. 1. Restore electricity to the outlet box by turning the electricity on at the main The appropriate speed settings of warm or cool fuse box. -
Page 7: Important Reminders
ASSEMBLY INSTRUCTIONS ASSEMBLY INSTRUCTIONS IMPORTANT:PAIRING BETWEEN REMOTE AND RECEIVER WARNING: TO REDUCE THE RISK OF PERSONAL INJURY, DO NOT BEND THE BLADE ARM WHILE INSTALLING, BALANCING THE BLADES, OR CLEANING THE FAN. DO NOT INSERT OBJECTS BETWEEN ROTATING FAN BLADES. Within the 30s after turning "ON"... -
Page 8: Troubleshooting
ASSEMBLY INSTRUCTIONS ASSEMBLY INSTRUCTIONS TROUBLESHOOTING HOW TO USE BALANCING KITS Your fan may occasionally jerk forward or backward upon starting up. NOTE: CEILING FANS TEND TO MOVE DURING OPERATION DUE TO THE FACT THAT THEY ARE This is normal and does not affect the fan operation. MOUNTED ON A RUBBER CROMMET.
Need help?
Do you have a question about the TLCFLS-0009 and is the answer not in the manual?
Questions and answers