Table of Contents
Advertisement
Available languages
Available languages
Operator's Manual
4 Cycle
CULTIVATOR / EDGER
Model No. 316.29270
CAUTION: Before using
this product, read this
manual and follow all
Safety Rules and
Operating Instructions.
Sears, Roebuck and Co., Hoffman Estates, IL 60179, U.S.A.
Visit our Sears website: www.sears.com/craftsman
Printed in U.S.A.
•
Safety
ES
•
Assembly
•
Operation
•
Maintenance
•
Parts
•
Español
FORM NO. 769-00027A.fm
(4/03)
Advertisement
Chapters
Table of Contents

Related Manuals for Craftsman 316.2927


Summary of Contents for Craftsman 316.2927
- Page 1 Model No. 316.29270 CAUTION: Before using this product, read this manual and follow all Safety Rules and Operating Instructions. Sears, Roebuck and Co., Hoffman Estates, IL 60179, U.S.A. Visit our Sears website: www.sears.com/craftsman Printed in U.S.A. • Safety • Assembly •...
-
Page 2: Table Of Contents
Limited Warranty on Craftsman Cultivator / Edger For two (2) years from the date of purchase, if this Craftsman Equipment is maintained, lubricated, and tuned up according to the instructions to the operator’s manual, Sears will repair or replace free of charge any parts found to be defective in material or workmanship. -
Page 3: Safety
WARNING: This symbol points out important safety instructions which, if not followed, could endanger the personal safety and/or property of yourself and others. Read and follow all instructions in this manual before attempting to operate this machine. Failure to comply with these instructions may result in personal injury. -
Page 4: Maintenance And Storage
5. Be careful when cultivating in hard ground. The tines may catch in the ground and propel the cultivator forward. If this occurs, let go of the handle and do not restrain the machine. 6. Never operate the machine at high transport speeds on hard or slippery surfaces. -
Page 5: Assembly
After assembly, see OPERATION section of this manual for proper fuel and engine oil fill-up. NOTE: Reference to right or left hand side of the cultivator / edger is observed from the operating position. Removing Unit From Carton •... -
Page 6: Operation
Wheel Support Bracket The wheel support bracket is attached to the tailpiece bracket behind the cultivator / edger. It is used to adjust the wheels to a higher or lower resting position. Edger Wheel and Blade The edger wheel and blade are separate parts that do not come attached on the cultivator / edger. -
Page 7: Starting Engine
• Squeeze the throttle control to the wide open position. Refer to Figure 2. • Place right foot on the right side of cultivator wheel. • Pull the starter rope briskly 3 to 5 times or until engine attempts to run. - Page 8 • It may be necessary to lay the cultivator / edger back in a horizontal position on a flat level surface with the upper handle touching the ground. •...
-
Page 9: Maintenance Schedule
WARNING: Always stop engine and dis- connect spark plug wire before cleaning or doing any kind of maintenance on your cultivator / edger. Checking Oil WARNING: To prevent extensive engine wear and damage to the unit, always maintain the proper oil level in the crank- case. -
Page 10: Carburetor Adjustment
• When adding oil, the unit must be laid back in the horizontal position on a flat surface with the upper handle touching the ground. See Figure 8. • Refill the crankcase with 3.4 fl.oz. (100 ml.) of SAE 30 SF, SG, or SH oil. •... - Page 11 and then every 50 hours of operation thereafter. The engine must be cold when checking IMPORTANT: or adjusting the valve clearance. This task should be performed inside in a clean and dust free area. A new gasket must be used in this adjustment. A new rocker arm gasket (part # 791-182099)can be purchased from your Sears service center.
-
Page 12: Service And Storage
Push the On/Off switch to Off (O) position to stop engine and tines and disconnect spark plug to avoid accidental starting. • It may be necessary to lay the cultivator back in a horizontal position on a flat level surface with the upper handle touching the ground. •... -
Page 13: Troubleshooting
2. Squeeze the throttle control to the wide open position. 3. Place right foot on the right side of cultivator wheel. 4. Pull the starter rope briskly 3 to 5 times or until engine starts. 5. With tines off the ground, depress the... -
Page 14: Parts List
PARTS LIST Sears Craftsman 4 Cycle Cultivator / Edger Model 316.29270... - Page 15 Sears Craftsman 4 Cycle Cultivator / Edger Model 316.29270 Ref. Part No. Part Description 753-04042 Throttle Control 753-04043 Torsion Spring 791-182673 On/Off Switch 753-04044 Foam Grip 753-04045 Throttle Cable 753-04046 Upper Handle 753-04047 Upper Handle Connector 753-04048 Carriage Bolt 5/16-18 x 3.0...
- Page 16 Sears Craftsman 4 Cycle Cultivator / Edger Model 316.29270...
- Page 17 Sears Craftsman 4 Cycle Cultivator / Edger Model 316.29270 Ref. Part No. Part Description 791-182339 Engine Cover Screws 791-182651 Starter Rope Eyelet 753-04028 Engine Cover 791-182652 Eyelet Nut 791-181025 Valve Cover Screw 791-182098 Valve Cover 791-182099 Valve Cover Gasket 791-182340...
- Page 18 California / EPA emission control Warranty Statement The California air resources board, EPA (Environmental Protection Agency), and Sears are pleased to explain the mission control system warranty on your 2000 and later small off-road engine. In California and the 49 states, new small off-road engines must be designed, built and equipped to meet the states stringent anti-smog standards.
-
Page 19: Garantía
Garantía limitada de la cultivadora/ bordeadora Craftsman Por un período de dos (2) años a partir de la fecha de compra, con la condición de que a este equipo Craftsman se le realiza el mantenimiento, la lubricación y ajustes de acuerdo con las instrucciones que aparecen en el manual del operador’, Sears llevará... -
Page 20: Seguridad
ADVERTENCIA: La presencia de este símbolo indica que se trata de instrucciones importantes de seguridad que debe respetar para evitar poner en riesgo su seguridad personal y / o material y de otras personas. Lea y siga todas las instrucciones contenidas en este manual antes de intentar poner esta máquina en funcionamiento. -
Page 21: Mantenimiento Y Almacenamiento
otra zona. Espere 5 minutos antes de encender el motor. Nunca almacene la máquina o el recipiente de combustible en un espacio cerrado donde haya fuego, chispas o luz piloto (por ejemplo, hornos, calentadores de agua, calefactores, secadores de ropa, etc.) Deje que la máquina se enfríe por lo menos 5 minutos antes de guardarla. - Page 22 California / la emisión de MINISTERIO DEL MEDIO AMBIENTE controla la Declaración De la garantía la tabla(el consejo) de recursos de aire de California, el MINISTERIO DEL MEDIO AMBIENTE (la Agencia de protección de medio ambiente), y Chamusca están contento de explicar la garantía de sistema de centro de control sobre su 2000 y el pequeño motor posterior fuera de caminos.
-
Page 23: Montaje
Esta unidad es enviada sin gasolina ni IMPORTANT: aceite en el motor. Después del montaje, consulte la sección de FUNCIONAMIENTO para el correcto llenado de combustible y aceite del motor. NOTE: Desde la posición de funcionamiento, se observa la referencia a la derecha o a la izquierda de la cultivadora / bordeadora. -
Page 24: Funcionamiento
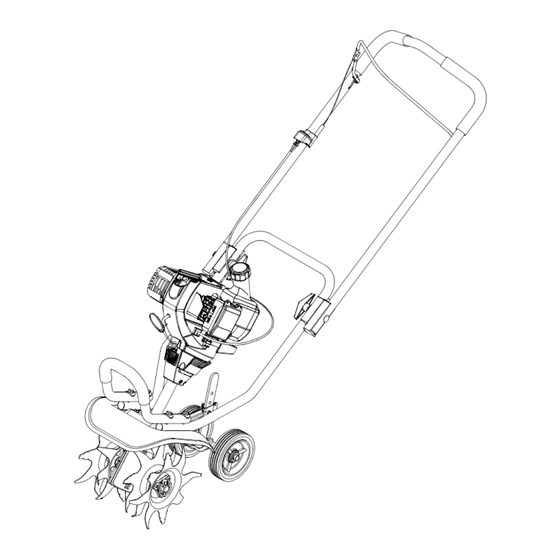
Interruptor encendido / apagado Manija Conectores Cebador Manija del arrancador Manija frontal Cultivadora Dientes Lea este manual del’operador y las reglas de seguridad antes de operar su cultivadora / bordeadora. Compare las ilustraciones con su unidad para familiarizarse con la ubicación de los distintos controles y ajustes. -
Page 25: Detención Del Motor
Detención del motor • Presione el interruptor encendido / apagado y colóquelo en posición Apagado (O) para detener el motor y los dientes. • Desconecte el cable de la bujía y póngalo de manera que haga masa contra el motor. Llenado de aceite Es extremadamente importante utilizar el aceite del tipo y peso adecuado en el cárter. - Page 26 Palanca de obturación Figura 5 • Exprima el control de regulador a la posición abierta de par en par. • Coloque el pie derecho sobre el lado derecho de rueda tiller. • Tire de la soga del arrancador enérgicamente de 3 a 5 veces o hasta que el motor intente funcionar.
- Page 27 • Ubique la chaveta de la horquilla a través del orificio y asegúrelo con una chaveta de retén. Conexión de la rueda y de la cuchilla de la bordeadora Para convertir la cultivadora en una bordeadora, siga los siguientes pasos: •...
-
Page 28: Cambio De Aceite
MANTENIMIENTO PROGRAMACIÓN Control del aceite del motor Cambio del aceite del motor Limpie el filtro de aire Control de la bujía Controle el dispositivo contra chispas Despacho de aduana de Balancín NOTE: El mantenimiento, el reemplazo(suplente), o la reparación de los dispositivos de control de emisión y el sistema pueden ser realizados por cualquier establecimiento de reparación no-del- camino de motor, el distribuidor de servicio... -
Page 29: Cambio De Aceite
Cambio de aceite • Extraiga el tapón de llenado de aceite / varilla del nivel del aceite. • Incline o aleje la unidad del filtro de aire para vaciar el aceite del orificio de llenado de aceite en un recipiente. •... - Page 30 Dispositivo contra chispas Pantalla Silenciador Aleta Ranura Figura 12 • Extraiga la pantalla del dispositivo contra chispas de la tapa del dispositivo contra chispas. • Limpie la pantalla del dispositivo contra chispas con un cepillo de alambre o reemplace la pantalla. •...
- Page 31 • Para aumentar el despacho de aduana, gire la tuerca que se adapta en sentido contrario a las agujas del reloj. Vea Figura 15. • Para disminuir el despacho de aduana, gire la tuerca que se adapta en el sentido de las agujas del reloj.
-
Page 32: Servicio Y Almacenamiento
SERVICIO Y ALMACENAMIENTO WARNING: Bajo ninguna circunstancia realice ningún tipo de ajuste a la unidad sin detener el motor cable bujía Extracción y reemplazo de los dientes NOTE: Los cuatro dientes deben ser reemplazados al mismo tiempo, debido a que se desgastan de manera pareja durante el uso normal. -
Page 33: Solución De Problemas
Problema El motor no arranca 1. Se ha desconectado el cable de la bujía. 2. El interruptor de ignición está APAGADO (O). 3. El tanque de combustible está vacío o el combustible es viejo. 4. La bombilla del cebador no está presionada’lo suficiente. - Page 34 Notes...
Need help?
Do you have a question about the 316.2927 and is the answer not in the manual?
Questions and answers