Table of Contents
Advertisement
Operator's Manual
2-Cycle
MINI-TILLER & CULTIVATOR
With Edger Attachment
Model No. 316.29256
CAUTION: Before using
this product, read this
manual and follow all
safety rules and operating
instructions.
Español, p. 19
Sears, Roebuck and Co., Hoffman Estates, IL 60179, U.S.A.
Visit our website: www.sears.com/craftsman
P/N 769-01154 (2/04)
PRINTED IN USA
Advertisement
Table of Contents

Related Manuals for Craftsman 316.29256


Summary of Contents for Craftsman 316.29256
- Page 1 Operator’s Manual 2-Cycle MINI-TILLER & CULTIVATOR With Edger Attachment Model No. 316.29256 CAUTION: Before using this product, read this manual and follow all safety rules and operating instructions. Español, p. 19 Sears, Roebuck and Co., Hoffman Estates, IL 60179, U.S.A.
-
Page 2: Table Of Contents
Full Two-Year Warranty on Craftsman Mini-Tiller and Cultivator For two (2) years from the date of purchase, if this Craftsman Equipment is maintained, lubricated, and tuned up according to the instructions to the operator’s manual, Sears will repair or replace free of charge any parts found to be defective in material or workmanship. -
Page 3: Rules For Safe Operation
RULES FOR SAFE OPERATION The purpose of safety symbols is to attract your SYMBOL MEANING attention to possible dangers. The safety symbols, and their explanations, deserve your careful attention and understanding. The safety warnings do not by Failure to obey a DANGER: themselves eliminate any danger. - Page 4 RULES FOR SAFE OPERATION • Always stop the engine and allow it to cool before filling • Do not touch the engine or muffler. These parts get the fuel tank. Never remove the cap of the fuel tank, or extremely hot from operation. They remain hot for a add fuel, when the engine is hot.
- Page 5 RULES FOR SAFE OPERATION SAFETY AND INTERNATIONAL SYMBOLS This operator's manual describes safety and international symbols and pictographs that may appear on this product. Read the operator's manual for complete safety, assembly, operating and maintenance and repair information. SYMBOL MEANING SYMBOL MEANING •...
-
Page 6: Know Your Unit
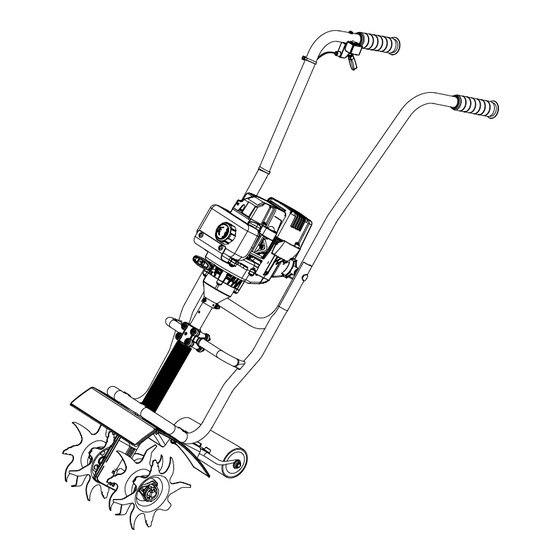
KNOW YOUR PRODUCT Applications • Cultivating sod and light to medium soil • Cultivating in garden areas, around trees, etc. • Edging STOP/OFF (O) Handgrip Throttle Control Handlebar On/Off Stop EZ Fire™ Lever Fuel Cap Primer Bulb Control START/ON (I) Starter Rope Grip Handlebar Knob... -
Page 7: Assembly Instructions
ASSEMBLY INSTRUCTIONS ASSEMBLING THE UNIT Washer Hole Before operating, position the unit’s handlebars. NOTE: You may also need to reposition the roller height Handlebar before using the cultivator. Refer to the Adjusting Bolt Knob Tine Depth section. Begin by carefully unpacking the contents and making Handlebars sure that nothing is damaged. - Page 8 ASSEMBLY INSTRUCTIONS 2. Install a carriage bolt through each of the slotted holes in the roller bracket and into the tine guard. 3. On the TOP side of the tine guard, install a lock washer and a wing nut onto each of the bolts (Fig. 3). 4.
-
Page 9: Oil And Fuel Information
Craftsman 2-cycle oil with without the fuel cap securely in place. this unit. If Craftsman 2-cycle oil is unavailable, use a good 2- Add fuel in a clean, WARNING: cycle oil designed for air-cooled engines along with a... -
Page 10: Starting/Stopping Instructions
STARTING/STOPPING INSTRUCTIONS Operate this unit only in a WARNING: OFF (O) well- ventilated outdoor area. Carbon monoxide exhaust fumes can be lethal in a confined area. Avoid accidental starting. WARNING: Make sure you are in the starting position when pulling the starter rope (Fig. -
Page 11: Operating Instructions
OPERATING INSTRUCTIONS OPERATING TIPS WARNING: Dress properly to reduce the risk of injury when operating this unit. Do not wear loose clothing or jewelry. Wear eye and ear/hearing protection. Wear heavy long pants, boots and gloves. Do not wear short pants, sandals or operate barefoot. 1. -
Page 12: Maintenance And Repair Instructions
MAINTENANCE AND REPAIR INSTRUCTIONS MAINTENANCE SCHEDULE NOTE: Maintenance, replacement, or repair of the emission control devices and system may be performed by Perform these required maintenance procedures at the any non-road engine repair establishment or a frequency stated in the table. These procedures should Sears parts and repair service center. - Page 13 MAINTENANCE AND REPAIR INSTRUCTIONS AIR FILTER MAINTENANCE Removing the Air Filter/Muffler Cover To avoid serious WARNING: personal injury, always turn the unit off and allow it to cool before you clean or service it. 1. Remove the four (4) screws securing the air Air Filter filter/muffler cover (Fig.
- Page 14 MAINTENANCE AND REPAIR INSTRUCTIONS 8. Place the muffler (with the exhaust gasket in place and Adjust Idle Speed Adjuster bolts inserted), against the engine, aligning the bolt holes. Tighten the bolts to secure the muffler to the The unit will still run WARNING: engine.
-
Page 15: Cleaning And Storage
MAINTENANCE AND REPAIR INSTRUCTIONS REPLACING THE SPARK PLUG LONG TERM STORAGE Use a Champion RDJ-7Y spark plug. The correct air gap If you plan to store the unit for an extended time: is 0.020 in. (0.5 mm). Remove the plug after every 25 1. -
Page 16: Troubleshooting Chart
TROUBLESHOOTING ENGINE WILL NOT START C A U S E A C T I O N Empty fuel tank Fill fuel tank with new fuel Primer bulb wasn't pressed enough Press primer bulb fully and slowly 10 times Engine is flooded Squeeze the trigger and pull the starter rope Old fuel Drain gas tank and add fresh fuel... -
Page 17: Specifications
SPECIFICATIONS ENGINE* Engine Type............................Air-Cooled, 2-Cycle Displacement ................................31 cc Idle Speed RPM ............................2,600-3,600 rpm Operating RPM..............................7,800+ rpm Clutch Type ................................. Centrifugal Ignition Type................................Electronic On/Off Stop Control............................Rocker Switch Spark Plug Type ............................ Champion RDJ-7Y Spark Plug Gap ..........................0.020 inch (0.50 mm) Lubrication .............................. -
Page 18: Epa Warranty Information
EPA Emission Control Warranty Statement Your Warranty Rights and Obligations The Environmental Protection Agency and Sears are pleased to explain the emission control system warranty on your 2002 and later small off-road engine. New small off-road engines must be designed, built and equipped to meet stringent anti-smog standards. - Page 19 Garantía de la cultivadora/ bordeadora Craftsman de dos años Por un período de dos (2) años a partir de la fecha de compra, con la condición de que a este equipo Craftsman se le realiza el mantenimiento, la lubricación y ajustes de acuerdo con las instrucciones que aparecen en el manual del operador’, Sears llevará...
- Page 20 NORMAS PARA UNA OPERACION SEGURA Los símbolos de seguridad se utilizan para llamar su SIMBOLO SIGNIFICADO atención sobre posibles peligros. Los símbolos de seguridad y sus explicaciones merecen toda su atención El no obedecer una y comprensión. Los símbolos de seguridad no eliminan PELIGRO: advertencia de ningún peligro por sí...
Need help?
Do you have a question about the 316.29256 and is the answer not in the manual?
Questions and answers