Table of Contents
Advertisement
Quick Links
SOLO AIRLINER
USER'S MANUAL
Rev. 2.0 - May 2022
For support, contact us at
support@virtual-fly.com
© 2022 Virtual Fly, SL
All trademarks and brand names are
trademarks or registered trademarks of their
respective owners. All rights reserved.
C. Maria Aurèlia Capmany, 21
P.I. La Fàbrica – 08297 Castellgalí (Spain)
Phone: (+34) 938 333 301
https://www.virtual-fly.com
Advertisement
Table of Contents

Related Manuals for Aircatglobal VirtualFly SOLO AIRLINER


Summary of Contents for Aircatglobal VirtualFly SOLO AIRLINER
- Page 1 SOLO AIRLINER USER’S MANUAL Rev. 2.0 - May 2022 For support, contact us at support@virtual-fly.com © 2022 Virtual Fly, SL C. Maria Aurèlia Capmany, 21 All trademarks and brand names are P.I. La Fàbrica – 08297 Castellgalí (Spain) trademarks or registered trademarks of their Phone: (+34) 938 333 301 respective owners.
-
Page 2: Table Of Contents
TABLE OF CONTENTS 1. IN THE BOX................3 9. TROUBLESHOOTING............20 2. HARDWARE SETUP 10. REMOTE ASSISTANCE...........23 2.1 CONNECTING TO PC..........4 2.2 ADJUSTING MAGNETIC LABELS ......5 11. TECHNICAL SPECIFICATIONS........24 3. SOFTWARE SETUP 3.1 INTERFACE WITH PC..........6 3.2 BOEING 737 ADD-ON..........6 4. START UP 4.1 ACTIVATING/DEACTIVATING PROCEDURES...7 4.2 START UP PROCEDURES........8 5. -
Page 3: In The Box
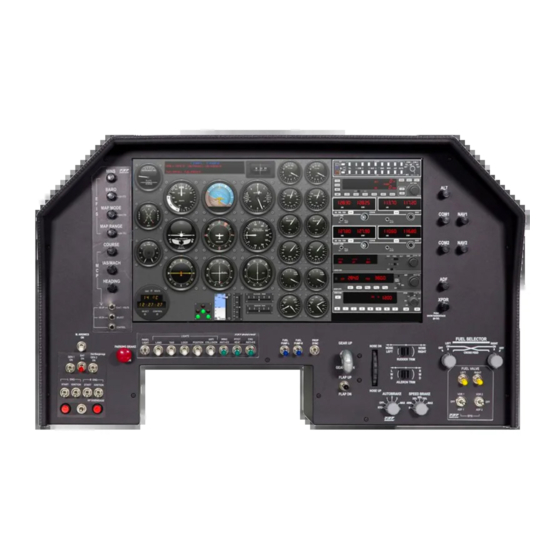
1. IN THE BOX A) SOLO Airliner Panel B) Power strip C) Network cable (Ethernet) D) Magnetic labels for Turboprop E) Magnetic labels Boeing 737 pack F) Quick Start Guide It is important to save all parts you are not going to use in case you need them in the future. -
Page 4: Hardware Setup
2. HARDWARE SETUP OPTION A: LAN Network Connection (Recommended) 2.1 CONNECTING TO PC Connect an Ethernet cable between the SOLO AIRLINER and router, and another from your PC to the router as displayed The SOLO AIRLINER has been developed to be pluggable to below. -
Page 5: Adjusting Magnetic Labels
2.2 ADJUSTING MAGNETIC LABELS ACCORDING TO AIRCRAFT TYPE The SOLO AIRLINER is a multifuncion panel, and some switches change their function depending on whether the selected aircraft is a piston, turboprop or jet. The panel incorporates two sets of magnetic labels, shown in following images, which allow you to change the designation of each switch and rotary switch to match the correct functionality. -
Page 6: Software Setup
3. SOFTWARE SETUP • VFConnect_XP: https://downloads.virtual-fly.com/ 3.1 INTERFACE WITH PC software/vfconnect/latest/vfconnect_xp.exe To interact with your PC, the SOLO AIRLINER requires installing some additional software to your PC depending on the flight simulation software you use. The SOLO AIRLINER is compatible "VFConnect3-Xplane"... -
Page 7: Start Up
4. START UP 4.1 ACTIVATING PROCEDURES 1. Start your preferred flight simulation software (MSFS, Prepar3D or X-Plane 11/12). 2. Press the push button (a) indicated below to start the "Windows" operating system of the SOLO AIRLINER' mini computer. The SOLO AIRLINER must not be disconnected while the programs are loading. -
Page 8: Start Up Procedures
The VFConnect software window will look like (a) below if it • Connected: Your device is ready to fly. is not yet connected, and like (b) if a connection has been established succesfully between computer and SOLO • Searching…: There is a communication failure between AIRLINER. -
Page 9: Selection Of Panel Type
5. PANEL SELECTION (ACCORDING TO AIRCRAFT) The aircraft best suited to be flown using the SOLO AIRLINER are those that MSFS, Prepar3D or X-Plane 11/12 incorporates The SOLO AIRLINER has been designed to operate and by default. However, planes from P3D CARENADO have been display instruments for single and twin engine planes of tested and have yielded good results. - Page 10 3. Push the "Start selected panel" button shown below and SELECTING INDICATORS PANEL the panel will automatically show the gauges and indicators The SOLO AIRLINER incorporates a 24" touchscreen, so you correspondoing to your selection. must manage it with your fingers. Follow the steps described below: 1.
-
Page 11: Engine Starting Procedures
6. ENGINE STARTING PROCEDURES The following procedures are indicated by Virtual Fly to start the plane using the SOLO AIRLINER in the simplest fashion. If you are flying a twin-engine aircraft, you must carry out indications 6, 7 and 8 again to start the right engine. Never use these procedures for pilot training or for real aviation. - Page 12 STOP PISTON ENGINES- MSFS START & STOP PISTON ENGINES- X-Plane 11/12 1. Pull on the PARKING BREAKE. To start and stop a piston engine aircraft in X-Plane 11/12, please refer to the selected aircraft's Pilot Operating Manual. 2. Move the MIXTURE lever to CUTOFF position. This can be found instide the corresponding aircraft's folder within: X-Plane 11/12\Aircraft\Laminar Research.
-
Page 13: Start & Stop For Turboprop Engines
The diagram below shows the position of every switch in the 6.2 START & STOP FOR TURBOPROP ENGINES SOLO AIRLINER along with the step that corresponds to their application when starting the turboprop engine. START PISTON ENGINES- MSFS 1. Pull on the PARKING BREAKE. 2. - Page 14 STOP TURBOPROP ENGINES- MSFS START & STOP TURBOPROP ENGINES- X-Plane 11/12 1. Pull on the PARKING BRAKE. To start and stop a turboprop engine aircraft in X-Plane 11/12, please refer to the selected aircraft's Pilot Operating Manual. 2. Switch off the FUEL VALVES switch. This can be found instide the corresponding aircraft's folder within: X-Plane 11/12\Aircraft\Laminar Research.
-
Page 15: Start & Stop For Turbofan (B-737) Engines- Only Prepar3D
6.3 START & STOP FOR TURBOFAN (B-737) ENGINES- ONLY Prepar3D Before activating GEN, do not forget to disable START. If you don't, the generator will not charge the batteries. Prepar3D: START TURBOFAN ENGINES In this type of engine, RPM and PROP mixture levers are not The diagram below shows the position of every switch in the used. - Page 16 Prepar3D: STOP TURBOFAN ENGINES 1. Pull on the PARKING BRAKE. 2. Switch off the FUEL VALVES switches. 3. Switch off the M. AVIONICS switch. 4. Switch off the GEN switch. 5. Switch off the HYD PUMP switch. 6. Switch off the BAT switch. The diagram below shows the position of every switch in the SOLO AIRLINER along with the step that corresponds to their application when starting the turboprop engine.
-
Page 17: Aerosoft B-737 Add On
7. AEROSOFT B-737 ADD-ON If you have purchased the license and installed the Aerosoft B737 add-on for your SOLO AIRLINER, follow the link below to see several tutorials where you can learn how to get the most out of this software: http://www.aerosoft.com.au/aerosoft_ australia/home.html. - Page 18 Most basic functions of the buttons on the autopilot can be To check the operation of the Radiostack, check out the activated from the Radiostack, The diagram below shows the Radiostack User's manual in: https://downloads.virtual-fly.com/ link between Radiostack buttons and buttons on the autopilot. docs/vfhub/latest/radiostack_user's_manual_rev1.0.pdf.
-
Page 19: Network
9. TROUBLESHOOTING Anomaly Possible Cause Solution Network cable nº 3 is not connected. Check connection of network cable nº 3 between SOLO and MFS / P3D / X-Plane computer. MFS / P3D / X-Plane is not running. Execute MFS / P3D / X-Plane. FSUIPC is not installed (MFS/P3D). -
Page 20: Troubleshooting
Anomaly Possible Cause Solution 1. If you are trying to use one network card to connect to your router and another one to connect directly to SOLO and it does not work, try connecting SOLO directly to your router instead PC has more than one network of connect to the pc.This way, connection will be established card. - Page 21 Anomaly Possible Cause Solution If you are using a PC which is connected to your network by Wifi, even SOLO is connected by cable, it is possible that due to interference, noi- Connection trough Wifi. se or other electromagnetic signal, connection will not be constant. It is so recommendable using always a network cable to connect SOLO to the router and your PC to the router also, or alternatively a direct cable Connection goes down,...
- Page 22 10. REMOTE SUPPORT In case you need help from Virtual Fly's technical team, there 6. Contact Virtual Fly's technical support team at support@ is the possibility to schedule a remote connection to your virtual-fly.com to: flight simulator computer and SOLO AIRLINER. For that, you •...
-
Page 23: Remote Assistance
11. TECHNICAL SPECIFICATIONS Power Supply: 110-220 VAC, mono, 50-60 Hz Nominal intensity: 0,75 A Weight: 20 kg Height: 43,7 cm Depth: 21,8 cm Width: 78.4 cm Compatibility: MSFS, Prepar3D and X-Plane 11/12 SOLO AIRLINER RS | User’s manual...
Need help?
Do you have a question about the VirtualFly SOLO AIRLINER and is the answer not in the manual?
Questions and answers