Table of Contents
Advertisement
Quick Links
V3RNIO & V3RNIO+
USER'S MANUAL
Rev 2.0 - September 2021
1. IN THE BOX
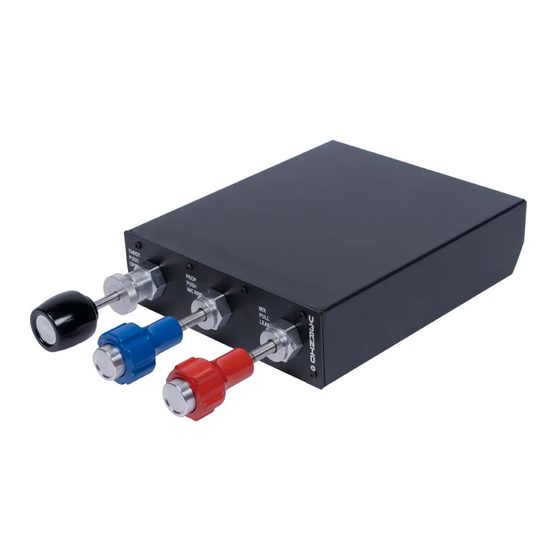
A) V3RNIO / V3RNIO+
B) Clamp
C) Allen Screws
D) Allen Key
E) USB-B to USB Cable
For support visit help.virtual-fly.com
or contact us at support@virtual-fly.com
© 2021 Virtual Fly, SL
All trademarks and brand names are
trademarks or registered trademarks of their
respective owners. All rights reserved.
C. Maria Aurèlia Capmany, 21
P.I. La Fàbrica – 08297 Castellgalí (Spain)
Phone: (+34) 983 333 301
www.virtual-fly.com
Advertisement
Table of Contents

Subscribe to Our Youtube Channel
Related Manuals for Aircatglobal Virtualfly V3RNIO


Summary of Contents for Aircatglobal Virtualfly V3RNIO
- Page 1 V3RNIO & V3RNIO+ USER’S MANUAL Rev 2.0 - September 2021 1. IN THE BOX A) V3RNIO / V3RNIO+ B) Clamp C) Allen Screws D) Allen Key E) USB-B to USB Cable For support visit help.virtual-fly.com or contact us at support@virtual-fly.com ©...
- Page 2 2. HARDWARE SETUP 2.2. Using the V3RNIO/V3RNIO+ in a 2.1 Using the V3RNIO/V3RNIO+ on a desk flight panel Use the four screws (C) to attach the clamp (B) to the To attach the V3RNIO/V3RNIO+ to your custom flight panel, V3RNIO/V3RNIO+ as seen in the picture. Now you can unscrew the six front screws to remove the cover.
- Page 3 2.3. Chaning the V3RNIO levers’ hardness 2.4. Chaning the V3RNIO+ levers’ hardness V3RNIO levers move forward and backward precisely. The THROTTLE lever from the V3RNIO+ moves forward and Tightening the screw under each lever adjusts its hardness. backward, and you can adjust the hardness by rotating the adjustment wheel, as seen in the picture.
- Page 4 3. SOFTWARE SETUP The V3RNIO/V3RNIO+ interacts with any computer as a joystick (HID), so it is compatible with any flight simulation software. Below, you have two options for setting up your If you use MSFS or X-Plane, set a blank profile to the V3RNIO/V3RNIO+ in the controls or joysticks V3RNIO/V3RNIO+ with the most popular flight simulation setup menu before using your device.
- Page 5 3.2 Using an alternative joystick configuration Since the V3RNIO/V3RNIO+ interacts with any computer Finally, restart Prepar3D and verify that the device is as a joystick (HID), it is compatible with any flight simulation configured correctly. software. Below, you have a general scheme for setting up your V3RNIO/V3RNIO+ with the most popular flight simulation software: MSFS, Prepar3D, and X-Plane.
Need help?
Do you have a question about the Virtualfly V3RNIO and is the answer not in the manual?
Questions and answers