Table of Contents
Advertisement
Quick Links
Advertisement
Table of Contents

Related Manuals for Aircatglobal VirtualFly SOLO GA


Summary of Contents for Aircatglobal VirtualFly SOLO GA
- Page 1 SOLO GA USER’S MANUAL Rev. 1.0 July 2020...
-
Page 2: Table Of Contents
TABLE OF CONTENTS 01. IDENTIFICATION OF ELEMENTS 02. INSTALLATION 03. START-UP 04. SELECTION OF PANEL TYPE (ACCORDING TO PLANE) 05. ENGINE STARTING 5.1. STARTING & STOP PISTON ENGINES (using MFS/P3D) 5.2. START & STOP PISTON ENGINES (using X-PLANE) 5.3. STARTING & STOP TURBOPROP ENGINES (using MFS/P3D) 5.4. -
Page 3: Identification Of Elements
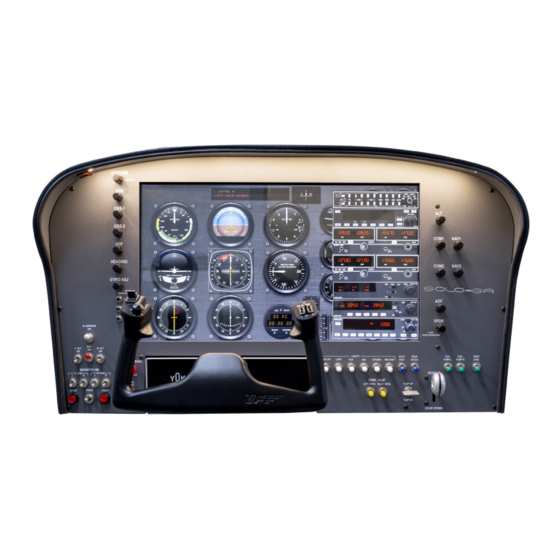
1. IDENTIFICATION OF ELEMENTS Packaging contents: 1. SOLO GA (Solo) (1 unit). 2. Multiple power socket (1 unit). 3. Network cable (1 unit). 4. 2 Magnetic labels Turboprop pack (1 unit). 5. Memory Stick (1unit). Content: User's manual, VFConnect3.exe plugin, FSUIPC and Remote session software. -
Page 4: Installation
2. INSTALLATION OPTION 1: direct The SOLO GA, hereinafter referred to as "SOLO", has been technologically developed to be fully Plug&Fly. It connects easily to any computer running the FSX hereinafter referred to as "MFS" or Prepar3D hereinafter referred to as "P3D" or X-Plane. Even so, weíll give you a series of steps to follow to install your panel. - Page 5 MFS / P3D: • Copy the "VFConnect3.exe" file from the Memory Stick in the • At this time, the "Windows" operating system and all programs MFS / P3D desktop computer. found in the SOLO computer will start automatically. (It is very im- •...
-
Page 6: Start-Up
3. START UP The SOLO incorporates a mini-computer at the back that is to be connec- • At the top “This Computer” indicates if the software Flight ted to the MFS / P3D / X-Plane computer using the previously mentioned Simulator MFS / P3D / X-Plane is detected. -
Page 7: Selection Of Panel Type (According To Plane)
4. SELECTION OF PANEL TYPE Above you can see the panel has 4 types of "GENERIC", on each of them (ACCORDING TO PLANE) you can choose the full scale of the speedometer "Airspeed Range" and type of instrument indication of direction "Directional Indicator". To select the panel according the plane you want to fly, you have to do two tasks: This instrument panel is designed to operate and display instruments for... - Page 8 • Push on the following button: Magnetic Labels pack for turboprop engines: Automatically the panel will show the gauges and indicators. Select the labels for the switches and rotaries of the panel: According the SOLO is a multifunction panel, a lot of switches change its function depending if the gauges&indicators panel selected is for piston or turboprop.
-
Page 9: Engine Starting
Starting piston engines 5. ENGINE STARTING The following procedures are indicated by VirtualFly to start the plane as simply as possible, never take these procedures for training or for real aviation. 5.1. STARTING & STOP PISTON ENGINES (USING MFS / P3D) Starting piston engines (using MFS / P3D) 1. -
Page 10: Start & Stop Piston Engines (Using X-Plane)
5.2. START & STOP PISTON ENGINES (USING X-PLANE) Refer to the aircraft manual found in: <X-Plane Installation Folder>/ Aircraft/<The Aircraft Folder>. In the aircraft manual search for the “Checklists” section. You will find detailed instructions for starting and stopping the engines. 5. -
Page 11: Starting & Stop Turboprop Engines (Using Mfs/P3D)
5.3. STARTING & STOP TURBOPROP ENGINES (USING MFS / P3D) Starting turboprop engines Starting turboprop engines (using MFS / P3D) 1. Pull on the PARKING BRAKE 2. Move the MIXTURE handle to RICH 3. Move the PROP RPM handle to HIGH 4. -
Page 12: Start & Stop Turboprop Engines (Using X-Plane)
5.4. START & STOP TURBOPROP ENGINES (USING X-PLANE) Refer to the aircraft manual found in: <X-Plane Installation Folder>/ Aircraft/<The Aircraft Folder>. In the aircraft manual search for the “Checklists” section. The switch INVERTER cannot be found in SOLO. You will find detailed instructions for starting and stopping the engines. 5. -
Page 13: Radiostack Panel
6. RADIOSTACK PANEL All the buttons of this Radisotack are tactile, so you have to push on the screen to activate them, just the numerical values have to be changed Audio panel with the real rotary knobs located at right side. &... -
Page 14: Audio Panel And Markers
Device description DUAL RECEPTION The order inwich the devices appear, if activated, is fixed: see diagram It is permitted to activate both COM1 and COM2 audio, simultaneously. on previous page. NOTE: Not all the buttons work; inoperative buttons are: MKR Sens, TEL and AUTO. - Page 15 5. HDG: Heading mode. This follows the Directional Gyro's or HSI's Display "heading bug". 1. Roll Active Mode: These can be ROL, HDG, NAV, APR and REV. 6. NAV: Navigation Mode (VOR1 or GPS). Arms the NAV mode to inter- •...
-
Page 16: Communications And Navigation
6.3. COMMUNICATIONS AND NAVIGATION 6.4. DISTANCE METERING EQUIPMENT (DME) COM & NAV equipment is integrated in the one device and is 100% This is a modified version to allow the user to choose between DME functional except "Pull test". When entering values with the key- 1 or 2. -
Page 17: Automatic Direction Finder (Adf)
6.5. AUTOMATIC DIRECTION FINDER (ADF) CHRONO MODE - Elapsed Time (ET) The ET mode allows a chrono with Minutes and Seconds (until 59:59). This is 100% functional; the ADF and BFO buttons are working but per- The chrono begins to count when you press SET/RST push button (also form no actions. -
Page 18: Transponder Xpdr
6.6. TRANSPONDER XPDR: 100% functional including the flight level in ALT mode. When inputting values with the keyboard, a dash appears in the digit that waits to be changed. Mode selector: This can be changed by pressing the caption (OFF, SBY, TST, ON, ALT) or with the rotatory knob. -
Page 19: Multiple Solo Ga Or Multiple Mfs
7. MULTIPLE SOLO GA OR MULTIPLE MFS / P3D / X-PLANE COMPUTER IN THE SAME NETWORK If you connect more than one SOLO to the same network, you should be aware that to use them simultaneously you should have more than one computers using MFS / P3D / X-Plane connected to the same network and indicate the right MFS / P3D / X-Plane computer to each SOLO, as detailed below. -
Page 20: Troubleshooting
1. Press combo key Windows + R. 2. Write “firewall.cpl” on the window that has appeared. 8. TROUBLESHOOTING ANOMALY: THE MFS / P3D /X-PLANE DOESN'T CONNECT TO THE PANEL 3. A Windows firewall window should appear. 4. Depending on your windows version: POSSIBLE CAUSE 1: Network cable nº... - Page 21 connecting SOLO directly to your router instead of connect to the pc. This way, connection will be established through the network LAN. 2. If you have connected SOLO directly to your PC and your PC has the other network sockets free, try connecting SOLO to the PC using another network card.
- Page 22 4. Make sure that the options “Obtain an IP address automatically” and ANOMALY: CONNECTION GOES DOWN, IS INTERMITTENT OR “Obtain DNS server address automatically” are chosen. INDICATORS MOVES SHARPLY 5. If still there is no connection between SOLO and your PC after the pro- cess, try rebooting SOLO and your PC.
-
Page 23: What Is New On This Version
9. WHAT IS NEW ON THIS VERSION 9. WHAT IS NEW ON THIS VERSION - USER’S MANUAL SOLO GA... -
Page 24: Remote Session
10. REMOTE ASSISTANCE In case you need help from VirtualFly technical service, there is the pos- o Take note of the ID code that appear on the screen, as the next sibility to make a remote connection to your SOLO. For that, you should example: do the next: 1. -
Page 25: Technical Specifications
11. TECHNICAL SPECIFICATIONS Power Supply: 110-220 VAC, mono, 50-60 Hz Nominal intensity: 0,75 A Weight: 20 kg Height: 43,7 cm Depth: 21,8 cm Width: 79,4 cm Compatibility: FSX or Prepar3d and X-Plane 11. TECHNICAL SPECIFICATIONS - USER’S MANUAL SOLO GA... - Page 26 VIRTUAL FLY HEADQUARTERS c. Morales, 39 bajos 08029 Barcelona (Spain) R & D CENTER - SHOWROOM c. Maria Aurèlia Capmany, 29 P. I. La Fàbrica 08297 Castellgalí (Spain) T. (+34) 938 333 301 info@virtual-fly.com www.virtual-fly.com...
Need help?
Do you have a question about the VirtualFly SOLO GA and is the answer not in the manual?
Questions and answers