
Subscribe to Our Youtube Channel
Related Manuals for Costway FP10194US


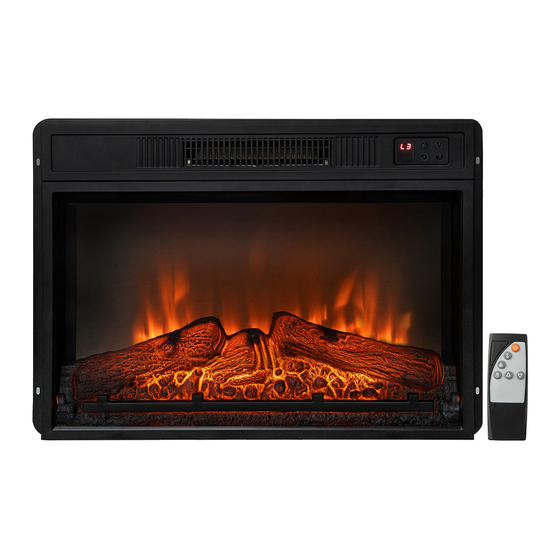
Summary of Contents for Costway FP10194US
- Page 1 USER’S MANUAL 23" Insert Fireplace Heater FP10194US THIS INSTRUCTION BOOKLET CONTAINS IMPORTANT SAFETY INFORMATION. PLEASE READ AND KEEP FOR FUTURE REFERENCE.
-
Page 2: Before You Start
Before You Start Please read all instructions carefully. Retain instructions for future reference. Separate and count all parts and hardware. Read through each step carefully and follow the proper order. We recommend that, where possible, all items are assembled near to the area in which they will be placed in use, to avoid moving the product unnecessarily once assembled. - Page 3 When using electrical appliances, basic safety precautions should always be followed including the following: READ ALL INSTRUCTIONS BEFORE USE 1. Read all instructions before using this heater. 2. Do not use this heater outdoors. 3. This heater is not intended for use in bathrooms, laundry areas and similar indoor locations.
- Page 4 ⚠ WARNING: This heater is hot when in use.To avoid burns, do not let bare skin touch hot surfaces. If provided, use handles when moving the heater. Keep combustible material, such as furniture, pillows, bedding, papers, clothes,and curtains at least 3ft (0.9m) from the front of the heater and keep them away from the side or rear.
-
Page 5: Technical Specification
TECHNICAL SPECIFICATION Model Number SF103-23G/FP10194US-BK Dimensions (W x D x H) 23” x 5.04” x 17.1” Net Weight 16.1 lb... -
Page 6: Assembly Instruction
ASSEMBLY INSTRUCTION Estimated Time for Assembly 20:00 STEP 1 Take out the unit from the box and layout all the spare parts for easy assembly. Make sure all small items are not left in packaging materials. ⚠CAUTION • This unit has a glass front panel. Use extreme caution when handling glass to prevent personal injury or damage. - Page 7 STEP 3 Carefully set the unit from the back of the mantel and center it in the opening. Check the alignment and attach the unit of the mantel by inserting screws through the drilled holes on the trim of the mantel. NOTE: Do not attempt to install the unit from the front of the mantel.
-
Page 8: User Instruction
USER INSTRUCTION Before use Check that the air intake and exhaust is not covered or obstructed in anyway. Keep combustible objects at least 3ft away from the unit. Plug the unit to a grounded power socket. Grounding This product must be grounded. If it should malfunction or breakdown, grounding provides a path of least resistance for electric current to reduce the risk of electric shock. - Page 9 USER INSTRUCTION (CONTROL PANEL) Flame Control Power Button Display Function Indicator Heater Control Timer Control Control Panel The control panel is located on the top right corner of the unit. Power ON / OFF Press the power button to turn on the unit. Press again to turn off the unit. NOTE: There is a thermostat limiter inside the unit.
-
Page 10: Heater Control
Heater Control Press the heater control to turn on and off the heater. When the heater is turned on, press and hold the heater control button for 5 seconds to enter temperature adjustment mode. The LED indicator is red. In adjustment mode, the display will flashes. - Page 11 USER INSTRUCTION (REMOTE CONTROL) Heater Control Power Button Heater Up Flame Control Heater Down Timer Control USER INSTRUCTION (REMOTE CONTROL) Remote Control The operation of the remote control buttons work the same as the button on the control panel. NOTE: The remote control cannot be used to switch between degree Fahrenheit and degree Celsius.
-
Page 12: Care And Maintenance
To replace the bracket, simply push it into the remote control. Make sure the bracket snaps into position. NOTE: Remove battery from remote control if not use for an extended period of time. ⚠CAUTION / WARNING • Dispose old / used battery at a suitable recycling point or according to local regulations. -
Page 13: Troubleshooting
TROUBLE SHOOTING Problem Solution Make sure the unit is plugged into The unit does not turn on a standard 120V grounded power source. Press the power button on the control panel. Flame effect is on, but there is no Open the top and back panel to flame effect check if the flame spindle has fallen off from the spindle motor. - Page 14 Replacements for missing or damaged parts will be shipped ASAP ! US office: Fontana UK office: Ipswich AU office: Truganina DE office: Hamburg FR office: Saint Vigor d'Ymonville PL office: Gdańsk Contact Us! US:cs.us@costway.com Do NOT return this item. UK:cs.uk@costway.com AU:cs.au@costway.com...
Need help?
Do you have a question about the FP10194US and is the answer not in the manual?
Questions and answers