
Related Manuals for Thinkware D1K32D


Summary of Contents for Thinkware D1K32D
- Page 1 D1K32D User Guide This product records videos while the vehicle is operating. Read and follow the instructions in this guide to properly use and maintain the product.
- Page 2 THINKWARE is not responsible for any loss caused by an accident, nor is it responsible for providing any support regarding the outcome of an accident.
-
Page 3: Table Of Contents
Contents Safety information 5. Using the PC viewer 5.1 System requirements 1. Product overview 5.2 PC viewer for Windows 1.1 Included items 5.2.1 Installing the PC viewer (for Windows) 1.1.1 Standard items 5.2.2 PC viewer screen layout (for Windows) 23 1.2 Part names 5.2.3 Playing recorded videos on the PC viewer (for Windows) -
Page 4: Safety Information
Safety information Read the following safety information to properly use the product. Safety symbols in this guide "Warning" - Indicates a potential hazard which, if not avoided, may result in injury or death. "Caution" - Indicates a potential hazard which, if not avoided, may result in minor injury or property damage. "Note"... - Page 5 Doing so may result in electrical fire or electrocution. • Use only genuine accessories from THINKWARE or an authorized THINKWARE dealer. THINKWARE does not guarantee compatibility and normal operation of third-party accessories.
- Page 6 • THINKWARE is NOT responsible for the loss of any recorded video during operation. • Although the device was designed to withstand high-impact car collisions, THINKWARE does not guarantee the recording of accidents when the device is damaged as a result of the accident.
-
Page 7: Product Overview
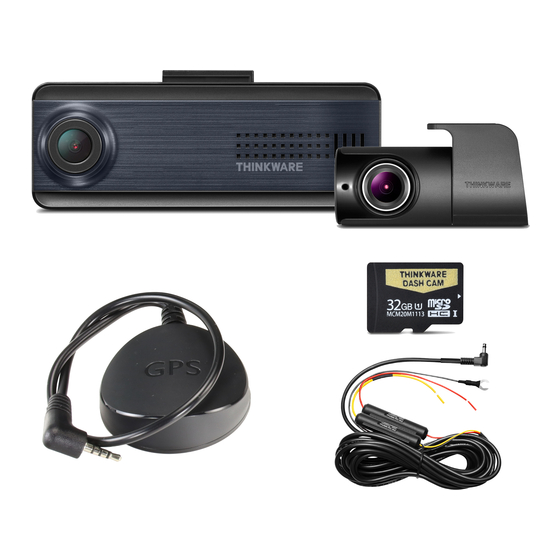
1. Product overview 1.1 Included items Ensure that all the items are included when you open the product box. 1.1.1 Standard items Front camera (main unit) Rear camera Mount Hardwiring cable External GPS receiver Adhesive cable holder microSD memory card Quick start guide &... -
Page 8: Part Names
Product overview 1.2 Part names 1.2.1 Front camera (main unit) - front view Mount connector Used to connect the mount. DC-IN power port Used to connect the power cable. GPS port Used to connect the external GPS receiver. V-IN input port Used to connect the Front camera lens rear camera. -
Page 9: Rear Camera
• Ensure that the memory card is in the correct direction before inserting it into the product. The memory card slot or the memory card may be damaged if it is inserted incorrectly. • Use only authentic memory cards from THINKWARE. THINKWARE does not guarantee the compatibility and normal operation of third-party memory cards. -
Page 10: Installing The Product
2. Installing the product 2.1 Installing the front camera (main unit) Follow the instructions to properly install the product. 2.1.1 Selecting an installation location Select an installation location that can record the entire view in front of the vehicle without obstructing the driver’s vision. - Page 11 Installing the product Remove the protective film from the adhesive mount, and then press the mount to the installation location. ➊ ➊ ➋ ➋ Remove the product from the mount and push the mount against the windshield to ensure that the ➋...
-
Page 12: Connecting The Power Cable
• Use the authentic THINKWARE continuous power cable only. Using other manufacturer’s cable may damage the product or cause electrocution due to the voltage difference. - Page 13 Installing the product Connect the BATTERY wire to a fuse leg of the continuous power terminal and connect the ACC wire to a fuse leg of the normal (ACC) terminal. Check the fuse panel’s input and output contact points by using an electrical tester. Place the fuses back into their locations on the fuse panel, connecting each fuse leg with the wire to the output contact point and taking care not to change the fuse position.
- Page 14 Installing the product Connect the product to THINKWARE DASH CAM LINK on your smartphone and adjust the camera angle so that the hood of the vehicle covers 1/4 - 1/8 of the screen while viewing the live view screen, as shown in the image to the left.
-
Page 15: Installing The Rear Camera
Installing the product 2.2 Installing the rear camera Refer to the following instructions to properly install the rear camera. 2.2.1 Selecting an installation location Select a location on the rear windshield where there is no defrost grid wire and the camera can record the entire rear view. -
Page 16: Connecting The Rear Camera Cable
Installing the product Attach the product with the THINKWARE logo facing indoors and press the adhesive tape firmly to secure the camera. If the product is fixed in reverse, the rear view will be recorded upside down. Adjust the camera's vertical angle. -
Page 17: Using Recording Features
Play videos on Window/Mac computer or using the Thinkware mobile app. If you play videos by inserting the memory card in devices such as a smartphone or a tablet PC, the video files may be lost. A file name is composed of the recording start date and time, and the recording option. -
Page 18: Using The Continuous Recording Feature
Using recording features 3.3 Using the continuous recording feature Connect the power cable to the product’s DC-IN power port and then turn on the vehicle’s electrical accessories or start the engine. The status LED and the voice guide are turned on, and the continuous recording starts. - Page 19 Using recording features • Parking mode operates only when the hardwiring cable is connected. The hardwiring cable must be professionally installed to the vehicle by a trained mechanic. • To use all recording modes, insert a memory card into the product. •...
-
Page 20: Using The Super Night Vision
Using recording features 3.6 Using the Super Night Vision With the Super Night Vision feature, you can record videos that are much brighter than videos recorded without this feature. This feature is enabled by real-time image signal processing (ISP) to improve the brightness of recorded videos while parking at night. -
Page 21: Using The Mobile Viewer
4. Using the mobile viewer You can view and manage recorded videos and configure various product features on your smartphone. • One of the following environments is required to use the THINKWARE DASH CAM LINK application: - Android 7.0 (Nougat) or higher - iOS 11.4 or higher... -
Page 22: Using The Pc Viewer
Insert the memory card into a memory card reader connected to your PC. Run the installation file, and complete the installation according to the instructions given in the installation wizard. After the installation is complete, there will be a shortcut icon to THINKWARE Dashcam Viewer. -
Page 23: Pc Viewer Screen Layout (For Windows)
Using the PC viewer 5.2.2 PC viewer screen layout (for Windows) The following provides brief information about the PC viewer's screen layout. ➍ ➎ ➋ ➌ ➊ ➏ ➐ ➑ ➒ ➓ Number Description Open a file, or save a video with a different name. ➊... -
Page 24: Playing Recorded Videos On The Pc Viewer (For Windows)
Using the PC viewer 5.2.3 Playing recorded videos on the PC viewer (for Windows) Follow the instructions to play recorded videos. Turn off the product and remove the memory card. Insert the memory card into a memory card reader connected to your PC. Double-click the shortcut to the PC viewer ( ) to open the program. -
Page 25: Pc Viewer Screen Layout (For Mac)
Using the PC viewer 5.2.4 PC viewer screen layout (for Mac) The following provides brief information about the PC viewer's screen layout. ➊ ➋ ➌ ➍ ➎ ➏ ➐ ➑ ➒ ➓ Number Description Set the language for the PC viewer. ➊... -
Page 26: Playing Recorded Videos On The Pc Viewer (For Mac)
Using the PC viewer 5.2.5 Playing recorded videos on the PC viewer (for Mac) Follow the instructions to play recorded videos. Turn off the product and remove the memory card. Insert the memory card into your Mac using a SD card reader or SD card adapter provided. Open the PC viewer. -
Page 27: Settings
6. Settings You can set the product features according to your needs and preferences using the mobile viewer or the PC viewer. The following procedures are based on the mobile viewer. The product will stop recording while configuring settings on the mobile viewer. 6.1 Managing the memory card From the mobile viewer, tap Dash Cam settings Memory Card Settings to manage the memory card settings. -
Page 28: Setting Road Safety Features
Settings Options Description Select from Lowest/Low/Mid/High/ Highest for the motion detection mode Motion Detection Sensitivity sensitivity. Record Timer Select from Disabled/3hrs/6hrs/12hrs/24hrs/48hrs/72hrs for the record time. Battery Protection Select from Enabled/Disabled for the battery protection. Battery Cutoff voltage Select from 12V (11.6-12.3)/24V (23.2-24.6) for the battery cutoff voltage. Wintertime Battery Protection Select the month(s) to apply the battery protection feature. -
Page 29: Configuring The System Settings
Settings 6.5 Configuring the system settings From the mobile viewer, tap Dash Cam Settings System Settings to configure the hardware system > settings. Options Description Language Select the desired language. Volume Select the desired volume level for each feature (Safety Cameras/ADAS/System). Time Zone Select the desired time zone. -
Page 30: Accessing The Product Information
7. Accessing the product information New users may benefit from the basic product information that can be accessed from the Menu screen. 7.1 Viewing the product information From the mobile viewer, tap Dash Cam Info to view product information. The following product information will be displayed on the screen. -
Page 31: Upgrading The Firmware
Follow the instructions to upgrade the firmware. On your PC, open a web browser and go to http://www.thinkware.com/Support/Download. Select the product and download the latest firmware upgrade file. -
Page 32: Troubleshooting
Every product requested for repair is regarded as a device that has had its data backed up. The customer service center does not back up your data. THINKWARE is not responsible for any loss, such as data loss. -
Page 33: Specifications
To see the product specifications, refer to the following table. Item Specification Remarks Model name D1K32D Dimensions / Weight 98.5 x 34 x 22 mm / 54 g - UHS-1: 16 GB, 32 GB, 64 GB, 128GB Memory microSD memory card... - Page 34 Ver. 1.0 (Sep. 2022)
Need help?
Do you have a question about the D1K32D and is the answer not in the manual?
Questions and answers