
Related Manuals for G.S.M Activate AD4IN1V8

Summary of Contents for G.S.M Activate AD4IN1V8
- Page 1 2G / 4G GSM Auto Dialler & Speech Module Page 1 Model number 2G /4G - AD4IN1V8 - SPEECH...
- Page 2 Product Information Our AD4IN1V4 SPEECH Auto Dialler is a versatile unit which can be attached to many of your electronic devices in your homes, workplace, gardens or wherever you may need it. It will alert you using GSM technology by sending a text message or phone call to your mobile phone or landline.
-
Page 3: Important - Please Read
Instructions SIM Active Function Our GSM Auto Dialler comes with a SIM Active function meaning that it will send a message every six weeks to a preprogrammed number we at GSM Activate own to prevent the SIM card being shut down due to inactivity. IMPORTANT - PLEASE READ Please make sure you disconnect the power when you fit the simcard. -
Page 4: Dip Switch
Dipswitch The dialler can work on 2G & 4G networks. The module works worldwide with all simcards (see page 3 for applicable bands). You can choose which frequency the unit will use at the start by using the dipswitch combinations below Dipswitch 1 Set to OFF = Unit boots up in 2G Dipswitch 1 Set to ON... - Page 5 How to Program the SMS Text Message You can now change the alarm message for inputs 2, 3 & 4 to your own choosing allowing you to know which input has been triggered. To change the message send the text command as follows. #MESS1=YOUR MESSSAGE# The default message is - “Alarm not Acknowledged”...
-
Page 6: Alarm=Off
How to Use The GSM Auto Dialler The Auto Dialler has four independent input’s Input 1 = Terminal 1 connection. (Negatively triggered) pulled to ground Input 2 = Terminal 2 connection. (Negatively triggered) pulled to ground Input 3 = Terminal 3 connection. (Negatively triggered) pulled to ground Input 4 = Terminal 4 connection. - Page 7 How to Use the Relay Output Auto Relay Trigger Input On (see below) The Auto Dialler has an 8 amp volt free contact relay output which can be used to switch on external electric devices such as lighting, sirens etc. By texting the unit you can turn the relay ON or OFF.
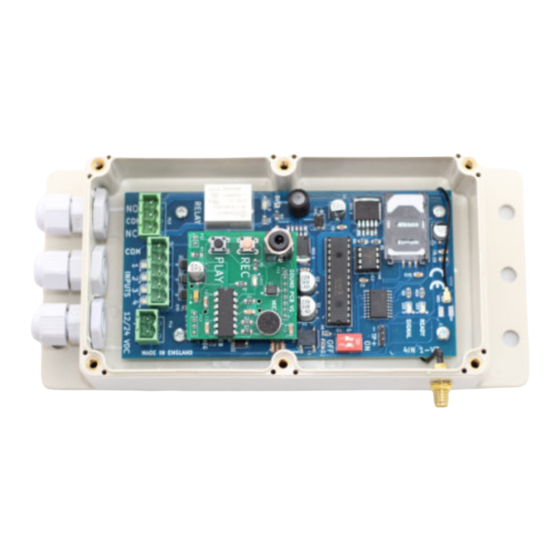
- Page 8 Speech Module Board The GSM Auto Dialler now has a Speech plug in board, so you can record a message which will be sent by phone call to the five users in sequence that has to be acknowledged by the recipient. Therefore, alerting the Auto Dialler that you have received the message. Recording a message To record a message, hold down the pink record button and speak as clearly as possible into the microphone.
- Page 9 Inputs As you can see in the circuit diagram above the inputs can be activated by pulling input 1, 2,3 & 4 to ground. Alternatively, input 4 can be triggered by pulling to ground or if the link is applied using a positive trigger. Relay Output - Volt Free Contact The relay has common, normally open and normally closed contacts which are capable of 8 Amp loads.
-
Page 10: Quick Reference
Quick Reference Different Plug In Boards Different plug in boards are available to purchase from our website or by calling or emailing the sales team on the below contact details. These add the following functionality to the Auto Dialler 8 Input Auto Dialler - high and low triggering Speech Auto Dialler with recorded message Wireless Auto Dialler with 120ft range wireless sensors For more information or technical support, please browse the FAQ’s on our website...
Need help?
Do you have a question about the AD4IN1V8 and is the answer not in the manual?
Questions and answers