Table of Contents
Advertisement
Quick Links
Hemolyzer
User Manual
Norma Instruments Zrt.
Address: Papírgyár u. 58-59,
H1038, Budapest, Hungary
www.normadiagnostika.com
5 NG Autosampler
®
Analyticon
Biotechnologies GmbH
Am Muehlenberg 10
35104 Lichtenfels - Germany
info@analyticon-diagnostics.com
www.analyticon-diagnostics.com
agile - affordable - accurate
Advertisement
Table of Contents

Related Manuals for Analyticon Hemolyzer 5 NG


Summary of Contents for Analyticon Hemolyzer 5 NG
- Page 1 Hemolyzer 5 NG Autosampler ® User Manual Analyticon Norma Instruments Zrt. Biotechnologies GmbH Address: Papírgyár u. 58-59, Am Muehlenberg 10 H1038, Budapest, Hungary 35104 Lichtenfels - Germany www.normadiagnostika.com info@analyticon-diagnostics.com www.analyticon-diagnostics.com agile - affordable - accurate...
-
Page 3: Table Of Contents
Limitations Safety measures, notes Symbols on the outside of the Autosampler Technical contact Warranty Package contents Installation requirements Identification of parts Front view Rear view Side view Tray Assembled view Installation Adjustments Operation Autosampler functions in Hemolyzer 5 NG software... - Page 4 Autosampler NG Running samples using Autosampler Selected samples mode Full Scan Mode Define individual sample information (optional) Automatic scanning Pause – Resume operation Disassembly for storage or transportation Maintenance Specifications Troubleshooting...
-
Page 5: Introduction
Analyticon Autosampler is an accessory for Analyticon Hemolyzer 5 NG automated hematology analyzer series with closed sample vial opening. Installing the Autosampler allows the Hemolyzer 5 NG processing up to 50 samples without operator interaction. The Autosampler features built-in sample mixing and sample barcode scanning. -
Page 6: Features
Features Operation when connected to Hemolyzer 5 NG analyzer: selected or continuous loading of vials into Hemolyzer 5 NG’s closed sample vial opening Vial and cap detection (vials without cap, or empty vial positions... -
Page 7: Limitations
User Manual Limitations The Autosampler is inoperable on its own and can only be used with Analyticon Hemolyzer 5 NG automated hematology analyzers with support for closed sample vials. The Autosampler supports the following primary blood collection vials: BD Vacutainer and Greiner Vacuette. -
Page 8: Safety Measures, Notes
– this could block the movement of the pickup arm Do not move the Autosampler during operation When relocating Hemolyzer 5 NG equipped with Autosampler, never lift the assembly by the base plate. The plate is not designed to bear the weight of the two devices. -
Page 9: Symbols On The Outside Of The Autosampler
Your local dealer is always ready to help you in case of malfunction. Please use the support@analyticon-diagnostics.com email address to contact the manufacturer directly. Analyticon will be doing its best to resolve your problems either directly or indirectly with the help of its local representative. -
Page 10: Warranty
Autosampler NG Warranty The Autosampler comes with a one-year manufacturer’s warranty against workmanship defects. Warranty claims must be made through your local representative. Your supplier will only be able to repair and warrant operation of the analyzer as per its specifications if all service actions are performed by qualified service personnel, and the warranty label is intact. -
Page 11: Package Contents
User Manual 2. Package contents electrical power cord Autosampler USB 2.0 cable 2 trays for 4 instrument feet power supply 50 vials each for Hemolyzer 5 Model: Sunny SYS1548-6524-T2 baseplate Grounding + spare O-rings for the gripper... -
Page 12: Installation Requirements
H = 500, D = 500, W = 500 (mm, minimum) Electrical: An additional power outlet is required for operation; the Autosampler and the Hemolyzer 5 NG must be powered from the same power network. -
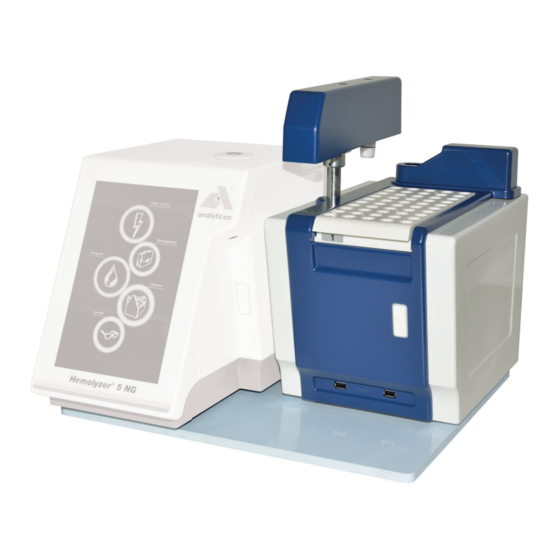
Page 13: Identification Of Parts
The installation procedure requires alteration to the main device (Hemolyzer 5 NG). Installation must be carried out by trained professionals only Hemolyzer 5 NG analyzer must run the newest software version that supports Autosampler operation. 4. Identification of parts Front view... -
Page 14: Rear View
Autosampler NG Rear view Picking arm Mixer cover (retracted position) Power connector Exit opening for USB B (to Hemolyzer fallen vial 5 NG) socket Side view Picking arm Mixing (retracted position) position Tray (inserted) Mixer cover (The barcode scanner is inside) Power button... -
Page 15: Tray
User Manual Tray ID pins Vial 1 Vial 5 Vial 6 Vial 46 Vial50 Make sure that the tray is inserted properly. Assembled view Hemolyzer Mixing 5 NG’s position and closed vial barcode opening scanner Picking arm (retracted) Tray baseplate Hemolyzer Autosampler 5 NG side... -
Page 16: Installation
Autosampler NG 5. Installation For Installation details of the Analyticon Autosampler please refer to the Installation Guide. Please contact your local distributor for further information. Installation must be carried out by a trained service engineer. The procedure consists of the following:... -
Page 17: Operation
User Manual 6. Operation WARNING! Device must be operated by trained operator only Power on: Briefly press the button in the front Power off: Press and hold the button in the front The power button has an illuminated frame. The color of this frame is providing status information. - Page 18 EAN8 UPC-E Codabar Code93 Code39 (Regular) Code 39 (FullASCII) Code 128 Pause – resume operation: Autosampler can be paused by: Pulling out the tray A quick press on the Autosampler power button Stopping operation using Hemolyzer 5 NG’s user interface...
-
Page 19: Autosampler Functions In Hemolyzer 5 Ng Software
User Manual 7. Autosampler functions in Hemolyzer 5 NG software When the Hemolyzer 5 NG operating software detects the presence of the Autosampler, an Autosampler symbol will be displayed in the upper left of the screen of Hemolyzer 5 NG. - Page 20 Autosampler NG Autosampler status symbols: Diagnostic / Running. Service mode Running paused by user or due to an error. No tray found Tray I loaded Tray II loaded Tray III loaded Autosampler operation aborted. Going to standby (sleep) mode Autosampler startup in progress.
-
Page 21: Running Samples Using Autosampler
Tapping on Press to Init will automatically start Hemolyzer 5 NG’s regular startup procedure (internal tests and blank measurement) to reach ready to operate status. Autosampler will also perform its startup and test sequence and will report the result to Hemolyzer 5 NG. -
Page 22: Selected Samples Mode
Hemolyzer 5 NG processes the sample. Operation is overlapped; upon feeding a vial to Hemolyzer 5 NG, the next vial will be detected and moved to the mixing position. After the vial has been processed, the Autosampler will put it back to its original location in the tray. - Page 23 User Manual Remove: The sample is removed from the list of samples to be processed. Repeat “Add” for as many vials as many you wish to process. You can now tap “START”. Autosampler will start processing selected samples. Autosampler will only process the sample positions defined above.
-
Page 24: Full Scan Mode
Autosampler NG Possible vial position symbols Position Vial back in tray, selected for waiting for processing results No vial was Vial back in tray, found (X) results available. Barcode OK / Vial found (*) Barcode missing Vial is in the Vial will be rerun. -
Page 25: Define Individual Sample Information (Optional)
User Manual Define individual sample information (optional) Tap on a vial position to access data entry screen. When you are done, swipe back. -
Page 26: Automatic Scanning
After mixing and barcode scanning is finished, the arm will pick the vial and place it into HEMOLYZER 5 Hemolyzer 5 NG’s closed vial sample opening. Hemolyzer 5 NG processes the PICK sample AND the arm will go and... - Page 27 By now the mixing of the following sample is complete, and the arm can feed it into HEMOLYZER Hemolyzer 5 NG’s closed vial 5 NG sample opening. HEMOLYZER The process continues with 5 NG PICK picking the upcoming vial.
-
Page 28: Pause - Resume Operation
Autosampler NG Pause – Resume operation Description Status light Operation paused by User flashing yellow Tap on PAUSE or tap the power button of the Autosampler Tap on RESUME or tap the power button of the Autosampler again... -
Page 29: Disassembly For Storage Or Transportation
User Manual 8. Disassembly for storage or transportation For safe transportation to retaining the condition of the device during storage or shipment, the device should be put back in its original packaging. Make sure that the device is in its “standby” mode and position: the arm is lowered and residing next to the tray (sleep position). -
Page 30: Specifications
Autosampler NG 10. Specifications Compatible analyzer(s) Analyticon Hemolyzer 5 NG; closed mode Accessory Baseplate, 2x sample trays, power supply Capacity 50 primary blood collection vials Supported vials Greiner Vacuette; BD Vacutainer • Full sequence operation (full tray scan) – can be... -
Page 31: Troubleshooting
/ touched moving obstructed), and tap operator parts, tray was “Resume” in Hemolyzer 5 interaction dislocated If the problem persists, disconnect USB cable between Hemolyzer 5 NG and Autosampler and contact Service. Use Hemolyzer 5 NG with manual sample feeding... - Page 32 Autosampler NG...
Need help?
Do you have a question about the Hemolyzer 5 NG and is the answer not in the manual?
Questions and answers