Table of Contents
Advertisement
Available languages
Available languages
Advertisement
Table of Contents

Related Manuals for Analyticon Combi Scan 100


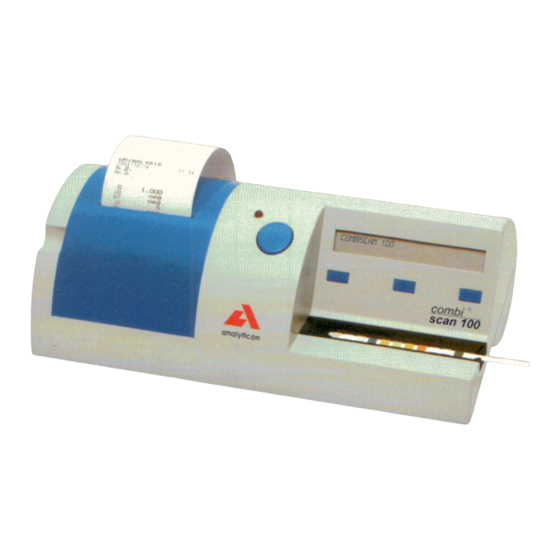
Summary of Contents for Analyticon Combi Scan 100
- Page 2 Contenuti 1. INTRODUZIONE ……………………………………………………………………………….……………………...2 Metodologia del test dell’urina …………………………………………………………………………………..2 Le strisce per il test ……………………………………………………………………………………………..2 2. DESCRIZIONE DELL’APPARECCHIO …...………………………………………………………………………..4 2.1 Lista delle parti contenute nella confezione ………………………………………………………….…………5 3. INSTALLAZIONE ..…………………………………………………………………………………………………….6 4. FUNZIONAMENTO ……………………………………………………………………………………………………7 4.1 Visione globale del sistema Menu ………….……………………………………………………………………7 Worklist ……………………………………………………………………………………………………………..7 4.2.1 Worklist con la tastiera ………………………………………………………………………………………8...
- Page 3 Bilirubina Urobilinogeno Chetoni Acido Ascorbico Glucosio Proteine Sangue Nitriti Leucociti Peso Specifico Prima di utilizzare le strisce Combi Screen 11SYS leggere attentamente le istruzioni relative! Il misuratore può essere usato esclusivamente con le strisce per il test delle urine Combi Screen 11SYS !
- Page 4 I connettori di interfacciamento sono posizionati sul retro della macchina. Il lettore esterno di codici a barre o la tastiera possono essere connessi al connettore “keyboard” (PS2). Il computer host può essere connesso alla porta USB o alla porta seriale. Per usare l’interfaccia seriale RS232 è necessario un cavo con il connettore appropriato.
- Page 5 4. Funzionamento 4.1 Visione globale del sistema Menu ® Il software del Combi Scan 100 è dotato di un’interfaccia utente che abilita tutte le impostazioni specifiche di laboratorio e le funzioni ricorrenti selezionabili dai tasti. ® Quando il Combi Scan 100 è...
- Page 6 4.4 Composizione del Menu ® Il menu Setup è adatto a personalizzare il Combi Scan 100 in armonia con le preferenze individuali o con il metodo di lav oro. Selezionando questo menu è possibile configurare la comunicazione con il computer host, la stampante integrata e il formato di stampa compresi i risultati, la sensibilità...
- Page 7 nel sotto-menu Menu/Regol/Striscia/Striscia/Sens.. Selezionando l’opzione Selezione, vengono visualizzati il primo nome di pad e l’attuale settaggio. La sensibilità di misurazione dei pad può essere impostata di due sia in positivo che in negativo utilizzando i tasti Basso e Alto. Dopo aver selezionato la sensibilità desiderata del pad attuale si può...
- Page 8 È possibile alternare tra modalità Normale e Veloce dal sotto-menu Menu/Modo Misura. La modalità attualmente in uso è visualizzata nella prima riga dell’LCD. Si può cambiare il modo premendo Normale o Veloce. Premendo OK i cambiamenti vengono salvati e il programma torna al Menu Principale. Scegliere la modalità...
- Page 9 § Per iniziare la misurazione senza un ID paziente premere il tasto Start. (Se nella worklist sono presenti degli ID paziente la macchina misura gli esami secondo l’ordine della worklist. È possibile iniziare le misurazioni della worklist direttamente dal sotto-menu della worklist o dal Menu Principale.
- Page 10 4.6.1 Trasferimento dei dati della memoria ® Il Combi Scan 100 è in grado di stampare o inviare ad un host (vedere sessione 4.7) i dati memorizzati. In entrambi i casi è possibile selezionare la porzione di memoria da stampare/trasferire desiderata. Per fare ciò, entrare nel sotto-menu Menu/Mem., dove, dopo aver premuto Sel.
- Page 11 5. Cura dello strumento Il funzionamento dell’apparecchio non richiede una particolare manutenzione, inoltre pulizia e sterilizzazione non sono necessarie per un’ulteriore cura. Proteggere lo strumento da temperature estremamente calde o fredde, dall’alta umidità atmosferica e tenere lontano dalla luce intensa (luce solare diretta, punto-lampade ecc…). Mantenere uno stato di igiene tenendo pulite le parti esterne e le superfici dello strumento.
- Page 12 7. Dati Tecnici Metodologia Fotometro riflettente Rilevamento CCD image processing Al massimo 40 test/ora nella modalità Normale (tempo di incubazione ∼60sec). Throughput Al massimo 120 test/ora nella modalità veloce (nessun tempo di incubazione programmato nella macchina). Memoria Ultimi 500 risultati Display 2 x 24 character LCD Stampante...
- Page 13 LIMITI DI RESPONSABILITÀ L’Analyticon Biotecnologies AG non potrà essere in nessun caso responsabile verso il distributore o il cliente utilizzatore finale per danni indiretti, incidentali speciali o consequenziali causati per negligenza dall’ANALYTICON stessa o per perdite di profitto, di denaro, di introiti, di investimenti interruzioni di affari e simili anche se l’ANALYTICON BIOTECNOLOGIES AG è...
- Page 14 ® l’Analyticon Biotechnologies AG mette a disposizione un aggiornamento del programma. In tal caso Analyticon Biotechnologies AG rilascerà dettagliate informazioni sull’uso del nuovo chip dei code key. Attenzione! Non rimuovere il chip dei code key dal suo alloggiamento! Senza di esso l’apparecchio non è...
- Page 15 ® scoprire i cambiamenti di colore sulle strisce. Il Combi Scan 100 supporta la gestione dei dati dei test e dei referti permettendo un immagazzinamento dei dati e la caratterizzazione dei dati computerizzati.
- Page 16 4.2.1 Worklist con la tastiera ® La worklist può essere inserita usando la tastiera. Connettere la tastiera al Combi Scan 100 e premere il tasto ® sinistro del Combi Scan 100 per accedere al menu della worklist. Nel menu della worklist può essere inserito un nome o un ID paziente di non oltre 13 caratteri.
- Page 17 3. Installazione Importante! Controllare se la confezione è completa (vedere sezione 2.1). Se è completa seguire le istruzioni qui di seguito, altrimenti contattare immediatamente il proprio distributore. ® Il Combi Scan 100 viene spedito in una scatola di cartone. Prima di disimballare il contenuto, pulire l’area su cui l’apparecchio verrà...
- Page 18 4.4.3 Impostazioni di data e ora 4.4.3.1 Regolazione data e ora L’orologio digitale integrato è in grado di memorizzare la data e l’ora della misurazione. Per avere le informazioni corrette è necessario impostare l’ora esatta. L’orologio funziona anche se l’apparecchio non è connesso alla rete elettrica.
- Page 19 Entrare nel sotto-menu Menu/Regol/Uscita/Conness./Protocollo per selezionare la comunicazione seriale di protocollo desiderata. Premendo Netw/PC è possibile scegliere tra protocollo Network e protocollo PC. Il protocollo attualmente selezionato o in uso viene visualizzato nella prima riga dell’LCD. Se si seleziona il protocollo di Network, premendo Seq/ID è...
- Page 20 § I valori vengono visualizzati nelle unità convenzionali. § I valori patologici vengono segnalati con un asterisco (*). § Se ad uno o più analiti è stata cambiata la sensibilità (v edere sessione 4.4.2.2), la linea di fine inizia e finisce con un asterisco (*------*). 4.6 Gestione della memoria ®...
- Page 21 Attenzione! È importante che la striscia sia ben posizionata sul vassoio e che il tasto Start venga premuto entro 5 – 10 secondi dal posizionamento della striscia sul vassoio. § Per iniziare la misurazione senza un ID paziente premere il tasto Start. (Se nella worklist sono presenti degli ID paziente la macchina misura gli esami secondo l’ordine della worklist.
- Page 22 6. Ricerca e riparazione dei guasti Durante le operazioni possono comparire differenti errori e messaggi di errore. Di seguito si può trovare una lista dei messaggi di errore e alcuni suggerimenti. Se il problema persiste contattare il distributrore. È possibile che il vassoio sia assente o che il suo Errore del vassoio movimento sia bloccato.
- Page 23 Installazione: 1. Installare il software Combi Scanner Data Management sul vostro computer. Leggere prima attentamente il file readme.txt. ® 2. Accendere il Combi Scan 100 senza connetterlo al computer host. 3. Connettere il cavo USB al computer a seguire il programma installer per installare i driver USB (i driver USB si trovano sul CD).
- Page 24 9. Simbologia...
- Page 25 Dichiarazioni o garanzie fatte da qualsiasi persona, inclusi distributori, venditori, rappresentanti o impiegati che siano contraddittorie, in conflitto con e in aggiunta a questi termini di garanzia non saranno legate all’Analyticon Biotecnologies AG se non scritte o firmate dai dirigenti della Società.
- Page 26 User‘s Manual Analyzer for CombiScreen 11SYS ® urine test strips...
-
Page 28: Table Of Contents
Contents V2.1.2 revised 09/2007 Contents 1. Introduction ................... 2 1.1. Methodology of urine test ..................2 1.2. Test strip ....................... 2 1.3. Intended use ......................3 2. Description of the equipment ..............4 2.1. Packing list ......................5 3. Installation ..................... 6 4. -
Page 29: Introduction
Introduction Introduction 1. Introduction 1.1. Methodology of urine test The urinalysis is part of the medical diagnosis methods frequently used by medical doctors in laboratories in order to reveal diseases. The most cost-effective device used to screen urine is a reagent test strip. This microchemistry system has been available for many years and allows qualitative or semi- quantitative analysis within one minute by simple but careful observation. -
Page 30: Intended Use
Introduction Introduction The CombiScan 100 is calibrated to CombiScreen 11SYS urine test strips and guarantees ® ® accurate results all time. The CombiScreen 11SYS urine test strip contains reagents for ® testing: Bilirubin Urobilinogen Ketones Ascorbic Acid Glucose Protein Blood Nitrite Leukocytes Specific Gravity... -
Page 31: Description Of The Equipment
It can be changed if analyticon® Biotechnologies AG offers an updated program version. In this case analyticon® Biotechnologies AG delivers detailed information on how to use the new code key. -
Page 32: Packing List
Description of the equipment Description of the equipment The interface connectors are located on the back panel. The external barcode reader or keyboard can be connected to the “keyboard” (PS2) connector. The host computer can be connected to the USB or to the serial interface connector. To use the serial interface a special RS232 cable with the appropriate connector is needed. -
Page 33: Installation
Installation 3. Installation Important! Please check first whether the shipment is complete (see Packing list 2.1.). If it is complete fol- low the instructions below, otherwise please contact your distributor immediately. The CombiScan 100 is shipped in a carton box. Prior to unpacking, clear the area where the ®... -
Page 34: Operation
Operation 4. Operation 4.1. Overview of the Menu system The software of the CombiScan 100 provides a user interface that enables all laboratory- ® specific settings and recurrent functions to be selected via the buttons. When the CombiScan 100 is connected to a power supply the screen of the Main Menu is dis- ®... -
Page 35: Worklist With Keyboard
Operation Operation 4.2.1. Worklist with keyboard The worklist can be typed in by a keyboard. Connect the keyboard to the CombiScan ® and press the left button of the CombiScan 100 to reach the worklist menu. In the worklist ® menu, a name or a patient ID of up to 13 characters can be typed in. -
Page 36: Setup Menu
Operation Operation 4.4. Setup menu The Setup menu is adapted to customize the CombiScan 100 according to your individual ® requirements or working methods. By selecting this menu, you can configure the communica- tion with your host computer, the built-in printer and the printout format including the result units, the sensitivity of different pads, etc. -
Page 37: Language Setting
Operation Operation col. The actually selected protocol is displayed in the first line of the LCD. If you select Network protocol by pressing the “Seq/ID” button you can decide the way records should be identified: according their sequence ID or by the patients name. In case you choose PC Unidirectional protocol the “Seq/ID”... -
Page 38: Changing The Pad Sequence In Printout
Operation Operation the sensitivity enter the Menu/Setup/Strip/Strip/Sens sub-menu. Selecting the Set option the first pad name and the actual setting are displayed. Pad measurement sensitivity can be set in two levels in both directions by the Up and Down buttons. After setting the proper sensitivity of the actual pad you can proceed with the next pad by pressing the NextPar button. -
Page 39: Settings Of Date And Time
Operation Operation 4.4.3 Settings of date and time 4.4.3.1. Adjust date and time The built-in digital clock enables to store the date and time of the measurement. To get correct information it is necessary to set the clock exactly. The clock is working even when power sup- ply is not connected to the equipment. -
Page 40: Measuring In Normal Mode (Single Readings)
Operation Operation You can switch between Fast and Normal mode in the Menu/MeasMode sub-menu. The actual- ly selected measuring mode is displayed in the first line of the LCD. You can change the mode by pressing either the Normal or the Fast button. Pressing OK will store your change and return to Main Menu. -
Page 41: Measuring In Fast Mode (Serial Readings)
Operation Operation Warning! It is important that the strip is correctly positioned on the tray, and the Start button pressed within 5 – 10 seconds of dipping the strip. To start the measurements without patient ID for identification press the Start button. (If you have entered patient ID’s in a worklist the instrument measures samples accord- ing to the sequence of ID’s of the worklist. -
Page 42: Results Printout
Operation Operation right wrong Fig. 5a Fig. 5b Fig. 5 Correct positioning of the urine strip: The top end of the strip has to touch the top edge of the area for the test strip on the strip holder tray, as shown in Fig. 5a. Wrong positioning is shown in Fig. -
Page 43: Memory Management
Operation Operation sensibility) have been changed, end line of result starts and ends with an asterisk (*----*). Each classification range has a name and a unit, corresponding to the analyte. Result printout can be in Chinese, too, if it is selected as language. Typical result printout Date Sequence Nr. -
Page 44: Memory Data Transfer
Operation Operation Memory Sel Last Clear Select last: 005 meas Down Select last: 005 meas Print Send Menu Printing data Sending data Cancel Cancel 4.6.1. Memory data transfer The CombiScan 100 is able to print out or send to a host (see section 4.7. data download) the ®... - Page 45 Operation System requirements: Hardware: Pentium III. 300Mhz Memory: 256 MB RAM Hard disk: 300 MB HDD Monitor: 1024*768 color Software Requirements: Operating Systems: Windows XP, Windows 2000 or Windows 98 Microsoft Internet Explorer 5.01 or higher Installation: 1. Install the CombiScanner data management software on your computer. Please care- fully read the readme.txt first 2.
-
Page 46: Care Of The Instrument
Care of the instrument 5. Care of the instrument Operation of the instrument doesn’t require any special maintenance, besides cleaning and dis- infection there is no need for further care. Protect the instrument from extremes of temperature and high atmospheric humidity and keep it out of bright light (direct sunlight, spot lamps, etc.). -
Page 47: Warnings / Precautions
Warnings / Precautions 6. Warnings / Precautions The CombiScan® 100 must be used in the manner described and specified in this manual in order to provide the saftety and performance standards specified. The instrument is calibrated for CombiScreen® 11SYS test strips. With other CombiScreen test strips or with test trips of other manufacturers, wrong results will be obtained. -
Page 48: Troubleshooting
Troubleshooting 7. Troubleshooting During operation different errors and error messages may appear. Below you will find the list of error messages and some suggestions what to do. If the problem persists, please contact your distributor. Tray error May be the tray is missing or it’s moving is blocked. -
Page 49: Technical Data
Technical data 8. Technical data Methodology Reflectance photometer Detection CCD image processing Throughput At least 40 tests/hour in Normal mode (Incubation time ∼60sec) At least 120 tests/hour in Fast mode (No built-in incubation time) Memory last 500 results Display 2x 24 character LCD Printer 57 mm thermal printer (2 lines/sec) Size... -
Page 50: Spareparts / Consumables
Spareparts / consumables 9. Spareparts / consumables A93150 CombiScreen 11SYS (pack size 150 pcs.) A93100 CombiScreen 11SYS (pack size 100 pcs.) A94150 CombiScreen 11SYS PLUS (pack size 150 pcs.) A94100 CombiScreen 11SYS PLUS (pack size 100 pcs.) A93010 Paper for thermal printer (57 mm x 25 m) UCP-4404-1 Stripholder UCP-4414-1... -
Page 51: Symbols
Please return it to your distributor at the end of the economic lifetime. Tested to comply with FCC standards For home or office use ANALYTICON BIOTECHNOLOGIES AG 35104 Lichtenfels Germany Phone: (+49) 64 54 79 91-0 Fax: (+49) 64 54 79 91-30 info@analyticon.de... -
Page 52: Appendix
Appendix Appendix Main menu structure 2004/01/01 12:12:25 000 Worklist ChkMeas Menu Pat ID: Check Mode Measurement Menu Wl.Next Wl.Prev Cancel Setup MeasMode Memory Measuring Mode: Norm Normal Fast Memory menu structure see Setup menu structure Memory Sel Last Clear Select last: 005 meas Down Select last: 005 meas Print... - Page 53 Appendix Appendix...
- Page 54 Appendix Appendix Table of results english Bilirubin Conv. mg/dl µmol/l Arbitrary Urobilinogen Conv. norm mg/dl µmol/l norm Arbitrary norm ++++ Ketones Conv. mg/dl mmol/l Arbitrary Glucose Conv. norm 1000 mg/dl norm mmol/l Arbitrary norm ++++ +++++ Protein Conv. mg/dl Arbitrary Blood Conv.
- Page 55 Appendix chinese Conv. mg/dl 胆红素 µmol/l Arbitrary Conv. norm mg/dl 尿胆原 µmol/l norm Arbitrary norm ++++ Conv. mg/dl 酮体 mmol/l Arbitrary Conv. norm 1000 mg/dl 尿糖 norm mmol/l Arbitrary norm ++++ +++++ Conv. mg/dl 尿蛋白 Arbitrary Conv. 潜血 Ery/µl Ery/µl Arbitrary Conv.
Need help?
Do you have a question about the Combi Scan 100 and is the answer not in the manual?
Questions and answers