Table of Contents
Advertisement
Available languages
Available languages
Quick Links
Instrukcja obsługi
Bedienungsanleitung
Instruction manual
Piece Konwekcyjno-Parowe
Elektryczne – Elektro - Electric
Modele – Modelle - Model:
STC 423/411/611/1011 E
STC 411/611/1011 E W
STG 201 E T
STB 616 E T
UWAGA: przed użyciem urządzenia należy zapoznać się z instr.
ACHTUNG: Bitte lesen Sie diese Anleitung, bevor Sie das Gerät benutzen.
ATTENTION: Please, read these instructions before using this unit.
Advertisement
Table of Contents

Subscribe to Our Youtube Channel
Related Manuals for FM Calefaccion STC 423 E


Summary of Contents for FM Calefaccion STC 423 E
- Page 1 Instrukcja obsługi Bedienungsanleitung Instruction manual Piece Konwekcyjno-Parowe Elektryczne – Elektro - Electric Modele – Modelle - Model: STC 423/411/611/1011 E STC 411/611/1011 E W STG 201 E T STB 616 E T UWAGA: przed użyciem urządzenia należy zapoznać się z instr. ACHTUNG: Bitte lesen Sie diese Anleitung, bevor Sie das Gerät benutzen.
- Page 3 INDEX OZNACZENIE CE GWARANCJA OGÓLNE ZASADY, PRZEPISY BEZPIECZEŃSTWA INSTRUKCJE DOTYCZĄCE BEZPIECZEŃSTWA, TRANSPORTU I KONSERWACJI Rozpakowanie Transport Czynności wstępne Umieszczenie urządzenia Ustawienie wózka (tylko dla modeli wyposażonych w wózek) URUCHOMIENIE URZĄDZENIA Podłączenie elektryczne Podłączenie do sieci wodnej Podłączenie odpływu Wylot pary z komory gotowania INSTRUKCJA UŻYCIA Pierwsze uruchomienie urządzenia Przeznaczenie urządzenia...
-
Page 4: Table Of Contents
ALLGEMEINE RICHTLINIEN UND SICHERHEITSREGELN SICHERHEITSHINWEISE, TRANSPORT UND WARTUNG 11.1 Auspacken 11.2 Transport 11.3 Vorbereitende Arbeiten 11.4 Aufstellung des Geräts 11.5 Positionierung des Wagens (nur für Öfen, die mit einem Wagen ausgestattet sind) INBETRIEBNAHME DES GERÄTS 12.1 Stromanschluss 12.2 Wasseranschluss 12.3 Abflussanschluss GEBRAUCHSANWEISUNG 13.1... - Page 5 18.4 Placing the unit 18.5 Trolley positioning (only for oven models equipped with trolley) INSTALLATION 19.1 Electrical connection 19.2 Water inlet 19.3 Draining connection USE INSTRUCTIONS 20.1 Using the unit for the first time 20.2 Cooking use 20.3 Control panel 20.4 Manual regulation of the chimney valve 20.5...
- Page 6 1. Oznaczenie CE ____________________________________________ UE DEKLARACJA ZGODNOŚCI Dyrektywa/y Rady, z którą/którymi deklarowana jest zgodność: DC 2014/35/EU + DC 2014/30/EU + DC 2011/65/EU + Reglamento (UE) 2016/426 Zastosowane normy: UNE-EN 60335-1:2012+AC:2014+A11:2014+A13:2017+A14:2014+A2:2020+A1:2020; UNE-EN 60335- 2-42:2004+Corr:2007+A1:2008+A11:2012; UNE-EN 55014-1:2017+A11:2021; UNE-EN 55014-2:2015; UNE-EN 61000-3-2:2014; UNE-EN 61000-3-3:2013+A1:2020; UNE-EN 203-1: 2014AC; UNE-EN 203-2- 2:2007;...
- Page 7 2. Gwarancja Okres gwarancji wynosi 12 miesięcy od daty zakupu urządzenia. Gwarancją nie są objęte uszkodzenia szkła, lamp, uszczelek drzwi, zużycie materiału izolacyjnego lub uszkodzenia powstałe w wyniku nieprawidłowego montażu, konserwacji, nieprawidłowej naprawy lub ich braku, a także niewłaściwego użytkowania urządzenia. W celu przeprowadzenia naprawy urządzenia objętego gwarancją...
- Page 8 3. Ogólne zasady, przepisy bezpieczeństwa Przepisy bezpieczeństwa i odpowiedzialność za instalację i konserwację. Zaleca się uważne przeczytanie niniejszej instrukcji przed rozpoczęciem pracy z urządzeniem i zachowanie jej do wglądu. W przypadku konieczności skorzystania z pomocy technicznej należy skontaktować się z autoryzowanym serwisem technicznym.
- Page 9 W przypadku dłuższej bezczynności urządzenia wszystkie przyłącza (zasilanie i woda) muszą zostać odłączone. Piec może być używany tylko i wyłącznie do celów, do których został zaprojektowany, tj. do pieczenia chleba, ciast, wszelkiego rodzaju produktów gastronomicznych, świeżych lub mrożonych. Każde inne użycie może spowodować...
- Page 10 Dotykać tylko elementów sterujących urządzenia i uchwytu otwierającego drzwi. Unikać dotykania innych zewnętrznych elementów pieca, ponieważ mogą one osiągnąć temperaturę wyższą niż 60ºC. Aby przesuwać lub manipulować dowolny pojemnik lub tacę w komorze gotowania, używać zawsze rękawic ochronnych termoizalacyjnych ...
- Page 11 4. Instrukcje dotyczące bezpieczeństwa, transportu i konserwacji 4.1 Rozpakowanie W przypadku widocznego uszkodzenia: po otrzymaniu towaru opis uszkodzenia należy opisać możliwie szczegółowo na protokole szkody lub na dowodzie dostawy. Ogólne uwagi, takie jak „uszkodzone opakowanie” lub „widoczne są uszkodzenia” itp. nie będą akceptowane. Należy dołączyć...
- Page 12 4.3 Czynności wstępne Usunąć folię ochronną z urządzenia. Oczyścić pozostałości kleju odpowiednim rozpuszczalnikiem. Nigdy nie używać ściernych lub kwaśnych produktów lub narzędzi, które mogą uszkodzić powierzchnie. Jeśli urządzenie zawiera zestaw termosondy, należy pamiętać o zdjęciu z niej ochronnej nakładki silikonowej. W przeciwnym razie może się...
- Page 13 Zaleca się pozostawienie odległości co najmniej 120 mm dla celów serwisowych. Bezpieczna odległość od źródeł ciepła lub elementów palnych musi wynosić co najmniej 700 mm. Zaleca się zadbać o dobrą wentylację urządzenia, aby nie przegrzać jego elementów. Przykład umieszczenia urządzenia bez pobliskich źródeł ciepła. Umieszczenie urządzenia obok źródeł...
- Page 14 Panel izolacyjny Do prac konserwacyjnych zaleca się około 500 mm wolnej przestrzeni roboczej. Urządzenie nie nadaje się do montażu podtynkowego. 4.5 Ustawienie wózka (tylko dla modeli wyposażonych w wózek) Aby zapewnić prawidłowe ustawienie wózka wewnątrz pieca, należy regularnie sprawdzać wysokość nóg. W tym przypadku uznaje się...
- Page 15 Należy Zapewnić prawidłowy ruch wózka wewnątrz pieca, unikając uderzeń lub przeszkód, które mogą spowodować wyciek płynów i oparzenia. Aby prawidłowo wprowadzić wózek do pieca, należy ustawić go na prowadnicach umieszczonych na spodzie pieca. Należy zapewnić prawidłowy ruch wózka wewnątrz pieca, unikając uderzeń lub przeszkód, które mogą spowodować...
- Page 16 Piec należy ustawić na całkowicie płaskiej powierzchni. Gdy w celu uzyskania dostępu do wózka do pieca niezbędna jest rampa, jej nachylenie nie powinno być większe niż 2°. W przypadku przekroczenia maksymalnego nachylenia wejścia wózka do pieca istnieje możliwość wylania się gorących płynów, które mogą...
- Page 17 5. Uruchomienie urządzenia W celu prawidłowej instalacji i uruchomienia urządzenia należy postępować zgodnie z punktami wskazanymi w „DOKUMENCIE DOT. INSTALACJI I URUCHOMIENIA INTELIGENTNYCH URZĄDZEŃ”, znajdującym się w opakowaniu wraz z niniejszą instrukcją obsługi. Należy pamiętać, że każda awaria lub uszkodzenie wynikające ze złej instalacji lub uruchomienia powoduje utratę gwarancji.
- Page 18 Podłączenie trójfazowe 400 V do gniazda trójfazowego typu CETAC TRÓJFAZOWE 230V Podłączenie trójfazowe 230V do gniazda trójfazowego typu CETAC Aby uniknąć niebezpieczeństwa związanego z przypadkowym zresetowaniem termicznego urządzenia odcinającego, urządzenie nie może być zasilane przez zewnętrzne urządzenie sterujące, takie jak zegar, ani nie może być podłączane do obwodu, którego zasilanie jest regularnie przerywane.
- Page 19 Przestrzegać oznaczeń kolorystycznych kabli. Nieprawidłowe podłączenie może nieodwracalnie uszkodzić urządzenie. KOD KOLORU: Czarny (L2) Szary (L1) Brązowy (L3) FAZY Niebieski (N) NEUTRALNA Żółty/Zielony UZIEMIENIE 5.2 Podłączenie do sieci wodnej Zalecane jest użycie filtra wapiennego na wlocie wody i zaworu przeciwzwrotnego. Piec jest wyposażony w przyłącze wlotu wody ¾”.
- Page 20 Rodzaje odpływów: 1. Opływ ścienny: Odpływ ścienny musi mieć pionowy kanał wentylacyjny o średnicy nie mniejszej niż 25 mm, który powinien znajdować się nad górną pokrywą urządzenia, jak pokazano na rysunku. Jeśli pionowy kanał wentylacyjny nie jest zainstalowany, prawidłowy drenaż nie zostanie zagwarantowany i może spowodować...
- Page 21 2. Oddzielny odpływ z lejem: Odpływ podłogowy: Ed.:21 - Ver.:01 - 01/01/2021...
- Page 22 5.4 Wylot pary z komory gotowania Opary wylotowe mogą być wilgotne i osiągać wysoką temperaturę, dlatego do ich odprowadzania nie należy używać rur wykonanych z materiałów, które nie gwarantują absolutnej stabilności termicznej do 250ºC. Aby oczyścić opary z procesu obróbki termicznej, można zamontować skraplacz, który pozwoli oparom na skroplenie się...
- Page 23 6. Instrukcja użycia______________ ¡Atención!!! Lea con detenimiento estas instrucciones antes de poner en funcionamiento el dispositivo. 6.1 Pierwsze uruchomienie urządzenia Usunąć zewnętrzną ochronną folię plastikową. Jeśli pozostanie jakikolwiek klej, użyć odpowiedniego rozpuszczalnika, a następnie umyć wodą z detergentem i spłukać. Komorę...
- Page 24 W przypadku produktów wstępnie zamrożonych zaleca się rozmrożenie produktu przed włożeniem go do pieca, aby uzyskać większą jednorodność pieczenia, a także krótszy czas pieczenia. Jeśli piec jest wyposażony w wózek, zalecamy umieszczenie go w nim podczas wykonywania cyklu wstępnego nagrzewania. Jeśli nie jest to możliwe, użyć pokrywy dołączonej jako akcesorium do tego celu. 6.3 Panel sterowania Wyświetlacz Kontrola...
- Page 25 Można także ustawić nieskończony czas gotowania. Aby to zrobić, obrócić pokrętło i zaprogramować „INF” na wyświetlaczu. Następnie nacisnąć, aby potwierdzić. Nawilżacz: dzięki nawilżaczowi istnieje możliwość wtrysku wilgoci w zakresie od 0-100% lub wykonania określonych wtrysków pary poprzez naciśnięcie niebieskiego przycisku na nawilżaczu. Aby ustawić procent wilgotności, obrócić...
- Page 26 Wewnętrzne i zewnętrzne powierzchnie pieca należy często czyścić, aby zapewnić higienę i jego prawidłowe działanie. Do czyszczenia tych powierzchni nie należy używać produktów ściernych lub łatwopalnych, które mogłyby uszkodzić urządzenie. Do czyszczenia urządzenia nie należy używać bezpośredniego strumienia wody ani pary pod ciśnieniem. ...
- Page 27 7. Częste wątpliwości ____ Oto lista najczęstszych przyczyn awarii i ich możliwych rozwiązań. USTERKA PRZYCZYNA ROZWIĄZANIE Brak napięcia sieciowego Sprawdzić napięcie sieciowe Niewłaściwe połączenie sieciowe Sprawdzić połączenie sieciowe Niewłaściwe zwymiarowanie Sprawdzić zwymiarowanie wyłącznika różnicowoprądowego wyłącznika różnicowoprądowego Niewłaściwe zwymiarowanie Urządzenie nie Sprawdzić...
- Page 28 8. CE-Zertifizierung____________________________________________ UE KONFORMITÄTSERKLARÜNG Richtlinie(n) des Rats, mit welcher/n die Konformität erklärt wird: DC 2014/35/EU + DC 2014/30/EU + DC 2011/65/EU + Reglamento (UE) 2016/426 Richtlinienanwendung: UNE-EN 60335-1:2012+AC:2014+A11:2014+A13:2017+A14:2014+A2:2020+A1:2020; UNE-EN 60335- 2-42:2004+Corr:2007+A1:2008+A11:2012; UNE-EN 55014-1:2017+A11:2021; UNE-EN 55014-2:2015; UNE-EN 61000-3-2:2014; UNE-EN 61000-3-3:2013+A1:2020; UNE-EN 203-1: 2014AC; UNE-EN 203-2- 2:2007;...
- Page 29 9. Garantie Die Garantiedauer beträgt 12 Monate ab Kaufdatum des Geräts. Die Garantie deckt keine Schäden an Glas, Lampen, Türabdichtungen oder Verschließ an Isoliermaterial oder Schäden aufgrund einer falschen Installation, falscher Wartung, nicht sachgemäßer oder nicht durchgeführter Reparatur sowie unsachgemäßen Gebrauch des Geräts. Zur Durchführung einer Reparatur an einem Gerät mit Garantie oder einer Konsultation, kontaktieren Sie den Händler unter Berücksichtigung folgender Tabelle.
-
Page 30: Allgemeine Richtlinien Und Sicherheitsregeln
Allgemeine Richtlinien und Sicherheitsregeln Sicherheitsregeln Lesen Sie diese Gebrauchsanweisung sorgfältig, bevor Sie die Arbeit mit dem Gerät beginnen und heben Sie die Gebrauchsanweisung für spätere Konsultationen auf. Sollten Sie technischen Support benötigen, kontaktieren Sie einen autorisierten Kundendienst. Installation, Inbetriebnahme und Wartung des Ofens sollten ausschließlich durch Fachpersonal und in Übereinstimmung mit dem Kriterienkatalog und den technischen Charakteristiken, die der Herstelle spezifiziert, erfolgen. - Page 31 Sollte das Gerät längere Zeit unbenutzt bleiben, müssen alle Anschlüsse (Strom- und Wasser) abmontiert werden. Der Ofen darf aussließlich gemäß seinem Verwendungsweck genutzt werden, das heißt, für das Garen und Zubereiten von Brot, Backwaren, alle Arten von gastronomischen Produkten, frischen und tiefgekühlten Produkten.
- Page 32 Berühren Sie ausschließlich die Steuerelemente des Geräts sowie den Türgriff. Vermeiden Sie es, andere externe Elemente des Ofens zu berühren, da diese Temperaturen über 60ºC erreichen können. Um Behälter oder Bleche in der Ofenkammer zu bewegen oder zu handhaben, müssen immer Ofenhandschuhe oder Ähnliches getragen werden.
-
Page 33: Sicherheitshinweise, Transport Und Wartung
Sicherheitshinweise, Transport und Wartung 11.1 Auspacken Sichtbase Schäden: bei Erhalten des Materials muss im PDA oder dem Lieferschein eine Beschreibung des Schadens, die so genau wie möglich ausfallen sollte, vermerkt werden. Nicht zulässig sind allgemeine Kommentare wie “beschädigte Packstücke” oder “es wurden Schäden festgestellt” o. ä. Es müssen eindeutige Fotos beigelegt werden, auf denen die beschädigte Ware und die Verpackung sichtbar sind. -
Page 34: Vorbereitende Arbeiten
11.3 Vorbereitende Arbeiten Nehmen Sie die Schutzfolie vom Gerät ab. Reinigen Sie die Klebstoffreste mit einem geeigneten Reinigungsmittel. Verwenden Sie in keinem Fall abreibende oder ätzende Produkte oder Werkzeuge, die die Oberfläche beschädigen könnten. Sollte Ihr Gerät einen Kerntemperaturfühler enthalten, denken Sie daran, den Silikonschutz von diesem zu entfernen. - Page 35 Beispiel für die Aufstellung des Geräts ohne nahe Hitzequellen. Aufstellung des Geräts neben Hitzequellen Für Wartungsarbeiten empfehlen wir etwa 500 mm Arbeitsplatz freizulassen. Das Gerät ist nicht für den Einbau geeignet. Ed.:21 - Ver.:01 - 01/01/2021...
-
Page 36: Positionierung Des Wagens (Nur Für Öfen, Die Mit Einem Wagen Ausgestattet Sind)
11.5 Positionierung des Wagens (nur für Öfen, die mit einem Wagen ausgestattet sind) Um die korrekte Positionierung des Wagens im Inneren des Ofens zu gewährleisten, muss die Höhe der Füße regelmäßig überprüft werden. Eine Höhe von 180 mm ist dabei optimal. Die Länge der Diagonalen des Ofeneingangs prüfen, da diese identisch sein sollte. - Page 37 Um den Wagen korrekt in den Ofen zu schieben, muss er auf die Schienen im unteren Teil des Ofens positioniert werden. Die korrekte Bewegung des Wagens im Inneren des Ofens sicherstellen, damit Schläge oder Blockierungen, die ein Flüssigkeitsleck oder Verbrennungen verursachen können, zu vermeiden. Der Ofen sollte auf einer vollkommen ebenen Fläche stehen.
-
Page 38: Inbetriebnahme Des Geräts
Inbetriebnahme des Geräts 12.1 Stromanschluss Prüfen Sie vor dem Anschluss des Geräts an das Stromnetz, ob die Netzeigenschaften mit denen übereinstimmen, die in den technischen Daten des jeweiligen Geräts beschrieben sind. Die elektrische Installation muss von autorisiertem Personal durchgefürt werden und den geltenden Vorschriften enstprechen. Der elektrische Anschluss sollte vorzugweise durch die Montage eines elektrischen Steckers (NICHT IM LIEFERUMFANG) erfolgen, dessen Typ und Leistung für die maximale Stromaufnahme der Ofenphasen geeignet ist. - Page 39 Dreiphasige Verbindung 400V an dreiphasiger Steckdose Typ CETAC DREIPHASIG 230V 230V-Drehstromanschluss, angeschlossen an eine Drehstromsteckdose vom Typ CETAC Um jegliche Gefahr durch versehentliches Zurücksetzen der thermischen Abschaltvorrichtung zu vermeiden, darf dieses Gerät nicht über eine externe Steuereinrichtung, wie z. B. Eine Zeitschaltuhr, mit Strom versorgt oder an einen Stromkreis angeschlossen werden, dessen Stromversorgung regelmäßig unterbrochen wird.
-
Page 40: Wasseranschluss
FARBCODES Schwarz (L2) Grau (L1) Braun (L3) PHASEN Blau (N) NEUTRAL Gelb / Grün ERDUNG 12.2 Wasseranschluss Es wird die Verwendung eines Antikalkfilters am Wasserzufluss sowie ein Absperrventil empfohlen. Der Ofen ist mit einer ¾“ –Wasserzuflussvrebindung ausgestattet. Außerdem ist es ratsam, ein “Digimeter » oder digitales Instrument zu installieren, um die vom Ofen verbrauchten Liter Wasser zu messen und auf diese Wiese zu wissen, wann der Filter ausgetauscht werden muss. - Page 41 Abflussart: 3. Wandabfluss: Der Ausgang des Wandabflusses sollte eine vertikale Belüftungsleitung mit einem Durchmesser von mindestens 25 mm haben und über der oberen Abdeckung des Geräts liegen, so wie auf der Abbildung zu erkennen. Sollte keine vertikale Belüftungsleitung installiert werden, kann eine korrekte Drainage nicht garantiert werden, was zu Störung und dem Verlust der Garantie führen kann.
- Page 42 4. Getrennter Abfluss mit Trichter: Bodenablauf: Ed.:21 - Ver.:01 - 01/01/2021...
- Page 43 12.4 Dampfaustritt aus dem Garraum Der ausströmmende Dampf kann feucht sein und sehr hohe Temperaturen erreichen, daher sollter Schläuche aus Materialien zur Ableitung verwendet werden, die eine Wärmestabilität bis 250ºC garantieren. Für die Verarbeitung des Gardampfs ist es möglich, einen Kondensator anzupassen, der die Dämpfe kondensiert und sie über einen Abfluss ableitet.
-
Page 44: Gebrauchsanweisung
Gebrauchsanweisung_____________ Achtung! Bitte lesen Sie diese Anweisungen sorgfältig durch, bevor Sie das Gerät in Betrieb nehmen. 13.1 Erste Verwendung des Geräts Entfernen Sie die Schutzfolie außem am Gerät. Sollte etwas Klebstoff zurückbleiben, verwenden Sie ein angemessenes Lösemittel und reinigen Sie danach mit Seife und Spülung. Die innere Kammer und die Bleche sollten mit Wasser und Seife gereinigt werden und dann etwa 30 Minuten einen Zyklus bei 200ºC durchlaufen. -
Page 45: Bedinfeld
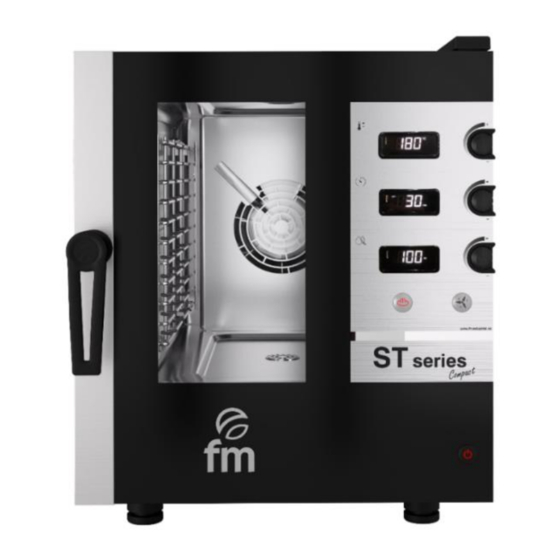
13.3 Bedinfeld Das Bedienfeld besteht aus 3 Schaltern und drei LEDs für die Anzeige: Temperaturdisplay Temperaturkontrolle START Zeitdisplay Zeitkontrolle STOP START/STOP Feuchtigkeitdisplay Feuchtigkeitskontrolle Feuchtigkeitsknopf Doppelter Geschwindigkeitsschalter Es existieren drei Variablen, die der Nutzer einstallen kann: Temperatur, Zeit und Feuchtigkeit. Sie sind alle abhängig von den Nahrungsmitteln und der Menge, die in den Ofen geschoben wird. -
Page 46: Manuelle Einstellung Des Wrasenabzuges
Doppelte Drehzahl: Mit dem doppelten Drehzahlschalter können Sie je nach Bedarf und zu kochendem Produkt zwischen der maximalen und der minmalen Drehzahl der Turbinen wählen. Auf diese Weise können Sie von großen Produkten bis zu den empfindlichsten kochen. 13.4 Manuelle Einstellung des Wrasenabzuges Der Wrasenabzug kann während des Garvorgangs offen oder geschlossen sein. - Page 47 Zum besseren Reinigung des Garraums des Backofens können Sie FM-Reinigungsmittel mit Hilfe eines Zerstäubers verwenden. Achtung: Verwenden Sie Gummihandschuhe zum Schutz und eine Schutzmaske oer –brille, bevor Sie mit chemischen Produkten hantieren. Achtung: Die Verwendung von anderen Reinigungsmitteln oder Putzmitteln kann ein schlechtles Finish oder irreparable Schäden, die zum Verlust der Garantie des Geräts führen können, nach sich ziehen.
-
Page 48: Häufig Gestellte Fragen
Häufig gestellte fragen Im Folfenden finden Sie eine Liste mit den häufigsten Fehlergründen und möglichen Lösungen. FEHLER GRUND LÖSUNG Fehlende Stromspannung Stromspannung prüfen Falscher Stromanschluss Stromverbindung prüfen Falscher Differenzialkaliber Differenzialkaliber prüfen Falscher Wärmeschutzchalter Wärmeschutzschalter prüfen Das Gerät schaltet Reset-Knopf des Sicherheitsthermostats drücken, nachdem der nicht ein entsprechende Drehdeckel abgenommen wurde. -
Page 49: Ce Certification
Certification____________________________________________ EU DECLARATION OF CONFORMITY Council Directive(s) to which conformity is declared: DC 2014/35/EU + DC 2014/30/EU + DC 2011/65/EU + Reglamento (UE) 2016/426 Application of the standards: UNE-EN 60335-1:2012+AC:2014+A11:2014+A13:2017+A14:2014+A2:2020+A1:2020; UNE-EN 60335- 2-42:2004+Corr:2007+A1:2008+A11:2012; UNE-EN 55014-1:2017+A11:2021; UNE-EN 55014-2:2015; UNE-EN 61000-3-2:2014; UNE-EN 61000-3-3:2013+A1:2020; UNE-EN 203-1: 2014AC; UNE-EN 203-2- 2:2007;... -
Page 50: Warranty
Warranty The warranty period is 12 months from the date of purchase of the unit. The warranty does not cover damages to the glass, lamps, door seals, insulating material or damages caused by improper installation, maintenance, or lack of maintenance, repair and misuse. To process the repair of a unit under warranty or for any other query, please contact your distributor and reference to the following description table. -
Page 51: General And Safety Standards
General and safety standards Safety standards and responsibility for installing and maintaining Read this manual thoroughly before starting the unit and keep it for further consultation. If you need technical support, contact an authorised technical service. Installation, starting and maintenance of the oven shall be carried out by qualified technicians in accordance with the scale and technical characteristics specified by the manufacturer. - Page 52 Usage and cleaning different from what is recommended by the manufacturer and with non-authorised products may damage the unit and the user. Do not use direct water jet on the unit in order to avoid damaging its components. ...
- Page 53 Risk of fire If you do not clean the unit properly or as often as needed, greases and food leftovers will be accumulated in the baking chamber and then, become inflamed. Only use the products recommended by the manufacturer. Using other products may damage the unit and invalidate the warranty.
-
Page 54: Safety Instructions, Transport And Maintenance
Safety instructions, transport and maintenance_________ 18.1 Unpackaging Visible damages: When receiving the material, enter a detailed description of the break in the PDA or in the delivery note. General comments such as “damaged packaging” or “damage can be seen”, etc. will not be accepted. Clear photographs showing the damaged good and packaging must be provided. -
Page 55: Preliminary Operations
18.3 Preliminary operations Remove the protection film from the unit. Clean the adhesive residues with an appropriate solvent. Never use abrasive or acid products or tools that may damage the surface. 18.4 Placing the unit Place the oven in the selected work place and keep a safe distance as indicated below. Check that the unit has sufficient cold air inlets through the ventilation registers ensuring correct operation. - Page 56 Example of equipment placement without nearby heat sources. Placement of equipment next to heat sources. For maintenance operations we recommend a free working space of 500 mm (approximately). This unit is not suitable for built-in installations. Ed.:21 - Ver.:01 - 01/01/2021...
-
Page 57: Trolley Positioning (Only For Oven Models Equipped With Trolley)
18.5 Trolley positioning (only for oven models equipped with trolley) In order to ensure correct positioning of the car inside the oven, the height of the legs must be checked regularly. For this, 180mm is considered as an optimal measure for this task. 80mm Check the length of the diagonals of the oven inlet, and they must be identical. - Page 58 To correctly insert the trolleyriage inside the oven, position it following the guides located at the bottom of the oven. Ensure the correct movement of the trolley inside the oven, avoiding blows or obstructions that can cause the leakage of liquids and lead to possible burns. The oven should be placed on a completely flat surface.
-
Page 59: Installation
Installation________________ 19.1 Electrical connection Before connecting the unit to the power supply, check that the electrical grid characteristics match those described in the technical characteristics of each unit. The electrical installation must be performed by authorised technicians and meet the regulations in force. Preferably, the electrical connection should be performed by mounting and electrical outlet of appropriate type and capacity for the maximum current absorbed by the oven phases. - Page 60 Three phase connection 400V connected to a three phase power socket type CETAC. socket MATERIAL NOT SUPPLIED THREE PHASE 230V Three phase connection 230V connected to a three phase power socket type MATERIAL NOT SUPPLIED In order to avoid any danger due to accidental rearmament of the thermal cutting device, this device must not be powered by an external control device, such as a timer, or connected to a circuit whose power is interrupted regularly.
-
Page 61: Water Inlet
COLOUR CODE Black (S) Grey (R) Brown (T) PHASES Blue (N) NEUTRAL Yellow / Green GROUNDING 19.2 Water inlet Use anti-lime system before to connect the water pipes to the device, is recommended. The water connection is ¾“. In addition, it is advisable to install a "digimeter" for the liters of water consumed by the oven, and in this way, to know when it is necessary to replace the filter. - Page 62 Types of drains: 5. Wall drain: It must have a vertical ventilation duct with a diameter not less than 25 mm, which must be above the top cover of the oven, as shown in the picture. In case of not installing the vertical ventilation duct, a correct drainage is not warrantyd, being able to cause damages and the loss of the warranty.
- Page 63 6. Drain with separated funnel: MATERIAL NOT SUPPLIED Distance 2,5mm Connection 40mm Connection Floor drain: Clamp Drain pipe Distance 2,5mm Ed.:21 - Ver.:01 - 01/01/2021...
- Page 64 19.4 Vapour exhaust from the baking chamber Fumes can be wet and reach a high temperature, so do not use pipes to channel the gases, which materials do not warranty absolute thermal stability up to 250ºC. For the treaty of cooking vapours, may adapt a capacitor allow vapours condense and expel to a drain. Important: Do not channel the vapour exhaust from the cooking chamber more than 50 centimeters due to risk of condensation.
-
Page 65: Use Instructions
Use instructions______________ ____ Attention! Read these instructions carefully before operating the device. 20.1 Using the unit for the first time Remove the external protection film. If there are adhesive residues, use an appropriate solvent and then, rinse with a damp cloth. The inner chamber and trays should be washed with water and soap and then, work at a 200ª... -
Page 66: Control Panel
20.3 Control panel Temperature display Temperature control START Time display Time control STOP START/STOP Humidity display Humidity control Humidity button Double speed switch There are four variables that can be adjusted by the user: time, temperature, humidity and speed of the turbines. These variables depend on the type of food and the quantity in the oven. -
Page 67: Manual Regulation Of The Chimney Valve
Double speed : With the double speed switch, you can choose between the maximum and minimum speed of the turbines according to your need and the product you are going to cook. In this way, you can cook from large products to the most delicate. - Page 68 To clean the oven, follow the instructions below. Turn on the oven set 100% humidity and 60 ° C for at least 15 min and then remove the residue with a damp cloth. You can use FM detergent with a sprayer, for a better cleaning of the oven's cooking chamber. Warning: Put on protective rubber gloves and mask or goggles before handling these chemicals.
-
Page 69: Frecuently Asked Questions
Frecuently asked questions A continuación se muestra una lista de causas que generan fallos frecuentes, asi como sus posibles soluciones. FAILURE CAUSE SOLUTION No mains voltage Check the mains voltage Inappropriate power connection Check the mains connection Reset the thermostat at the front. If the failure persists, The unit does not switch contact a specialised technician.
Need help?
Do you have a question about the STC 423 E and is the answer not in the manual?
Questions and answers