
Related Manuals for Patton Kamado


Summary of Contents for Patton Kamado
- Page 1 GEBRUIKS- EN INSTALLATIEHANDLEIDING Kamado 16” Table Chef WITH BLUETOOTH SMART THERMOMETER PATTON B.V. Veilingweg 2 NL 5301 KM Zaltbommel Holland Website: www.patton.eu...
- Page 2 NL, BE, LU NL, BE, LU Gebruiksaanwijzing - 3 FR, CH Notice d’emploi - 14 GB, IE Operating instructions - 26 DE, CH, AT Gebrauchsanweisung - 37 IT, CH Uso e istruzioni di montaggio - 49...
- Page 3 In Japan was de Mushikamado een ronde pot van klei met een verwijderbaar bol deksel. Deze was bedoeld voor het stomen van rijst. De naam ‘Kamado’ is dan ook het Japanse woord voor ‘fornuis’ of ‘kookplaat’. Deze naam is overgenomen door de Amerikanen en is nu een algemene term voor dit type keramische kookplaat.
- Page 4 Open het onderste luchtgat en steek de krant aan met een lange aansteker of veiligheidslucifers. • Laad het apparaat NIET te vol met brandstof; als het vuur te krachtig is kan de Kamado schade oplopen. • Laat het vuur branden tot alle brandstof op is en het vuur is gedoofd.
- Page 5 Zorg dat de Kamado op een vaste, vlakke, horizontale, warmtebestendige en niet-brandbare ondergrond staat, uit de buurt van brandbare voorwerpen. • Zorg dat de Kamado minimaal 2 meter bovenruimte heeft en minimaal 2 meter van andere voorwerpen af staat. •...
-
Page 6: Brandstof Bijvullen
HET VERVANGEN VAN HET VILT VAN DE KAMADO GRILL Afhankelijk van hoe vaak u uw Kamado Grill gebruikt dient u het vilt van het deksel en de basis van de Kamado Grill af en toe te vervangen. Hiermee voorkomt u de eerder genoemde “valse” lucht. Ga zorgvuldig en als volgt te werk:... - Page 7 Plak aan de buitenzijde van het deksel en de basis direct onder de rand het schilderstape om te voorkomen dat er lijm op de Kamado Grill komt. Bescherm de binnenzijde met een stuk karton en spuit de randen met de lijm in.
- Page 8 NL, BE, LU TEMPERATUURINSTRUCTIES Langzaam bakken / roken (110ºC-135ºC) Luchtgat boven Luchtgat beneden Runderborst 2 uur per pond Draadjesvlees 2 uur per pond Hele kip 3 - 4 uur Ribben 3 - 5 uur Braadstukken 9+ uur Grillen / roosteren (160ºC-180ºC) Luchtgat boven Luchtgat beneden 15-20 min.
-
Page 9: Montage
Open the bottom vent fully and leave the lid open for about 10 minutes to build a small bed of hot embers. • Monitor the Kamado until it has risen to the desired temperature. See page 4 for a temperature cooking guide. NL, BE, LU •... - Page 10 Secure the handle (5) with the 2x pre-attached dome headed nuts. STEP 4 - Place the Kamado Grill on the cart with the bottom vent facing to the front of the cart allowing the vent...
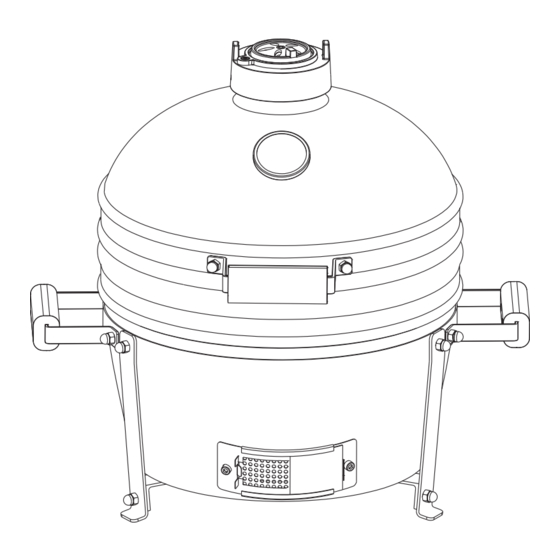
- Page 11 STEP 5 - When the grill is securely placed on the stand add the firebox (8), charcoal plate (7), and cooking grill (6) inside of the Kamado Grill as displayed in the assembly diagram. STAP 5 - Zodra de grill stabiel op het onderstel is geplaatst, plaatst u de vuurbak (8), de houtskoolplaat (7) en het grill...
- Page 12 Assembly instructions STEP 6 - To attach the handle (5) to the lid of the Kamado grill(9).start by aligning the bolt holes of the handle to pre-installed bolts on the lid. Secure the handle (5) with the 2x pre-attached dome headed nuts.
- Page 13 Voor het optillen van pizzastenen of grills wanneer deze te heet zijn om met de handen aan te pakken. Regenhoes Wanneer de Kamado is afgekoeld en niet in gebruik is, kunt u hem voor extra bescherming bedekken met de Kamado-regenhoes. Asschraper Wanneer de Kamado alle brandstof heeft verbruikt en is afgekoeld, kunt u hiermee de as van de bodem verwijderen.
- Page 14 INSTRUCTIONS DE MONTAGE ET MODE D’EMPLOI Cuiseur Kamado, modèle 16” Table Chef AVEC THERMOMÈTRE BLUETOOTH...
- Page 15 Il y a 4 000 ans, des archéologues découvrent de grands récipients d’argile que l’on considère aujourd’hui comme les premières incarnations du cuiseur en céramique Kamado. Depuis lors, le produit a évolué à bien des égards. Il a été équipé d’un couvercle amovible, d’une trappe de tirage offrant un meilleur contrôle thermique, et d’un bouton permettant de sélectionner le bois ou le charbon comme combustible principal.
- Page 16 Pour allumer le foyer, placer du papier journal enroulé et quelques cubes d’allume-feu solides sur la plaque à charbon de bois (7) suitée à la base du cuiseur Kamado. Placer ensuite 2 ou 3 poignées de charbon de bois au-dessus du papier journal.
-
Page 17: Entretien
Pour allumer le foyer, placer du papier journal enroulé et quelques cubes d’allume-feu solides sur la plaque à charbon de bois (7) suitée à la base du cuiseur Kamado. Placer ensuite 2 ou 3 poignées de charbon de bois au-dessus du papier journal. -
Page 18: Ajout De Combustible
• Une précuisson des gros morceaux de viande est recommandée avant toute cuisson sur le grill. • Après une cuisson dans le cuiseur Kamado, toujours nettoyer les surfaces de cuisson du grill et les ustensiles de cuisine. AJOUT DE COMBUSTIBLE •... - Page 19 CONDITIONS ET DISPOSITIONS DE LA GARANTIE LIMITÉE DU GRIL PATTON KAMADO Le foyer en céramique de tout gril Patton Kamado est couvert par une garantie limitée sur les matériaux et la fabrication de tous les éléments en céramique (le dôme, le cadre, la cheminée et sa vanne, la braisière et l’anneau de feu). La présente garantie reste en vigueur tant que l’acheteur initial reste le propriétaire du gril Patton Kamado ou de la pièce...
- Page 20 Les présentes garanties reposent sur l’hypothèse d’une utilisation domestique et d’un entretien normaux et raisonnables du gril Patton Kamado. L’utilisation commerciale et toute autre application de même nature sont exclues de la présente garantie. La présente garantie n’est applicable à aucun dommage ni aucune cassure collatéral ou imprévisible, ni à...
- Page 21 Open the bottom vent fully and leave the lid open for about 10 minutes to build a small bed of hot embers. • Monitor the Kamado until it has risen to the desired temperature. See page 4 for a temperature cooking guide. •...
- Page 22 Secure the handle (5) with the 2x pre-attached dome headed nuts. STEP 4 - Place the Kamado Grill on the cart with the bottom vent facing to the front of the cart allowing the vent...
- Page 23 ÉTAPE 5 - Une fois que le gril a été placé de façon stable sur le châssis, placez la boîte à feu (8), la plaque à charbon (7) inside of the Kamado Grill as displayed in the assembly diagram. et la grille (6) dans le barbecue Kamado, comme indiqué dans le schéma d’installation.
- Page 24 Assembly instructions STEP 6 - To attach the handle (5) to the lid of the Kamado grill(9).start by aligning the bolt holes of the handle to pre-installed bolts on the lid. Secure the handle (5) with the 2x pre-attached dome headed nuts.
- Page 25 Cette pince vous permet de soulever la pierre à pizza ou les grilles de cuisson lorsqu’elles sont trop chaudes pour être manipulées. Housse antipluie Lorsque le cuiseur Kamado a refroidi et lorsqu’il n’est pas utilisé, le recouvrir au moyen de la housse imperméable Kamado pour une protection supplémentaire.
- Page 26 OPERATING AND ASSEMBLY INSTRUCTIONS Kamado 16” Table Chef WITH BLUETOOTH SMART THERMOMETER...
-
Page 27: Warnings - Caution
CAUTION - DO NOT use petrol, white spirit, lighter fluid, alcohol or other similar chemicals for lighting or relighting. Use only firelighters complying to EN1860-3! • It is highly recommened that you use lump charcoal in your Kamado. It burns for longer and produces less ash which can restrict the airflow. • IMPORTANT: When opening the lid at high temperatures it is essential to lift the lid only slightly, allowing air to enter slowly and safely, preventing any backdraft or flare-ups that may cause injury. -
Page 28: Maintenance
CLEANING • The Kamado is self cleaning. Heat it up to 260ºC for 30 minutes and it will scorch off all of the food and debris. • DO NOT use water or any other types of cleaning product to clean the inside of your Kamado. The walls are porous and will absorb any fluids used, this could cause the Kamado to crack. If the soot becomes excessive... -
Page 29: Smoking Guide
Open the bottom vent fully and leave the lid open for about 10 minutes to build a small bed of hot embers. • Monitor the Kamado until it has risen to the desired temperature. See page 27 for a temperature cooking guide. •... - Page 30 REPLACING THE FELT PACKING ON THE KAMADO GRILL Depending on how you use the Kamado Grill, the felt packing around the lid and the base should be replaced from time to time. This prevents “false air” from occurring. Carefully carry out the following:...
-
Page 31: Cooking Temperature Guide
Patton expressly rejects any liability for direct, indirect, incidental or consequential damages or losses that may result. Using fire lighter fluid or any other type of flammable mixture in a Patton Kamado Grill renders the guarantee null and void. This is a dangerous practice and can lead to damage and physical injury. - Page 32 Open the bottom vent fully and leave the lid open for about 10 minutes to build a small bed of hot embers. • Monitor the Kamado until it has risen to the desired temperature. See page 4 for a temperature cooking guide. GB, IE •...
- Page 33 STEP 3 - To attach the 2x handle (5) to the lid of the brace ring(1).start by aligning the bolt holes of the handle to STEP 4 - Place the Kamado Grill on the cart with the bottom vent facing to the front of the cart allowing the vent to open pre-installed bolts on the lid.
- Page 34 STEP 5 - When the grill is securely placed on the stand add the firebox (8), charcoal plate (7), and cooking grill (6) STEP 5 - When the grill is securely placed on the stand add the firebox (8), charcoal plate (7), and cooking grill (6) inside inside of the Kamado Grill as displayed in the assembly diagram. of the Kamado Grill as displayed in the assembly diagram.
- Page 35 Assembly instructions STEP 6 - To attach the handle (5) to the lid of the Kamado grill(9).start by aligning the bolt holes of the handle to pre-installed bolts on the lid. Secure the handle (5) with the 2x pre-attached dome headed nuts.
- Page 36 Allows you to lift the pizza stone or cooking grills when they are too hot to handle. Rain Cover When the Kamado has cooled and is not in use, cover it with the Kamado raincover for extra protection. Ash Tool Once your Kamado has burnt all its fuel and cooled down use this tool for removing the ash from the bottom.
-
Page 37: Bedienungs-Und Montageanleitung
BEDIENUNGS-UND MONTAGEANLEITUNG Kamado 16” Table Chef MIT BLUETOOTH THERMOMETER... - Page 38 Entfernen Sie nicht die graue Filzdichtung vom Rand des Untersatzes oder Deckels. Diese Filzdichtung sorgt nämlich für die Abdichtung und dafür, dass „falsche“ Luft, die die Zirkulation im Kamado beeinträchtigen könnte, keine Chance erhält. Sorgen Sie dafür, dass Sie die Schrauben und Scharniere der Metallreifen regelmäßig mit einem leichten Maschinenöl (oder WD40) einölen.
- Page 39 Öffnen Sie die untere Belüftungsklappe und zünden Sie das Zeitungspapier mit einem langen Feuerzeug oder mit Sicherheitsstreichhölzern an. • Überfüllen Sie das Gerät NICHT mit Brennstoff – Wenn das Feuer zu stark ist, könnte dies den Kamado beschädigen. • Warten Sie, bis der Brennstoff vollständig verbraucht und erloschen ist.
-
Page 40: Wartung
• Stellen Sie sicher, dass der Kamado fern von brennbaren Gegenständen auf einer festen, flachen, ebenen, hitzebeständigen, nicht brennbaren Oberfläche steht. • Sorgen Sie dafür, dass über dem Kamado ein Abstand von mindestens 2 Metern vorhanden ist und dass sich alle umliegenden Gegenstände in einem Abstand von mindestens 2 Metern befinden. • Um ein Feuer zu machen, legen Sie zusammengerollte Zeitung mit einigen Anzünderwürfeln oder festen Feueranzündern auf die Kohlenplatte (7) im Sockel des Kamado. Legen Sie dann 2 oder 3 Handvoll Grillkohle über das Zeitungspapier. - Page 41 DEN FILZ AM KAMADO GRILL AUSTAUSCHEN Je nachdem, wie oft Sie Ihren Kamado Grill benutzen, müssen Sie den Filz am Deckel und der Basis des Kamado Grills austauschen. Hiermit verhindern Sie die oben erwähnte „falsche“ Luft. Gehen Sie sorgfältig und wie folgt vor: Sie benötigen:...
- Page 42 Verpackung trocknen und kleben Sie danach den Filz auf die Ränder. Lassen Sie den Leim gut aushärten. Bauen Sie den Kamado Grill wieder zusammen. Halten Sie das Spannband um die Basis und ziehen Sie die Muttern fast vollständig fest. Setzen Sie den Deckel vorsichtig in das obere Spannband und ziehen Sie die Muttern fast vollständig fest.
- Page 43 Hierzu zählen u.a.: das Bohren von Löchern oder das Herumwerkeln an Gerätekomponenten; die Verwendung fremder Komponenten im Patton Kamado Grill, die keine Originalteile des Patton Kamado Grill sind; oder der Gebrauch innerer Teile /Komponenten in einer anderen als der vorgesehenen bzw. vom Hersteller vorgeschriebenen Weise. Änderungen oder der Austausch innerer Gerätekomponenten, wie etwa des Kochtopfes und/oder Innenringes, heben die Garantie...
- Page 44 Open the bottom vent fully and leave the lid open for about 10 minutes to build a small bed of hot embers. • Monitor the Kamado until it has risen to the desired temperature. See page 4 for a temperature cooking guide. DE, CH, AT •...
- Page 45 Secure the handle (5) with the 2x pre-attached dome headed nuts. STEP 4 - Place the Kamado Grill on the cart with the bottom vent facing to the front of the cart allowing the vent...
- Page 46 Schritt 5 - Sobald der Grill stabil auf dem Chassis platziert ist, setzen Sie den Feuerraum (8), die Kohleplatte (7) und den inside of the Kamado Grill as displayed in the assembly diagram. Grillrost (6) wie im Installationsplan gezeigt in das Kamado-Grill ein.
- Page 47 Assembly instructions STEP 6 - To attach the handle (5) to the lid of the Kamado grill(9).start by aligning the bolt holes of the handle to pre-installed bolts on the lid. Secure the handle (5) with the 2x pre-attached dome headed nuts.
- Page 48 Greifzange Zum Anheben des Pizzasteins oder der Kochgitter, wenn diese zu heiß zum Anfassen sind. Regen-schutz Wenn sich der Kamado abgekühlt hat und nicht in Gebrauch ist, decken Sie ihn mit dem Kamado-Regenschutz ab, um ihn zusätzlich zu schützen. Asche-werkzeug Nachdem Ihr Kamado sämtlichen Brennstoff verbrannt und sich...
- Page 49 ISTRUZIONI D’USO E DI MONTAGGIO Kamado 16” Table Chef CON BLUETOOTH THERMOMETRO...
- Page 50 Datati di 4.000 anni fa, gli archeologi hanno scoperto ampi recipienti di cottura in argilla ritenuti essere i predecessori del fornello da cottura in ceramica Kamado. Da allora, il prodotto si è evoluto nel corso degli anni in diversi modi;...
- Page 51 • Per accendere il fuoco, porre un giornale arrotolato con qualche cubetto accendi-fuoco o esca solida per il fuoco sul braciere (7) posto sulla base del Kamado. Quindi mettere 2 o 3 manciate di carbone sopra al giornale. • NON utilizzare benzina, acquaragia, liquido infiammabile per accendini, alcool o altri prodotti chimici simili per l’accensione o la riaccensione.
-
Page 52: Manutenzione
• Per accendere il fuoco, disporre un giornale arrotolato con qualche cubetto accendi-fuoco o esca solida per il fuoco sul braciere (7) posto sulla base del Kamado. Quindi porre 2 o 3 manciate di carbone sopra al giornale. • NON utilizzare benzina, acquaragia, liquido infiammabile per accendini, alcool o altri prodotti chimici simili per l’accensione o la riaccensione. - Page 53 SOSTITUZIONE DEL FELTRO DEL KAMADO GRILL A seconda della frequenza dell’utilizzo del vostro Kamado Grill è necessario sostituire di tanto in tanto il feltro del coperchio e della base del Kamado Grill. In questo modo prevenite l’introduzione della soprannominata aria “cattiva”.
- Page 54 Il Patton Kamado Grill è coperto da una garanzia limitata di 2 anni per difetti di fabbricazione in favore dell’acquirente originario. La garanzia non copre la rottura dei componenti in ceramica derivante da cadute o da un uso inappropriato.
- Page 55 IT, CH Qualsiasi modifica o variazione del Patton Kamado Grill non autorizzata causerà il decadimento della garanzia. Queste comprendono la creazione di fori o la manomissione dei componenti; l’utilizzo nel Patton Kamado Grill di componenti non originali della Patton Kamado Grill; o l’utilizzo dei componenti interni in maniera diversa dalla destinazione d’uso prevista dal produttore. La modifica o la sostituzione dei componenti interni, come il focolaio e l’anello interno, causa la decadenza della garanzia, e la Patton declina espressamente ogni responsabilità per qualsiasi danno diretto o indiretto accessorio che ne deriva. L’utilizzo nel Patton Kamado Grill di liquido accendifuoco o di qualsiasi altra miscela infiammabile fa...
- Page 56 Open the bottom vent fully and leave the lid open for about 10 minutes to build a small bed of hot embers. • Monitor the Kamado until it has risen to the desired temperature. See page 4 for a temperature cooking guide. IT, CH •...
- Page 57 Secure the handle (5) with the 2x pre-attached dome headed nuts. STEP 4 - Place the Kamado Grill on the cart with the bottom vent facing to the front of the cart allowing the vent...
- Page 58 PASSO 5 - Una volta che la griglia è stata posta sullo chassis, posizionare il fuoco (8), la piastra di carbone (7) e la griglia inside of the Kamado Grill as displayed in the assembly diagram. grill (6) nella griglia Kamado, come mostrato nel diagramma di installazione.
- Page 59 Assembly instructions STEP 6 - To attach the handle (5) to the lid of the Kamado grill(9).start by aligning the bolt holes of the handle to pre-installed bolts on the lid. Secure the handle (5) with the 2x pre-attached dome headed nuts.
-
Page 60: Accessori Opzionali
Permette di sollevare la pieta per la cottura della pizza o le griglie di cottura quando sono troppo calde da maneggiare. Protezione anti-pioggia Quando il Kamado è freddo e non in uso, coprirlo con questa custodia anti-pioggia Kamado per una maggiore protezione. Paletta per la cenere Una volta bruciato tutto il combustibile e il Kamado è... - Page 61 Anmerkung: Diese Anleitung dient Änderungen ohne vorherige Bekanntgabe lediglich der Information. Teile der vorbehalten. Grillspezifikation können je nach Vertriebsregion oder Händleranforderung unterschiedlich sein. IT, CH Nota: Questa informazione è solo una Tutte le specifiche sono soggette a guida. Gli elementi inclusi nella vostra modifiche senza preavviso. specifica barbecue possono essere diversi a seconda della regione o specificazione rivenditore specifico. www.patton.eu...
Need help?
Do you have a question about the Kamado and is the answer not in the manual?
Questions and answers