
Related Manuals for Patton Kamado 21


Summary of Contents for Patton Kamado 21
- Page 1 GEBRUIKS- EN INSTALLATIEHANDLEIDING Kamado 21” WITH BLUETOOTH SMART THERMOMETER AND LED LIGHT PATTON B.V. Veilingweg 2 NL 5301 KM Zaltbommel Holland Website: www.patton.eu...
- Page 2 NL, BE, LU NL, BE, LU Gebruiksaanwijzing - 3 FR, CH Notice d’emploi - 16 GB, IE Operating instructions - 30 DE, CH, AT Gebrauchsanweisung - 43 IT, CH Uso e istruzioni di montaggio - 57...
- Page 3 NL, BE, LU Benodigd gereedschap (NIET inbegrepen) Instructies voor de gebruiker – bewaar deze goed, zodat u deze later kunt raadplegen BELANGRIJK: verwijder voor gebruik alle verpakkingen, maar bewaar de veiligheidsinstructies. Deze instructies zijn onderdeel van het product. Let goed op alle veiligheidswaarschuwingen in deze instructies. Lees deze instructies volledig door en bewaar ze voor toekomstig gebruik.
- Page 4 NL, BE, LU • BELANGRIJK: bij het openen van het deksel op hoge temperaturen is het belangrijk dat u het deksel slechts licht omhoog tilt, zodat de lucht langzaam en veilig kan binnenkomen en er geen backdrafts of steekvlammen kunnen ontstaan die kunnen leiden tot letsel. •...
- Page 5 NL, BE, LU ONDERHOUD • Twee keer per jaar (vaker indien nodig) de ringen vastschroeven en de scharnieren oliën. AANSTEKEN, GEBRUIK EN VEILIGHEID • Zorg dat de Kamado op een vaste, vlakke, horizontale, warmtebestendige en niet-brandbare ondergrond staat, uit de buurt van brandbare voorwerpen. •...
- Page 6 NL, BE, LU INSTRUCTIES VOOR BAKKEN OP HOGE TEMPERATUUR • Stook de houtskool op volgens de instructies op pagina 4. • Sluit het deksel en zet de luchtgaten aan de boven- en onderkant helemaal open. • Houd de Kamado in de gaten tot deze de gewenste temperatuur heeft. Zie pagina 5 voor temperatuur- instructies.
- Page 7 De garantie zoals genoemd in deze garantievoorwaarden geldt uitsluitend voor de oorspronkelijke (particuliere) koper die zijn Patton Kamado bij een erkende dealer heeft aangekocht na 1 januari 2021, en dient aantoonbaar te zijn middels het overleggen van een origineel aankoopbewijs.
- Page 8 NL, BE, LU TEMPERATUURINSTRUCTIES Langzaam bakken / roken (110ºC-135ºC) Luchtgat boven Luchtgat beneden Runderborst 2 uur per pond Draadjesvlees 2 uur per pond Hele kip 3 - 4 uur Ribben 3 - 5 uur Braadstukken 9+ uur Grillen / roosteren (160ºC-180ºC) Luchtgat boven Luchtgat beneden 15-20 min.
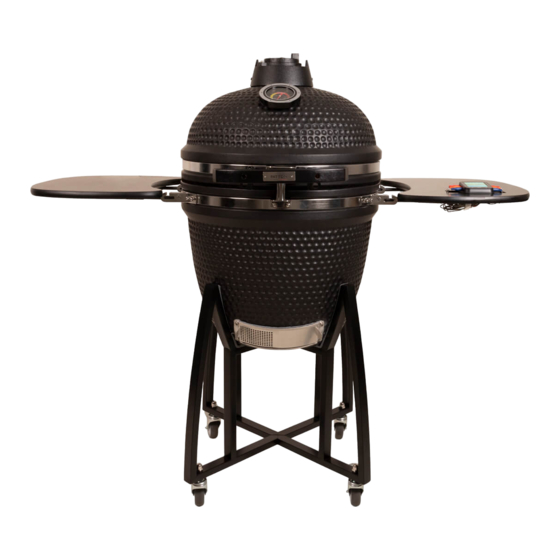
- Page 9 NL, BE, LU Parts list Onderdelenlijst 1 (4x) 6 (1x) 10 (2x) A (16x) 11 (1x) 7 (1x) B (4x) 8 (1x) 12 (1x) C (2x) D (2x) 13 (� x) 2 (2x) 9 (1x) E (2x) 14 ( x) 3 (2x) F (4x) 15 (2x) G (2x)
- Page 10 NL, BE, LU STAP 8 - Zodra de grill stabiel op het onderstel is geplaatst, plaatst u de vuurbak (8), de houtskoolplaat (7) en de bovenste ring (6) in de Kamado-grill, zoals in het montageschema staat aangegeven. STAP 9 - Druk de wielklemmen (2) naar beneden zodat de Kamado niet kan bewegen tijdens het gebruik. STAP 10 - Om de hendel (10) aan het deksel van de kamado Grill (9) te bevestigen, begin je met het bevestigen van 2x handvatbeugels (11) met behulp van de 2 voorgemonteerde bouten en de dopmoeren.
- Page 11 NL, BE, LU Assembly instructions STEP 2 - To assemble the cart insert the two cross pieces (4) into one of the four brackets (1) from both the top and bottom. STEP 3 - Continue to insert the cross pieces (4) into the other three brackets (1). STEP 4 - Secure the brackets (1) to the cross pieces (4) by using the 16x screws (A).
- Page 12 NL, BE, LU Assembly instructions STEP 8 - When the grill is securely placed on the cart add the firebox (8), charcoal plate (7), upper ring (6) and cooking grill (5) inside of the Kamado Grill as displayed in the assembly diagram. STEP 9 - Press down on the castor levers (2) to lock the castor wheels to ensure the Kamado can not move when in use.
-
Page 13: Table Of Contents
NL, BE, LU Assembly instructions STEP 10 - To attach the handle (10) to the lid of the Kamado Grill (9) start by attaching 2x handle brackets (11) using the 2x pre-attached bolts and dome headed nuts. Attach the handle (11) to the brackets (10) using 2x bolts (C) and nuts ( ). - Page 14 headed nuts per bracket. Please note the position shown in the above diagram �ttach the �� table brackets ���� to the �amado �rill ��� using the �� pre�attached bolts and dome STEP 13 – NL, BE, LU headed nuts per bracket. Please note the position shown in the above diagram. �ttach the ��...
- Page 15 NL, BE, LU OPTIONEEL Verhoogd bakrooster Extra roestvrijstalen grill voor extra bakruimte. Ribrek Dit roestvrijstalen rek is ideaal voor het bakken van ribben. Pizzasteen met draagframe Onmisbaar accessoire voor gelijkmatige, knapperige pizza’s, platte broden en andere lekkernijen. Klem Voor het optillen van pizzastenen of grills wanneer deze te heet zijn om met de handen aan te pakken.
- Page 16 INSTRUCTIONS DE MONTAGE ET MODE D’EMPLOI Cuiseur Kamado, modèle 21” pouces AVEC THERMOMÈTRE BLUETOOTH ET LAMPS Á LED...
- Page 17 FR, CH Outils requis (non inclus) Instructions pour l’utilisateur, à conserver pour toute référence ultérieure IMPORTANT : Retirez avec précaution tout emballage avant l’utilisation, mais prenez soin de conserver les instructions de sécurité. Ces instructions font partie du produit. Veuillez prendre connaissance de l’ensemble des avertissements de sécurité figurant dans ces instructions. Veuillez lire ces instructions dans leur intégralité...
- Page 18 FR, CH • Il est vivement recommandé d’utiliser des briquettes ou morceaux de charbon de bois comme combustibles pour votre cuiseur Kamado. Ces combustibles brûlent plus longtemps et produisent moins de cendres à même d’entraver la circulation de l’air. • IMPORTANT : Lors de l’ouverture du couvercle à...
- Page 19 FR, CH NETTOYAGE • Le cuiseur Kamado est autonettoyant. Le laisser chauffer jusqu’à 260 °C pendant 30 minutes afin qu’il brûle tous les résidus d’aliments et débris. • NE PAS utiliser d’eau ou tout autre type de produit de nettoyage pour nettoyer l’intérieur du cuiseur Kamado. Les parois du cuiseur Kamado sont poreuses et absorberont tous les fluides utilisés, ce qui pourrait provoquer des craquements et fissures. Lorsqu’un excès de suie est constaté, utiliser une brosse métallique ou l’outil fourni afin de gratter les résidus de carbone avant l’utilisation successive. • Pour nettoyer les différentes grilles de l’appareil une fois celui-ci totalement refroidi, utiliser un produit de net toyage non abrasif.
- Page 20 FR, CH GUIDE DE FUMAISON • Suivre les instructions ci-dessus, comme si vous lanciez une cuisson lente. • Surveiller le cuiseur Kamado jusqu’à ce qu’il ait atteint la température souhaitée. Reportez-vous à la page 16 pour consulter le guide des températures de cuisson. •...
- Page 21 Chaque Patton Premium Kamado (modèle 13, 15, 16 et 21 pouces.) bénéficie d’une garantie limitée de 20 ans sur les matériaux et la construction en ce qui concerne le dôme en céramique. Le panier et l’anneau de feu du Patton Premium Kamado ont une période de garantie de 2 ans sur les défauts de fabrication. Les pièces en métal, en acier inoxydable et en fonte des barbecues Patton Kamado (telles que les sangles métalliques,...
- Page 22 Sur la jante en feutre, une période de garantie allant jusqu’à 6 mois s’applique, car il s’agit d’un article d’usage. La garantie ci-dessus ne s’applique que si le Patton Kamado est correctement entretenu. On entend par là au moins un entretien adéquat :...
-
Page 23: Assembly Instructions
FR, CH Parts list Liste des pièces 1 (4x) 6 (1x) 10 (2x) A (16x) 11 (1x) 7 (1x) B (4x) 8 (1x) 12 (1x) C (2x) D (2x) 13 (� x) 2 (2x) 9 (1x) E (2x) 14 ( x) 3 (2x) F (4x) 15 (2x) - Page 24 FR, CH ÉTAPE 6: Il faut au moins deux personnes pour lever le cuiseur Kamado et le déposer sur le chariot. Placer une main dans l’évent inférieur du cuiseur Kamado et l’autre sous le grill. Tout levage par la charnière ou les tables latérales risque d’entraîner des blessures corporelles et pourrait avoir pour effet d’annuler la garantie en cas de dommage.
-
Page 25: Assembly Instructions
FR, CH Assembly instructions STEP 2 - To assemble the cart insert the two cross pieces (4) into one of the four brackets (1) from both the top and bottom. STEP 3 - Continue to insert the cross pieces (4) into the other three brackets (1). STEP 4 - Secure the brackets (1) to the cross pieces (4) by using the 16x screws (A). - Page 26 FR, CH Assembly instructions STEP 8 - When the grill is securely placed on the cart add the firebox (8), charcoal plate (7), upper ring (6) and cooking grill (5) inside of the Kamado Grill as displayed in the assembly diagram. STEP 9 - Press down on the castor levers (2) to lock the castor wheels to ensure the Kamado can not move when in use.
-
Page 27: Using 2X Bolts (D) And Nuts (E) . Ensure That The Top Vent Bolt Is On The Left Hand Side When Assembling It
FR, CH Assembly instructions STEP 10 - To attach the handle (10) to the lid of the Kamado Grill (9) start by attaching 2x handle brackets (11) using the 2x pre-attached bolts and dome headed nuts. Attach the handle (11) to the brackets (10) using 2x bolts (C) and nuts ( ). -
Page 28: Headed Nuts Per Bracket. Please Note The Position Shown In The Above Diagram
headed nuts per bracket. Please note the position shown in the above diagram �ttach the �� table brackets ���� to the �amado �rill ��� using the �� pre�attached bolts and dome STEP 13 – FR, CH headed nuts per bracket. Please note the position shown in the above diagram. �ttach the ��... - Page 29 FR, CH EN OPTION Grille de cuisson surélevée Une grille supplémentaire en acier inoxydable pour augmenter l’espace de cuisson Support pour côtes levées de porc Ce support en acier inoxydable est idéal pour une cuisson parfaite des côtes levées de porc. Pierre à...
- Page 30 OPERATING AND ASSEMBLY INSTRUCTIONS Kamado 21” WITH BLUETOOTH SMART THERMOMETER AND LED LIGHT...
- Page 31 GB, IE Tools required (NOT included) User Instructions - Please keep for future reference IMPORTANT – Carefully remove any packaging before use, but retain the safety instructions. These instructions form part of the product. Please take note of all of the safety warnings listed in these instructions. Please read these instructions in their entirety and retain them for future reference.
- Page 32 GB, IE • DO NOT use the Kamado on decking or any other flammable surfaces such as dry grass, wood chips, leaves or decorative bark. • Ensure that the Kamado is positioned at least 2 metres away from flammable items. • DO NOT use this Kamado as a furnace. • DO NOT handle or move the Kamado whilst alight as it will be hot. • ALWAYS USE heat resistant gloves when handling hot ceramics or cooking surfaces. •...
- Page 33 GB, IE • Allow the charcoal to heat up and be kept red hot for at least 30 minutes prior to the first cooking on the Kamado. DO NOT cook before the fuel has a coating of ash. • It is recommended you don’t stoke or turn the coals once they are alight. This allows the charcoals to burn ore uniformly and efficient. • Once alight ONLY use heat resistant gloves when handling hot ceramics or cooking surfaces. •...
- Page 34 The guarantee as mentioned in these guarantee conditions only applies to the original barbecues. (private) buyer who has purchased his Patton Kamado from an authorised dealer after 1 January 2021, and must be able to prove this by presenting an original proof of purchase.
- Page 35 GB, IE Parts made of metal, stainless steel and cast iron of Patton Kamado barbecues (such as metal straps, hinge mechanism, grill, etc.) have a warranty period of 2 years. Bamboo side tables are guaranteed for 2 years. Bamboo products are not covered against weathering and/or cracks, unless the structural use is also lost.
- Page 36 GB, IE Parts list Parts list 1 (4x) 6 (1x) 10 (2x) A (16x) 11 (1x) 7 (1x) B (4x) 8 (1x) 12 (1x) C (2x) D (2x) 13 (� x) 2 (2x) 9 (1x) E (2x) 14 ( x) 3 (2x) F (4x) 15 (2x) G (2x)
- Page 37 GB, IE STEP 8 - When the grill is securely placed on the cart add the firebox (8), charcoal plate (7), and upper ring (6) inside of the Kamado Grill as displayed in the assembly diagram. STEP 9 - Press down on the castor levers (2) to lock the castor wheels to ensure the Kamado can not move when in use. STEP 10 - To attach the handle (10) to the lid of the kamado Grill (9) start by attaching 2x handle brackets (11) using the 2 pre-attached bolts and dome headed nuts.
- Page 38 GB, IE Assembly instructions STEP 2 - To assemble the cart insert the two cross pieces (4) into one of the four brackets (1) from both the top and bottom. STEP 3 - Continue to insert the cross pieces (4) into the other three brackets (1). STEP 4 - Secure the brackets (1) to the cross pieces (4) by using the 16x screws (A).
- Page 39 GB, IE Assembly instructions STEP 8 - When the grill is securely placed on the cart add the firebox (8), charcoal plate (7), upper ring (6) and cooking grill (5) inside of the Kamado Grill as displayed in the assembly diagram. STEP 9 - Press down on the castor levers (2) to lock the castor wheels to ensure the Kamado can not move when in use.
- Page 40 GB, IE Assembly instructions STEP 10 - To attach the handle (10) to the lid of the Kamado Grill (9) start by attaching 2x handle brackets (11) using the 2x pre-attached bolts and dome headed nuts. Attach the handle (11) to the brackets (10) using 2x bolts (C) and nuts ( ).
- Page 41 headed nuts per bracket. Please note the position shown in the above diagram �ttach the �� table brackets ���� to the �amado �rill ��� using the �� pre�attached bolts and dome STEP 13 – GB, IE headed nuts per bracket. Please note the position shown in the above diagram. �ttach the ��...
- Page 42 GB, IE OPTIONAL Raised Cooking Grid Stainless steel extra grill for additional cooking space. Rib Rack This stainless steel rack is ideal for cooking perfect ribs. Pizza Stone with Support Frame Essential accessory for evenly cooking crispy pizzas, flat breads and other delights. Clip Tool Allows you to lift the pizza stone or cooking grills when they are too hot to handle.
- Page 43 BEDIENUNGS-UND MONTAGEANLEITUNG Kamado 21” MIT BLUETOOTH THERMOMETER UND LED BELEUCHTUNG...
- Page 44 DE, CH, AT Benötigte Werkzeuge (NICHT enthalten) Bedienungsanleitung - Für zukünftige Zwecke aufbewahren WICHTIG – Entfernen Sie vor der Verwendung sorgfältig sämtliche Verpackungen, heben Sie jedoch die Sicherheitshinweise auf. Diese Hinweise gehören zum Produkt. Bitte beachten Sie alle in dieser Gebrauchsanweisung aufgeführten Sicherheitshinweise. Bitte lesen Sie diese Gebrauchsanweisung vollständig durch und heben Sie sie für zukünftige Zwecke auf.
- Page 45 DE, CH, AT Verletzungen führen könnte, verhindert wird. • Folgen Sie IMMER den HINWEISEN ZUR LEBENSMITTELZUBEREITUNG auf Seite 4 dieser Gebrauchsanweisung. • Verwenden Sie den Kamado NICHT auf Terrassendielen oder anderen brennbaren Oberflächen wie trockenes Gras, Holzspänen, Blättern oder dekorativer Baumrinde. • Achten Sie darauf, dass der Kamado mindestens 2 Meter entfernt von brennbaren Elementen steht. •...
- Page 46 DE, CH, AT mitgelieferte Werkzeug, um die Kohlenrückstände vor der nächsten Verwendung zu entfernen. • Um den Rost und die Gitter zu reinigen, verwenden Sie ein nicht scheuerndes Reinigungsmittel, nachdem sich das Gerät vollständig abgekühlt hat. • Um die Außenflächen zu reinigen, warten Sie, bis sich der Kamada abgekühlt hat, und verwenden Sie ein feuchtes Tuch mit einem milden Reinigungsmittel. WARTUNG •...
- Page 47 DE, CH, AT • WICHTIG: Wenn Sie den Deckel bei hohen Temperaturen öffnen, sollten Sie ihn nur leicht anheben, damit die Luft langsam und sicher einströmen kann und eine Windentwicklung oder ein Auflodern, das zu Verletzungen führen könnte, verhindert wird. • Folgen Sie IMMER den HINWEISEN ZUR LEBENSMITTELZUBEREITUNG auf Seite 4 dieser Gebrauchsanweisung. • Tragen Sie IMMER hitzebeständige Handschuhe, wenn Sie die heißen Keramik- oder Kochoberflächen berühren.
- Page 48 Hotels, Restaurants, Catering-Unternehmen und andere Unternehmen im Gastgewerbe aus. Dieser Ausschluss gilt auch, wenn der Patton Kamado benutzt und zur Vermietung angeboten wird. Jeder Patton Premium Kamado (Modell 13, 15, 16 und 21 Zoll.) hat eine begrenzte 20-jährige Garantie auf Material und Konstruktion in Bezug auf die Keramikkuppel.
- Page 49 Regelmäßige Reinigung des Patton Kamado d. Überwinterung des Patton Kamado Diese Garantien basieren auf einer normalen und vernünftigen Nutzung und Wartung des Patton Kamado Grill im Inland. Die kommerzielle Nutzung und solche Anwendungen sind von der Garantie ausgeschlossen. Die Garantie gilt nicht für zusätzliche oder unvorhergesehene Schäden oder Brüche oder für Schäden, die verursacht werden durch:...
-
Page 50: Assembly Instructions
DE, CH, AT Parts list Teileliste 1 (4x) 6 (1x) 10 (2x) A (16x) 11 (1x) 7 (1x) B (4x) 8 (1x) 12 (1x) C (2x) D (2x) 13 (� x) 2 (2x) 9 (1x) E (2x) 14 ( x) 3 (2x) F (4x) 15 (2x) G (2x) - Page 51 DE, CH, AT SCHRITT 7 - Setzen Sie den Kamado-Grill auf den Wagen, so dass die untere Belüftung zur Vorderseite des Wagens zeigt, damit sich die Belüftungsklappe ungehindert öffnen und schließen lässt. SCHRITT 8 - Wenn der Grill sicher auf dem Wagen platziert wurde, setzen Sie die Feuerkammer (8), Kohlenplatte (7) und den oberen Ring (6) in den Kamado-Grill, wie in der Montagezeichnung dargestellt.
-
Page 52: Assembly Instructions
DE, CH, AT Assembly instructions STEP 2 - To assemble the cart insert the two cross pieces (4) into one of the four brackets (1) from both the top and bottom. STEP 3 - Continue to insert the cross pieces (4) into the other three brackets (1). STEP 4 - Secure the brackets (1) to the cross pieces (4) by using the 16x screws (A). - Page 53 DE, CH, AT Assembly instructions STEP 8 - When the grill is securely placed on the cart add the firebox (8), charcoal plate (7), upper ring (6) and cooking grill (5) inside of the Kamado Grill as displayed in the assembly diagram. STEP 9 - Press down on the castor levers (2) to lock the castor wheels to ensure the Kamado can not move when in use.
-
Page 54: Using 2X Bolts (D) And Nuts (E) . Ensure That The Top Vent Bolt Is On The Left Hand Side When Assembling It
DE, CH, AT Assembly instructions STEP 10 - To attach the handle (10) to the lid of the Kamado Grill (9) start by attaching 2x handle brackets (11) using the 2x pre-attached bolts and dome headed nuts. Attach the handle (11) to the brackets (10) using 2x bolts (C) and nuts ( ). -
Page 55: Headed Nuts Per Bracket. Please Note The Position Shown In The Above Diagram
headed nuts per bracket. Please note the position shown in the above diagram �ttach the �� table brackets ���� to the �amado �rill ��� using the �� pre�attached bolts and dome STEP 13 – DE, CH, AT headed nuts per bracket. Please note the position shown in the above diagram. �ttach the ��... - Page 56 DE, CH, AT OPTIONAL Erhöhtes Kochgitter Zusätzlicher Edelstahlrost für zusätzlichen Kochbedarf. Rippcheneinsatz Mit dem Edelstahleinsatz lassen sich Rippchen perfekt zubereiten. Pizzastein mit Stützrahmen Unverzichtbares Zubehör für das gleichmäßige Backen von knusprigen Pizzas, Fladenbroten und anderen Köstlichkeiten. Greifzange Zum Anheben des Pizzasteins oder der Kochgitter, wenn diese zu heiß...
- Page 57 ISTRUZIONI D’USO E DI MONTAGGIO Kamado 21” CON BLUETOOTH THERMOMETRO E ILLUMINAZIONE A LED...
- Page 58 IT, CH Attrezzi richiesti (NON inclusi) Istruzioni di montaggio – Da conservare per uso futuro IMPORTANTE – Rimuovere con cura tutti gli imballaggi prima dell’uso econservare le informazioni sulla sicurezza. Queste istruzioni fanno parte del prodotto. Prendere nota di tutte le avvertenze sulla sicurezza elencate in queste istruzioni. Leggere attentamente le istruzioni e conservarle per uso futuro.
- Page 59 IT, CH • È fortemente consigliato l’uso di carbone in pezzi nel vostro Kamado perché brucia più a lungo e produce meno ceneri che possono limitare il flusso d’aria. • IMPORTANTE: Quanto aprite il coperchio a temperature elevate è essenziale sollevarlo lentamente per permettere all’aria di entrare piano e in maniera sicura, evitando eventuali schizzi o scintille che possono provocare danni.
- Page 60 IT, CH • Per pulire le griglie e le graticole utilizzare un detergente non-abrasivo quando l’unità è completamente raffreddata. • Per pulire la superficie esterna attendere il raffreddamento del Kamado e utilizzare uno straccio umido con del detergente neutro. MANUTENZIONE • Stringere le fasce in metallo e oliare il cardine 2 volte l’anno o più se necessario. INFORMAZIONI SU ACCENSIONE, UTILIZZO E CURA •...
- Page 61 IT, CH GUIDA ALLA COTTURA AD ALTA TEMPERATURA • Accendere il carbone rispettando le istruzioni indicate a pagina 59. • Chiudere il coperchio e aprire completamente la bocchetta di ventilazione superiore e quella inferiore. • Monitorare il Kamado fino al raggiungimento della temperatura desiderata. Fare riferimento alla guida delle temperature di cottura di pagina 59. •...
- Page 62 Patton Kamado viene utilizzato e offerto a noleggio. Ogni Patton Premium Kamado (modello 13, 15, 16 e 21 pollici) ha una garanzia limitata di 20 anni sul materiale e sulla costruzione della cupola in ceramica.
- Page 63 IT, CH Queste garanzie si basano su un normale e ragionevole uso domestico e sulla manutenzione del Patton Kamado Grill. L’uso commerciale e tali applicazioni sono esclusi dalla garanzia. La garanzia non si applica a danni o rotture aggiuntive o impreviste, o per danni causati da: trasporto; caduta; montaggio improprio; supporto improprio; tentativi di sostenere la griglia Patton Kamado Grill con mezzi diversi da una superficie solida e non combustibile sotto la base; uso commerciale;...
- Page 64 IT, CH Parts list Elenco pezzi 1 (4x) 6 (1x) 10 (2x) A (16x) 11 (1x) 7 (1x) B (4x) 8 (1x) 12 (1x) C (2x) D (2x) 13 (� x) 2 (2x) 9 (1x) E (2x) 14 ( x) 3 (2x) F (4x) 15 (2x) G (2x)
- Page 65 IT, CH PASSAGGIO 7 - Posizionare il Grill Kamado sul carrello con la bocchetta di ventilazione inferiore posta sul davanti per permetterne l’aerazione e quindi apribile e chiudibile senza ostacoli. PASSAGGIO 8 - Una volta che il grill è posizionato in maniera sicura sul carrello, aggiungere il forno (8), il braciere (7) e il fornello superiore (6) all’interno del Grill Kamado come raffigurato nella figura di montaggio.
- Page 66 IT, CH Assembly instructions STEP 2 - To assemble the cart insert the two cross pieces (4) into one of the four brackets (1) from both the top and bottom. STEP 3 - Continue to insert the cross pieces (4) into the other three brackets (1). STEP 4 - Secure the brackets (1) to the cross pieces (4) by using the 16x screws (A).
- Page 67 IT, CH Assembly instructions STEP 8 - When the grill is securely placed on the cart add the firebox (8), charcoal plate (7), upper ring (6) and cooking grill (5) inside of the Kamado Grill as displayed in the assembly diagram. STEP 9 - Press down on the castor levers (2) to lock the castor wheels to ensure the Kamado can not move when in use.
- Page 68 IT, CH Assembly instructions STEP 10 - To attach the handle (10) to the lid of the Kamado Grill (9) start by attaching 2x handle brackets (11) using the 2x pre-attached bolts and dome headed nuts. Attach the handle (11) to the brackets (10) using 2x bolts (C) and nuts ( ).
- Page 69 headed nuts per bracket. Please note the position shown in the above diagram �ttach the �� table brackets ���� to the �amado �rill ��� using the �� pre�attached bolts and dome STEP 13 – IT, CH headed nuts per bracket. Please note the position shown in the above diagram. �ttach the ��...
- Page 70 IT, CH ACCESSORI OPZIONALI Griglia di cottura sollevata Griglia aggiuntiva in acciaio inossidabile per ulteriore spazio di cot- tura. Griglia a rastrelliera per costolette Questa griglia a rastrelliera in acciaio inossidabile è ideale per una cottura perfetta delle costolette. Pietra per pizza con supporto di sostegno Accessorio essenziale per la cottura uniforme di croccanti pizze, piadine e altre golosità.
- Page 71 Information. Teile der Bekanntgabe vorbehalten. Grillspezifikation können je nach Vertriebsregion oder Händleranforderung unterschiedlich sein. Tutte le specifiche sono soggette a IT, CH Nota: Questa informazione è solo una modifiche senza preavviso. guida. Gli elementi inclusi nella vostra specifica barbecue possono essere diversi a seconda della regione o specificazione rivenditore specifico. www.patton.eu...
Need help?
Do you have a question about the Kamado 21 and is the answer not in the manual?
Questions and answers