Table of Contents
Advertisement
Quick Links
Advertisement
Table of Contents

Related Manuals for epredia Cool-Cut


Summary of Contents for epredia Cool-Cut
-
Page 3: Company Information
If electronic or other form without prior written consent of Epredia. this symbol appears on the instrument, All information contained in this manual is proprietary and always refer to the operator guide. -
Page 4: Table Of Contents
Chapter 1 – Introduction Chapter 2 – Operating Instructions Initial turn-On ..........11 Installing the Cool-Cut on the Rotary Microtomes HM 310, HM 315, HM 325 and HM 340 E ..11 Installing the Cool-Cut on the Rotary Microtome HM 335 E ............. 12 Installing the Cool-Cut on the Rotary Microtomes HM 355, HM 355 S and HM 360 .... -
Page 5: Safety Information
Safety Information Introduction Related to the potential hazards of the specimens to be processed personal Epredia instruments are designed for convenient and protection measures shall be considered: reliable service; however, improper use or handling • protection gloves by a user may damage the instrument or cause a hazard to health. -
Page 6: Chemical Safety
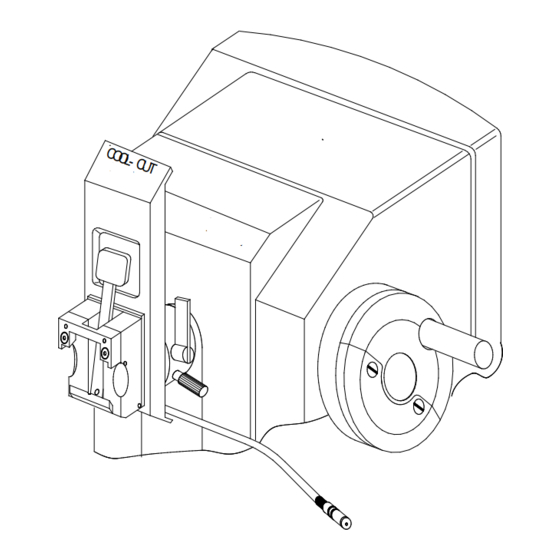
Warranty Statement chemicals in the instrument, do so at their own risk. Epredia are proud of their quality, reliability and of our after-sales service. We continuously strive to improve • All chemicals recommended by Epredia our service to our customers. - Page 7 Fig 1 Cool Cut Operator Guide Issue 18...
-
Page 8: Chapter 1 - Introduction
Chapter 1 – Introduction IVDR Intended Purpose The Epredia Cool-Cut is an in vitro diagnostic device intended to be used alongside the rotary microtomes. It is designed to cool samples for taking precision sections of tissue specimens including the sectioning of paraffin embedded... - Page 9 Power requirements: 100-240 V / 0.6 A +/-10%/50...60 Hz 7.5V DC/3.3A Pollution degree: Protection Class Power Supply Class II Device Cool-Cut Class III Overvoltage category: Acoustic pressure: 20 dB(A) Dimensions: 180 x 60 x 95 mm (long x wide x deep)
- Page 10 Fig. 2 COOL - CUT COOL - CUT MICROM MICROM Fig 3 Cool-Cut Operator Guide Issue 18...
-
Page 11: Chapter 2 - Operating Instructions
Initial turn-On placed on the hand wheel (fig. 4.6) by using a small screwdriver. The Cool-Cut can be adapted to all current rotary • Remove the hand wheel handle (fig. 4.5) using microtomes from Epredia. the attached Allen key (size 5). -
Page 12: Installing The Cool-Cut On The Rotary Microtome Hm 335 E
Otherwise, there is the conventional specimen clamps". danger to get injured. • Now fit the Cool-Cut to the orienting adapter The Cool-Cut is heavier than a on the microtome using the clamping lever on specimen clamp without cooling the microtome. - Page 13 (fig 2.6) into the socket of the Cool-Cuts (fig. 2.7). Fig 5 • The specimen clamp of the Cool-Cut is now being cooled down. Now insert the hand wheel handle together with the respective distance ring (fig. 5.2) into the •...
-
Page 14: Installing The Cool-Cut On The Rotary Microtomes Hm 355, Hm 355 S And Hm 360
• If the specimen clamp is still installed, remove • Now fit the Cool-Cut to the orienting adapter it. For this, loosen the clamping lever and on the microtome using the clamping lever on remove the clamp from the microtome. -
Page 15: Installing The Cool-Cut On The Rotary Microtomes Hm 350 And/Or Hm 350 Sv
• If the specimen clamp is still installed, remove 2.7). it. For this, loosen the clamping lever and • The specimen clamp of the Cool-Cut is now remove the clamp from the microtome. being cooled down. • Now fit the Cool-Cut to the orienting adapter •... -
Page 16: Sectioning Of Specimens
Fig 7 Sectioning of Specimens Especially at high ambient temperatures, the lower specimen temperature generated by the Cool-Cut has very positive effects on the sectioning results. The active cooling of a paraffin specimen clamped in the specimen clamp allows thin sections of excellent quality without re-cooling the specimen. - Page 17 Changing to Conventional Specimen Clamps As an average, the Cool-Cut is 400 g heavier than a conventional specimen clamp. The counterweight increases the weight on the hand wheel accordingly. Resulting in a smooth run of the rotary microtome during the sectioning process with the Cool-Cut.
-
Page 18: Standard Equipment
Standard Equipment The Cool-Cut is supplied with the following accessories: Cool-Cut complete with standard specimen Cool-Cut complete with universal cassette clamp clamp (cat. no. 771120) (cat. no. 771110) • 2 screws • 2 screws • 1 distance ring • 1 distance ring •... -
Page 19: Chapter 3 - Theory Of Operation
Peltier element. The cooling plate on the rear side of the specimen clamp warms up during operation with the Cool-Cut. In its upper area, a fan is place for eliminating the heat Cool-Cut Operator Guide Issue 18... -
Page 20: Chapter 4 - Working With The Cool-Cut
Cool-Cut, or the socket or the cable might be damaged. How to Proceed in Error Cases Note In case of an error, the Cool-Cut must only be checked or repaired by trained skilled service personnel. Note In case components or assemblies must be replaced, only original spare parts must be used. -
Page 21: Chapter 5 - Cleaning And Care
Do not use Acetone! The user must care for a clean and safe condition of the instrument To clean the specimen clamp of the Cool-Cut when returning it to an appropriate from paraffin, use a cloth soaked with solvent. service provider. - Page 22 • Industrial users should contact their suppliers and observe the conditions of the contract. This product must not be disposed of together with other commercial waste. • Please contact your supplier!! Cool-Cut Operator Guide Issue 18...
- Page 23 Installing the Cool-Cut on the Rotary Microtomes HM 355, HM 355 S and HM 360 ....14 How to avoid malfunctions ......20 Orienting the Cool-Cut on a Rotary Microtome ..17 How to Proceed in Error Cases ....... 20...
- Page 24 Revision Control for this Document Date Revision number Changes made February 2022 IVDR compliance requirements added, including this revision record table.
Need help?
Do you have a question about the Cool-Cut and is the answer not in the manual?
Questions and answers