Table of Contents
Advertisement
Quick Links
Advertisement
Table of Contents

Related Manuals for KERN ADB-C Series


Summary of Contents for KERN ADB-C Series
- Page 1 KERN & Sohn GmbH Ziegelei 1 Tel: +49-[0]7433- 9933-0 D-72336 Balingen Fax: +49-[0]7433-9933-149 E-Mail: info@kern-sohn.com Internet: www.kern-sohn.com Operating instructions Analytical balance KERN ADB-A / ADB-C / ADJ Version 3.4 2022-04 ADB_ADJ-BA-e-2234...
-
Page 2: Table Of Contents
Interface cable ........................27 12.3 Interface parameters ......................27 12.3.1 Baud rate ..........................27 12.3.2 Output condition ........................28 12.4 Sample protocols (KERN YKB-01N) ..................28 Servicing, maintenance, disposal .............. 29 Instant help ....................30 14.1 Error messages ........................30 ADB_ADJ-BA-e-2234... -
Page 3: Technical Data
1 Technical data KERN ADB 100-4 ADB 200-4 ADB 600-C3 Product no. / type ADB 100-4A TADB 220-4-B ADB 600-C3 Default weighing unit 0,001 ct Readability (d) 0,0001 g 0,0001 g 0,0001 g 600 ct Weighing range (max) 120 g... -
Page 4: Declaration Of Conformity
KERN ADJ 100-4 ADJ 200-4 ADJ 600-C3 Product no. / Type TADJ 100-4-A TADJ 220-4-B TADJ 600-C3-A Default weighing unit 0,001 ct Readability (d) 0,0001 g 0,0001 g 0,0001 g 600 ct Weighing range (max) 120 g 220 g 120 g... -
Page 5: Device Overview
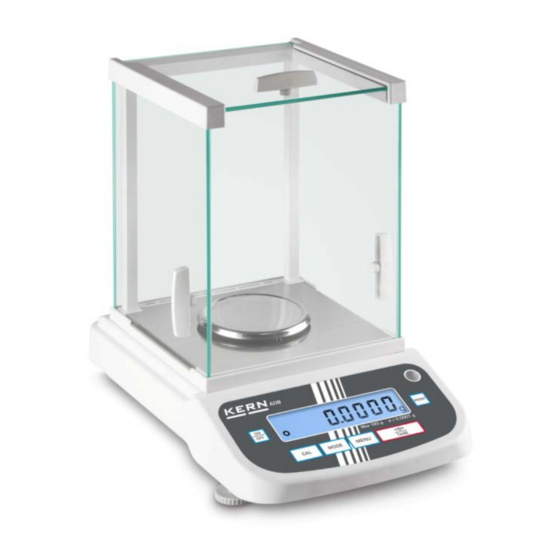
3 Device overview 3.1 Components Pos. Designation Glass windshield Interface RS 232 Weighing pan Bubble level Display Keyboard Foot screws Handle for operation of the side windshield doors Mains adapter connection ADB_ADJ-BA-e-2234... -
Page 6: Keyboard Overview
3.2 Keyboard overview Designation Function Turn on/off ON/OFF key Exit menu Adjustment CAL key Taring Zeroing TARE key Save setting Switch-over weighing unit MODE key Selecting an application How to save the reference MENU key ... -
Page 7: Overview Of Display
3.3 Overview of display Display Description Stability display The balance is in stand-by mode Weighing unit [Gram] Weighing unit [Carat] Weighing unit [Pound] Weighing unit [Ounce] Application parts counting Application percentage determination ADB_ADJ-BA-e-2234... -
Page 8: Basic Information (General)
The balance may only be used according to the described conditions. Other areas of use must be released by KERN in writing. 4.3 Warranty Warranty claims shall be voided in case •... -
Page 9: Monitoring Of Test Resources
In KERN's accredited DKD calibration laboratory test weights and balances may be calibrated (return to the national standard) fast and at moderate cost. 5 Basic Safety Precautions 5.1 Pay attention to the instructions in the Operation Manual... - Page 10 Secure all parts against shifting and damage as depicted. ADB_ADJ-BA-e-2234...
-
Page 11: Unpacking, Setup And Commissioning
7 Unpacking, Setup and Commissioning 7.1 Installation Site, Location of Use The balances are designed in a way that reliable weighing results are achieved in common conditions of use. You will work accurately and fast, if you select the right location for your balance. On the installation site observe the following: •... -
Page 12: Unpacking, Checking And Installation
7.2 Unpacking, checking and installation Open packaging and remove all parts carefully. Verify that there has been no damage and that all packing items are present. Scope of delivery / serial accessories • Balance • Mains adapter • Operating instructions Prior to any installation and assembly works, the balance must be separated from the mains supply. -
Page 13: Electric Power Supply
Before connecting or disconnecting of additional devices (printer, PC) to the data interface, always disconnect the balance from the power supply. With your balance, only use accessories and peripheral devices by KERN, as they are ideally tuned to your balance. -
Page 14: Adjustment
8 Adjustment As the acceleration value due to gravity is not the same at every location on earth, each balance must be coordinated - in compliance with the underlying physical weighing principle - to the existing acceleration due to gravity at its place of location (only if the balance has not already been adjusted to the location in the factory). -
Page 15: Models Adb
• Carry out adjustment as near as possible to the balance’s maximum weight (required adjustment weight see chap. 1). Info about adjustment weights can be found on the Internet at: http://www.kern-sohn.com • Observe stable environmental conditions. Stabilisation requires a certain warm-up time. - Page 16 Procedure: Press CAL in the weighing mode. The device will display the value of the required adjustment weight (e.g. 100 g). In the ADB 200-4A model, select <CAL 200> by pressing TARE. Press CAL again, you will see the indication <CAL in>. No objects may be left on the weighing plate.
-
Page 17: Basic Operation
9 Basic Operation 9.1 Start-up As soon as the balance is supplied with energy, the indicator [ ] is displayed. To switch on press the ON/OFF key. The balance carries out a display test. As soon as the weight display appears, the balance is ready for weighing. - Page 18 9.3 Zeroing In order to obtain optimal weighing results, reset to zero the balance before weighing. Unload the balance. Press the TARE key. Wait until the zero display appears. 9.4 Sample weighing Place the goods to be weighed and close the windshield.
- Page 19 9.6 Weighing with tare The dead weight of any weighing container may be tared away by pressing a button, so that the following weighing procedures show the net weight of the goods to be weighed. Set balance to zero Deposit empty weighing container. The result is displayed.
-
Page 20: Applications
10 Applications 10.1 Parts counting Before the balance can count parts, it must know the average part weight (i.e. the reference). Proceed by putting on a certain number of the parts to be counted. The balance determines the total weight and divides it by the number of parts, the so- called reference quantity. - Page 21 Use the MODE key to switch-over the display to the available units, see chap. 9.5 Sample protocol 7. Printing (KERN YKB-01N) The display value will be printed out by connecting an optional printer and pressing the PRINT key (factory 100 pcs s setting).
- Page 22 Use the MODE key to switch-over the display to the available units, see chap. 9.5 Sample protocol 6. Printing (KERN YKB-01N) The displayed value will be printed out by connecting an optional printer and pressing the PRINT key (factory 49.99 % s setting).
-
Page 23: Menu
11 Menu 11.1 Navigation in the menu Access to menu In weighing mode print first the MENU key, then the PRINT key. The first menu item „C1“ showing the current setting will be displayed. Select menu items Press the TARE key to select the individual menu items showing the current settings one by one. - Page 24 Confirm setting with TARE key, the next menu item will be displayed. Either carry out more settings or exit and save menu (see step 4 or 5) How to save settings and to exit the menu Press the ON/OFF key, „SAVE“ will be displayed.
-
Page 25: Menu Overview
11.2 Menu overview Menu item Settings Description Adjustment mode C1 - 0 Automatic internal adjustment (ADJ models) External adjustment (ADB models: always use this setting) C1 – 1 Note: At the models with internal adjustment weight the adjustment with external weight is not recommended.. -
Page 26: Rs232C-Interface
• Connect balance using a suitable cable with the interface of the peripheral device. Faultless operation requires an adequate KERN interface cable. • Communication parameters (baud rate, bits and parity) of balance and peripheral device must match. -
Page 27: Interface Cable
12.2 Interface cable Balance 9-poles 9-poles Balance Printer 9-poles 9-poles 12.3 Interface parameters 12.3.1 Baud rate In this menu point the data transfer is adapted to different RS232C-peripheral devices. The baud rate determines the speed of the data transfer via the serial interface. -
Page 28: Output Condition
C5 - 3 Output for stable and instable weighing values after pressing PRINT key Save / back to weighing mode, see chap. 11.1 12.4 Sample protocols (KERN YKB-01N) + 10.0000 g SS Stable/positive weighing value - 10.0000 g SD Instable/negative weighing value 12.5 Remote control instructions... -
Page 29: Servicing, Maintenance, Disposal
Spilled weighing goods must be removed immediately. 13.2 Servicing, maintenance The appliance may only be opened by trained service technicians who are authorized by KERN. Before opening, disconnect from power supply. 13.3 Disposal Disposal of packaging and appliance must be carried out by operator according to valid national or regional law of the location where the appliance is used. -
Page 30: Instant Help
14 Instant help In case of an error in the program process, briefly turn off the balance and disconnect from power supply. The weighing process must then be restarted from the beginning. Help: Fault Possible cause The displayed weight does •...
Need help?
Do you have a question about the ADB-C Series and is the answer not in the manual?
Questions and answers