Table of Contents
Advertisement
Available languages
Available languages
Quick Links
Advertisement
Table of Contents

Related Manuals for KitchenAid KMT2115


Summary of Contents for KitchenAid KMT2115
- Page 1 KMT2115 KMT4115...
-
Page 2: Parts And Features
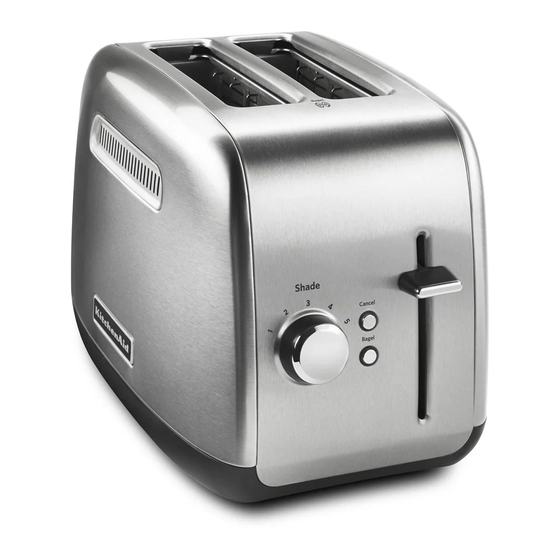
PARTS AND FEATURES TOASTER PARTS 4-Slice Model Extra-Wide Slots with Automatic Self-Centering Racks Back of Toaster Dual- Independent Controls Cord Wrap Removable (not shown) Crumb Trays 2-Slice Model Extra-Wide Slots Extra-Wide Slots with Self-Centering with Automatic Racks Self-Centering Racks Extra-wide slots allow you to easily toast bread, bagels, and English muffins up to "... -
Page 3: Toaster Safety
PARTS AND FEATURES TOASTER CONTROLS Shade Control Knob Cancel Precisely sets the desired brownness level. Press the cancel button to stop a toasting cycle that is already in process. Bagel High-Lift Lever Your Toaster features a special setting for bagels, ensuring optimal heat and time for Press down to lower foods and start the the best results. - Page 4 TOASTER SAFETY 6. Do not operate any appliance with a damaged cord or plug or after the appliance malfunctions or has been damaged in any manner. Return appliance to the nearest Authorized Service Facility for examination, repair or adjustment. 7. The use of accessory attachments not recommended by the appliance manufacturer may cause injuries.
-
Page 5: Using Your Toaster
USING YOUR TOASTER BEFORE FIRST USE Before using your Toaster, check the extra-wide slots and remove any packing or printed material that might have fallen inside during shipping or handling. Do not probe inside the Toaster with a metal object. You may see light smoke the first time you use the Toaster. -
Page 6: Special Toasting Functions
SPECIAL TOASTING FUNCTIONS TOASTING BAGELS Your Toaster features a special setting for With the set to the desired level bagels, ensuring optimal heat and time for of brownness, press down on the Lift the best results. The heating elements will Lever to start the toasting cycle. -
Page 7: Troubleshooting
TROUBLESHOOTING If your toaster should fail to operate, check the following: Check that the Toaster is plugged into a grounded 3 prong electrical outlet. If it is, unplug the Toaster. Plug in Toaster. If the Toaster still does not work, check the household fuse or circuit breaker. -
Page 8: Warranty
WARRANTY KitchenAid Toaster Warranty for the 50 United States, the ® District of Columbia, Puerto Rico, and Canada This warranty extends to the purchaser and any succeeding owner for Toasters operated in the 50 United States, the District of Columbia, Puerto Rico, and Canada. Length of Warranty: One Year Full Warranty from date of purchase. - Page 9 WARRANTY Hassle-Free Replacement Warranty – 50 United States, District of Columbia, and Puerto Rico We’re so confident the quality of our toll-free Customer Satisfaction Center at products meets the exacting standards 1-800-541-6390 Monday through of KitchenAid that, if your Toaster should Saturday.
-
Page 10: Pièces Et Caractéristiques
PIÈCES ET CARACTÉRISTIQUES PIÈCES DE GRILLE-PAIN Fentes extra larges Modèle 4 tranches avec grilles automatiques auto-centrées Derrière du grille-pain Doubles commandes Rangement pour indépendantes Ramassemiettes cordon (pas montré) amovible Modèle 2 tranches Fentes extra larges avec grilles automatiques auto-centrées Fentes extra larges Les fentes extra larges vous permettent avec grilles automatiques de griller sans effort le pain, les bagels... -
Page 11: Sécurité Du Grille-Pain
PIÈCES ET CARACTÉRISTIQUES COMMANDES DE GRILLE-PAIN Bouton de contrôle du brunissement Bouton Cancel (annulation) Règle le degré de brunissement souhaité avec précision. Appuyer sur le bouton Cancel (annulation) pour interrompre un programme de Bagel brunissement en cours. Le grille-pain comporte un réglage spécial Manette haut niveau pour le brunissement des bagels, assurant ainsi un chauffage et une durée optimaux... - Page 12 SÉCURITÉ DU GRILLE-PAIN 4. Une surveillance attentive s’impose lorsqu’un appareil ménager est utilisé par ou à proximité d’enfants. 5. Débrancher le grille-pain de la prise lorsqu’on ne l’utilise pas et avant le nettoyage. Attendre le refroidissement total avant d’installer ou de retirer des pièces.
-
Page 13: Spécifications Électriques
SÉCURITÉ DU GRILLE-PAIN SPÉCIFICATIONS ÉLECTRIQUES Volts: 120 volts C.A.uniquement Fréquence: 60 Hz REMARQUE : Votre grille-pain possède une prise de mise à la terre à 3 broches. Pour réduire le risque de choc électrique, cette fiche ne peut être insérée dans une prise que dans un seul sens. -
Page 14: Faire Des Toasts
UTILISATION DU GRILLE-PAIN FAIRE DES TOASTS Raccourcir le cordon si nécessaire en l’enroulant sous le socle. Les pieds du grille-pain sont suffisamment grands pour permettre de sortir le cordon sous n’importe quel côté du grille-pain. Brancher l’appareil dans une prise à 3 alvéoles reliée à... -
Page 15: Fonctions Spéciales De Brunissement
FONCTIONS SPÉCIALES DE BRUNISSEMENT FAIRE GRILLER DES BAGELS Le grille-pain comporte un réglage spécial Après avoir réglé la manette pour le brunissement des bagels, assurant degré de brunissement souhaité, ainsi un chauffage et une durée optimaux appuyer sur la manette pour démarrer pour de meilleurs résultats. -
Page 16: Dépannage
DÉPANNAGE Si votre grille-pain ne fonctionne pas,vérifier ce qui suit : Vérifier que le grille-pain est branché dans une prise à 3 alvéoles reliée à la terre. Si c’est le cas, le débrancher. Brancher le grille-pain. Si le grille-pain ne fonctionne toujours pas, vérifier le fusible ou le disjoncteur du domicile. -
Page 17: Garantie
GARANTIE Garantie du grille-pain KitchenAid pour les 50 États des ® États-Unis, le district fédéral de Columbia, Porto Rico et le Canada Cette garantie couvre l’acheteur et les propriétaires suivants du grille-pain lorsqu’il est utilisé dans les 50 États des États-Unis, le district fédéral de Columbia, Porto Rico et le Canada. - Page 18 GARANTIE Garantie de satisfaction totale et de remplacement - 50 États des États-Unis, district fédéral de Columbia et Porto Rico Nous sommes tellement certains que lundi au samedi. Veuillez avoir votre reçu la qualité de nos produits satisfait aux de vente à portée de main au moment normes exigeantes de KitchenAid que, si de votre appel.
-
Page 19: Piezas Y Características
PIEZAS Y CARACTERÍSTICAS PIEZAS DE TOSTADOR Ranuras extra anchas Modelo de 4 rebanadas con rejillas de centrado automático Detrás del tostador Controles duales independientes Almacenaje del cable Bandeja (no mostrado) para migajas removible Modelo de 2 rebanadas Ranuras extra anchas con rejillas de Ranuras extra anchas centrado automático con rejillas de centrado... -
Page 20: Seguridad Del Tostador
PIEZAS Y CARACTERÍSTICAS CONTROLES Perilla de control de tostado Cancel (Anulación) Fija con precisión el nivel de dorado Presione el botón de anulación para deseado. detener un ciclo de tostado que ya esté en proceso. Bagel (Roscas) Palanca de elevación alta Su tostador tiene un ajuste especial para Presiónela hacia abajo para bajar los tostar roscas, el cual ajusta el calor y... - Page 21 SEGURIDAD DEL TOSTADOR 5. Desenchufe el tostador del contacto cuando no esté en uso y antes de la limpieza. Deje que se enfríe antes de colocar o quitar piezas. 6. No opere ningún aparato con un cable o enchufe dañado o después de que el aparato funcione mal o se haya dañado de alguna manera.
-
Page 22: Uso De Su Tostador
25. La temperatura de las superficies accesibles puede ser mayor cuando el aparato se encuentra en funcionamiento. GUARDE ESTAS INSTRUCCIONES Este producto ha sido diseñado únicamente para uso doméstico. REQUISITOS ELÉCTRICOS KMT2115 Tensión: 120 V~ Frecuencia: 60 Hz Potencia: 900 W KMT4115 Tensión: 120 V~... -
Page 23: Cómo Tostar Pan
USO DE SU TOSTADOR CÓMO TOSTAR PAN Acorte el cable si es necesario, envolviéndolo debajo de la base. Las patas del tostador son lo suficientemente altas como para permitir que el cable salga de la parte inferior de cualquier lado del tostador. Conecte a un contacto de pared de conexión a tierra de 3 terminales. -
Page 24: Funciones Especiales De Tostado
FUNCIONES ESPECIALES DE TOSTADO CÓMO TOSTAR ROSCAS Su tostador tiene un ajuste especial Con la fijada en el nivel deseado para tostar roscas, asegurando el calor y de dorado, presiónela hacia abajo para tiempo óptimos para obtener los mejores comenzar el ciclo de tostado. resultados. -
Page 25: Solución De Problemas
SOLUCIÓN DE PROBLEMAS Si el tostador todavía no funciona, revise el fusible o el cortacircuitos de la casa. Si no se puede corregir el problema: Consulte las secciones de garantía y servicio de KitchenAid. No devuelva el tostador a la tienda; los vendedores no proveen servicio técnico. - Page 26 GARANTÍA Garantía de KitchenAid para el tostador en los 50 estados de los ® Estados Unidos, el Distrito de Columbia, Puerto Rico y Canadá Esta garantía se extiende al comprador y a cualquier propietario subsiguiente para los tostadores usados en los 50 estados de los Estados Unidos, el Distrito de Columbia, Puerto Rico y Canadá.
- Page 27 GARANTÍA Garantía de reemplazo sin dificultades en los 50 estados de los Estados Unidos, el Distrito de Columbia y Puerto Rico Confiamos tanto en que la calidad de compra original cuando llame. Se requiere nuestros productos cumple con las la prueba de compra para hacer un exigentes normas de KitchenAid, que si el reclamo.
- Page 28 DISCOVER MORE. DÉCOUVREZ PLUS. DESCUBRA MÁS. KITCHENAID.COM/QUICKSTART PRODUCT QUESTIONS OR RETURNS QUESTIONS SUR LE PRODUIT OU LES RETOURS PREGUNTAS SOBRE EL PRODUCTO O DEVOLUCIÓNES USA: 1.800.541.6390 | KitchenAid.com CANADA: 1.800.807.6777 | KitchenAid.ca ®/™ ©2018 KitchenAid. All rights reserved. KITCHENAID and the design of the stand mixer are trademarks in the U.S.
Need help?
Do you have a question about the KMT2115 and is the answer not in the manual?
Questions and answers