
Related Manuals for KitchenAid KMT4115


Summary of Contents for KitchenAid KMT4115
- Page 1 KMT2115 • KMT4115 Toaster I N S T R U C T I O N S Grille-pain I N S T R U C T I O N S Toastador I N S T R U C C I O N E S...
- Page 2 Welcome to the world of KitchenAid ® We’re committed to helping you create a lifetime of delicious meals for family and friends. To help ensure the longevity and performance of your appliance, keep this guide handy. It will empower you with the best way to use and care for your product.
-
Page 3: Table Of Contents
Toaster. Proof of purchase will assure you of in-warranty service. Before you use your Toaster, please fill out and mail your product registration card packed with the unit, or register online at www.kitchenaid.com. This will enable us to contact you in the unlikely event of a product safety notification and assist us in complying with the provisions of the Consumer Product Safety Act. -
Page 4: Toaster Safety
Toaster Safety IMPORTANT SAFEGUARDS When using electrical appliances, basic safety precautions should always be followed, including the following: 1. Read all instructions. 2. Do not touch hot surfaces. Use handles or knobs. 3. To protect against electrical shock, do not immerse cord, plugs, or toaster in water or other liquid. -
Page 5: Electrical Requirements
Toaster Safety ELECTRICAL REQUIREMENTS Do not use an extension cord. If the power supply cord is too short, have a qualified electrician or serviceman install an outlet near the appliance. A short power supply cord (or detachable power supply cord) should be used to reduce the risk resulting from becoming entangled in or tripping over a longer cord. -
Page 6: Parts And Features
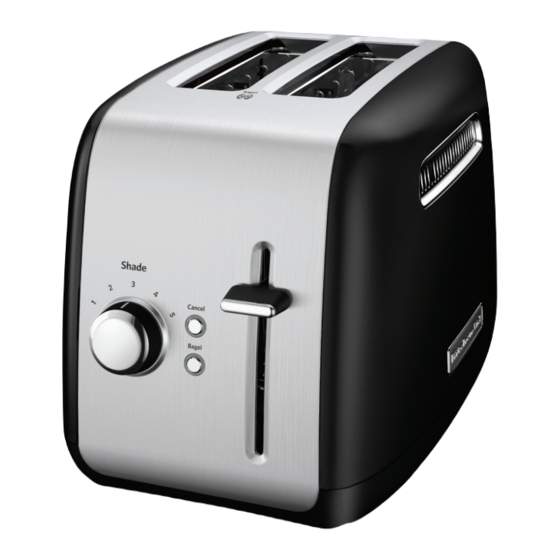
Parts and Features 4-Slice Model Extra-Wide Slots with Automatic Self-Centering Racks Back of Toaster Dual- Independent Controls Cord Wrap Removable (not shown) Crumb Trays 2-Slice Model Extra-Wide Slots Extra-Wide Slots with with Automatic Self-Centering Racks Self-Centering Racks Extra-wide slots allow you to easily toast bread, bagels, and English muffins up to 1 "... -
Page 7: Using Your Toaster
Parts and Features Shade Control Knob Precisely sets the desired brownness level. Bagel High-Lift Your Toaster features a special setting for Lever bagels, ensuring optimal heat and time for the best results. The heating elements will adjust to nicely toast the inside of a cut bagel without burning the outside surface. -
Page 8: Making Toast
Using Your Toaster Making Toast 4. Insert bread or other food to be toasted in slot(s). 1. Shorten cord, if necessary, by wrapping cord under the base. The toaster’s feet are tall enough to allow the cord to exit from under any side of the toaster. NOTE: For even toasting on 2-slot models, toast only one bread type and thickness at a time. -
Page 9: Special Toasting Functions
4. Return Crumb Tray to Toaster. Press it in immediately following a toasting cycle. firmly until it clicks into position. Do not use the Toaster without the Crumb Tray in proper position. NOTE: KitchenAid does not recommend the use of a toaster cover. -
Page 10: Troubleshooting
3. If the Toaster still does not work, check the household fuse or circuit breaker. If the problem cannot be corrected: See the KitchenAid Warranty and Service sections. Do not return the Toaster to the retailer; retailers do not provide service. -
Page 11: Warranty
IF THIS PRODUCT FAILS TO WORK AS WARRANTED, CUSTOMER’S SOLE AND EXCLUSIVE REMEDY SHALL BE REPAIR OR REPLACEMENT ACCORDING TO THE TERMS OF THIS LIMITED WARRANTY. KITCHENAID AND KITCHENAID CANADA DO NOT ASSUME ANY RESPONSIBILITY FOR INCIDENTAL OR CONSEQUENTIAL DAMAGES. This warranty gives you specific legal rights and you may also have other rights... - Page 12 Customer Satisfaction Center at products meets the exacting standards 1-800-541-6390 Monday through Saturday. of KitchenAid that, if your Toaster should Please have your original sales receipt fail within the first year of ownership, available when you call. Proof of purchase KitchenAid will arrange to deliver an will be required to initiate the claim.
- Page 13 Bienvenue dans le monde de KitchenAid ® Nous nous engageons à vous aider à créer de délicieux repas pour votre famille et vos amis, et ce durant toute la vie. Pour contribuer à la longévité et à une bonne performance de votre appareil, conserver ce guide à...
- Page 14 La preuve d’achat vous garantit le bénéfice du service après-vente. Avant d’utiliser le grille-pain, veuillez remplir et poster la carte d’enregistrement du produit emballée avec l’appareil, ou visitez notre site Web à www.kitchenaid.com. Grâce à cette carte, nous pourrons vous contacter dans l’éventualité improbable d’un avis de sécurité...
-
Page 15: Consignes De Sécurité Importantes
Sécurité du grille-pain CONSIGNES DE SÉCURITÉ IMPORTANTES Lors de l’utilisation d’appareils électriques, il faut toujours observer certaines précautions élémentaires de sécurité, y compris les suivantes : 1. Lire toutes les instructions. 2. Ne pas toucher de surface chaude. Utiliser les poignées ou les boutons. 3. -
Page 16: Spécifications Électriques
Sécurité du grille-pain 14. Lorsque le grille-pain est en cours de fonctionnement, un incendie peut se produire si le grille-pain est recouvert par un matériau inflammable ou en contact avec celui-ci, notamment des rideaux, draperies, parois et autres objets assimilés. 15. -
Page 17: Pièces Et Caractéristiques
Pièces et caractéristiques Modèle 4 tranches Fentes extra larges avec grilles automatiques auto-centrées Derrière du grille-pain Doubles commandes indépendantes Rangement pour Ramasse- cordon (pas montré) miettes amovible Modèle 2 tranches Fentes extra larges avec grilles Fentes extra larges automatiques auto-centrées avec grilles automatiques Les fentes extra larges vous permettent de auto-centrées... -
Page 18: Utilisation Du Grille-Pain
Pièces et caractéristiques Bouton de contrôle du brunissement brunissement. Une fois le brunissement terminé, la manette soulève les aliments Règle le degré de brunissement souhaité au-delà du niveau du grille-pain pour faciliter avec précision. leur retrait. Bagel Le grille-pain comporte un réglage spécial pour le brunissement des bagels, assurant ainsi un chauffage et une durée optimaux pour de meilleurs résultats. - Page 19 Utilisation du grille-pain 3. Tourner le bouton de contrôle du 5. Appuyer sur la manette pour démarrer brunissement pour sélectionner le degré le programme de brunissement. Le toast de brunissement souhaité. Tourner le se soulève automatiquement à la fin du bouton de brunissement vers la droite programme et le grille-pain s’éteint.
-
Page 20: Fonctions Spéciales De Brunissement
4. Replacer le ramasse-miettes dans programme de brunissement, le plateau le grille-pain. L’enfoncer fermement est chaud. jusqu’à ce qu’il s’enclenche. Ne pas utiliser le grille-pain si le ramasse-miettes n’est pas correctement installé. REMARQUE : KitchenAid ne recommande pas l’emploi d’une protection de grille-pain. -
Page 21: Dépannage
Si le problème ne peut être résolu : Consulter les sections de garantie et de dépannage de KitchenAid. Ne pas rapporter le grille-pain au vendeur; les détaillants n’assurent aucun service après vente. Si votre grille-pain ne fonctionne pas,vérifier ce qui suit :... -
Page 22: Garantie
SI CET APPAREIL NE FONCTIONNE PAS COMME GARANTI, LE SEUL ET EXCLUSIF RECOURS DU CLIENT EST LA RÉPARATION OU LE REMPLACEMENT SELON LES DISPOSITIONS DE LA GARANTIE LIMITÉE. KITCHENAID ET KITCHENAID-CANADA N’ASSUMENT AUCUNE RESPONSABILITÉ EN CAS DE DOMMAGES ACCESSOIRES OU INDIRECTS. - Page 23 à portée de main au moment de votre qualité de nos produits satisfait aux normes appel. Une preuve d’achat est indispensable exigeantes de KitchenAid que, si le grille-pain pour que votre réclamation puisse être cesse de fonctionner au cours de la première traitée.
- Page 24 Bienvenido al mundo de KitchenAid ® Estamos comprometidos a ayudarle a crear deliciosas comidas para su familia y amistades por toda la vida. Para ayudar a asegurar la larga duración y el desempeño de su aparato, mantenga esta guía a la mano.
- Page 25 La prueba de compra le asegurará el servicio bajo la garantía. Antes de usar el tostador, llene y envíe por correo la tarjeta de registro del producto, que fue empacada con la unidad, o a www.kitchenaid.com. Esta tarjeta nos permitirá contactarlo en el caso improbable de una notificación acerca de la seguridad del producto y nos asistirá...
-
Page 26: Seguridad Del Tostador
Seguridad del Tostador SALVAGUARDIAS IMPORTANTES Al utilizar aparatos eléctricos, debe seguir las precauciones básicas de seguridad, entre las que se incluyen las siguientes: 1. Lea todas las instrucciones. 2. No toque las superficies calientes. Use asas o perillas. 3. Para protegerse contra choque eléctrico, no sumerja el cable, los enchufes ni el tostador en agua ni en ningún otro líquido. -
Page 27: Requisitos Eléctricos
Seguridad del Tostador 13. No deben insertarse en el tostador alimentos demasiado grandes, paquetes con papel de aluminio ni utensilios, ya que pueden constituir un riesgo de incendio o choque eléctrico. 14. Puede ocurrir un incendio si se cubre el tostador con un material inflamable o si lo toca, incluyendo cortinas, pañería, paredes y objetos similares cuando esté... -
Page 28: Piezas Y Características
Piezas y características Modelo de 4 rebanadas Ranuras extra anchas con rejillas de centrado automático Detrás del tostador Controles duales independientes Almacenaje del cable Bandeja (no mostrado) para migajas removible Modelo de 2 rebanadas Ranuras extra anchas con rejillas de Ranuras extra anchas centrado automático con rejillas de centrado... -
Page 29: Uso De Su Tostador
Piezas y características Perilla de control de tostado Fija con precisión el nivel de dorado deseado. Palanca de elevación alta Bagel (Roscas) Su tostador tiene un ajuste especial para tostar roscas, el cual ajusta el calor y tiempo óptimos para obtener los mejores resultados. -
Page 30: Cómo Tostar Pan
Uso de su tostador Cómo tostar pan 3. Gire la perilla del control de tostado para seleccionar el grado de dorado que 1. Acorte el cable si es necesario, desee. Gírela hacia la derecha para un envolviéndolo debajo de la base. Las patas tostado más intenso y hacia la izquierda del tostador son lo suficientemente altas para un tostado menos intenso. -
Page 31: Funciones Especiales De Tostado
Uso de su tostador 5. Presione hacia abajo la palanca para 6. Para anular el tostado comenzar el ciclo de tostado. El alimento en cualquier momento, tostado se levantará automáticamente al presione CANCEL final del ciclo y el tostador se apagará. (Anulación). -
Page 32: Cuidado De Su Tostador
Presione con firmeza hasta que encaje a presión en su lugar. No use el tostador sin la bandeja para migajas en la posición correcta. NOTA: KitchenAid no recomienda usar una cubierta para el tostador. -
Page 33: Solución De Problemas
Si no se puede corregir el problema: Consulte las secciones de garantía y servicio de KitchenAid. No devuelva el tostador a la tienda; los vendedores no proveen servicio técnico. Si el tostador no funciona, verifique lo siguiente: 1. -
Page 34: Garantía
SI ESTE PRODUCTO NO FUNCIONA SEGÚN SE GARANTIZA, EL ÚNICO Y EXCLUSIVO RECURSO DEL CLIENTE SERÁ LA REPARACIÓN O EL REEMPLAZO SEGÚN LOS TÉRMINOS Y LAS CONDICIONES DE ESTA GARANTÍA LIMITADA. KITCHENAID Y KITCHENAID CANADÁ NO ASUMEN NINGUNA RESPONSABILIDAD POR DAÑOS INCIDENTALES O CONSIGUIENTES. - Page 35 KitchenAid al 1-800-541-6390, de productos cumple con las exigentes normas lunes a sábados. Tenga a mano el recibo de de KitchenAid, que si el tostador presentara compra original cuando llame. Se requiere la alguna falla durante el primer año, le prueba de compra para hacer un reclamo.
- Page 36 KitchenAid, U.S.A. ® Marque déposée/™ Marque déposée/La forme du batteur est une marque déposée de KitchenAid, Etats-Unis ® Marca registrada/™ Marca de comercio/La forma de la batidora es una marca de comercio de KitchenAid, U.S.A. W10441000A © 2011 All rights reserved.
Need help?
Do you have a question about the KMT4115 and is the answer not in the manual?
Questions and answers