Table of Contents
Advertisement
Installation Overview
•
•
•
•
•
Preinstallation Checks and Installation Guidelines
Before you mount and deploy your access point, we recommend that you perform a site survey (or use the
Site Planning tool) to determine the best location to install your access point.
You should have the following information about your wireless network available:
• Access point locations
• Access point mounting options: To a vertical or horizontal wall or a DIN rail
• Access point power options: Use either of the following options to power the AP:
• Operating temperature: -40° to +158°F (-40° to +70°C) with still air.
• Console access using the console port
Note
Preinstallation Checks and Installation Guidelines, on page 1
Mounting the Access Point, on page 2
Grounding the Access Point, on page 9
Powering the Access Point, on page 11
Connecting an Ethernet Cable to the Access Point, on page 13
• DC power input
• Cisco-approved power injector
• 802.3at (PoE+), 802.3bt, and Cisco Universal PoE (Cisco UPOE)
We recommend that you use a console cable that is one meter or less in length.
The AP may face issues while booting if you use an unterminated console cable
(not plugged into any device or terminal) or a console cable that is more than one
meter in length.
Installation Overview
1
Advertisement
Table of Contents

Related Manuals for Cisco Catalyst IW9165E


Summary of Contents for Cisco Catalyst IW9165E
- Page 1 • Access point power options: Use either of the following options to power the AP: • DC power input • Cisco-approved power injector • 802.3at (PoE+), 802.3bt, and Cisco Universal PoE (Cisco UPOE) • Operating temperature: -40° to +158°F (-40° to +70°C) with still air. • Console access using the console port We recommend that you use a console cable that is one meter or less in length.
-
Page 2: Mounting The Access Point
Installation Overview Mounting the Access Point We recommend that you make a site map showing access point locations so that you can record the device MAC addresses from each location and return them to the person who is planning or managing your wireless network. - Page 3 Installation Overview Mounting on a Wall • Mounting screws (x4) M4 x 6mm When choosing a location for wall-mounting an access point, consider cable limitations and wall structure, and consider suitable antenna location ahead of time. Warning Read the wall-mounting instructions carefully before beginning installation. Failure to use the correct hardware or to follow the correct procedures could result in a hazardous situation to people and damage to the system.
- Page 4 Installation Overview Mounting on a Wall M4 screws from kit Mounting holes Step 2 Align the mounting brackets (1) over the mounting holes (3) so that the larger holes on the brackets extend out over the access point. Step 3 Attach the brackets to the access point with the four M4 screws (2) provided using a Phillips head driver.
-
Page 5: Installing A Din Rail
Installation Overview Installing a DIN Rail Figure 4: Wall Mounting Hole Dimensions and Overall Dimensions With Mounting Brackets Attached Step 5 Route the cables so that they do not put a strain on the connectors or mounting hardware. Installing a DIN Rail The DIN Rail kit is ordered separately. - Page 6 Installation Overview Mounting the DIN Rail Bracket on the Access Point Mounting the DIN Rail Bracket on the Access Point Step 1 First, attach the DIN rail bracket to the back of the access point. The DIN rail bracket can be attached to the bottom or the back of the access point.
- Page 7 Installation Overview Attaching the Bracket onto the DIN Rail Figure 6: DIN Rail Bracket Mounted on the Bottom Figure 7: DIN Rail Bracket Mounted on the Back Attaching the Bracket onto the DIN Rail To attach the IW9165E with the bracket to a DIN rail, follow these steps. Step 1 Position the access point so that the lower edge and spring of the DIN clip, located within the bottom of the DIN rail bracket, engages with the bottom section of the DIN rail.
- Page 8 Installation Overview Attaching the Bracket onto the DIN Rail Step 2 Push up on the AP so that the spring of the DIN clip compresses against the lower section of DIN rail, and then rotate the AP so that the top hook of the DIN clip clamps to the top section of DIN rail. Figure 8: Bracket Attached to the DIN Rail DIN rail bracket DIN rail...
-
Page 9: Grounding The Access Point
Installation Overview Grounding the Access Point To remove the router from the DIN Rail, simply reverse the procedure. Note Grounding the Access Point In all installations, after mounting the access point, you must properly ground the unit before connecting power cables. Warning This equipment must be grounded. - Page 10 Installation Overview Grounding the Access Point Step 2 Connect the supplied ground lug to the access point ground connection point using the supplied screws. Apply supplied oxide inhibitor between the ground lug and the access point ground connection. 6-32 screws Grounding lug AP ground connection point Step 3...
-
Page 11: Powering The Access Point
Depending on the configuration and regulatory domain, the required power for full operation is 802.3bt or UPOE. For more information, see Power Sources. Power Feature Matrix The following table provides the AP power feature matrix. Table 1: Cisco Catalyst IW9165E Feature Matrix Power Input 5G Radio 5G/6G Radio GNSS mGig Eth RJ45 1G 24-48V max 2.5G... - Page 12 Installation Overview Connecting a DC Power Cable to the Access Point To reduce the risk of fire, use only No. 24 AWG or larger telecommunication line cord. Statement 1023 Warning The installer is responsible for ensuring that powering the AP from this type of power injector is allowed by Note local and/or national safety and telecommunications equipment standards.
-
Page 13: Connecting An Ethernet Cable To The Access Point
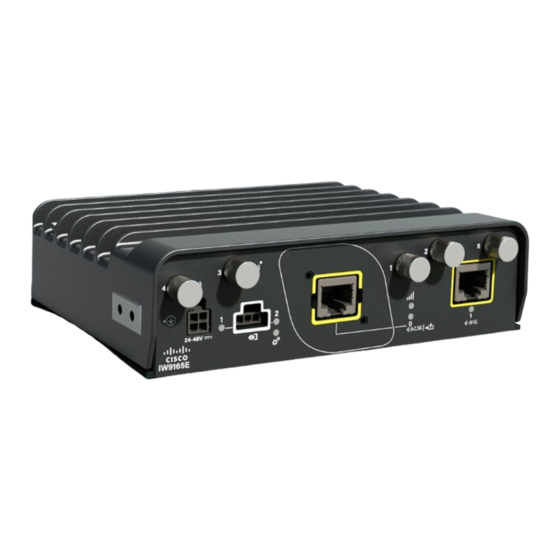
Installation Overview Connecting an Ethernet Cable to the Access Point Connecting an Ethernet Cable to the Access Point Connect an Ethernet cable to the access point by using a cable gland or an M12-RJ45 adapter. Connecting an Ethernet Cable to the Access Point Follow these steps to connect an Ethernet cable to the RJ-45 port: Step 1 Disconnect power to the power injector, and ensure all power sources to the access point are turned off. - Page 14 Installation Overview Connecting to the RJ-45 Port Using M12 Adapter M12 adapter O-ring Spacer O-ring Step 2 Attach the spacer to the chassis with the screws provided (4 in the following figure). Use 5-7 in-lbs. of torque to screw the spacer onto the access point. Installation Overview...
- Page 15 Installation Overview Connecting to the RJ-45 Port Using M12 Adapter M12-RJ45 adapter Captive screws RJ45 plug M3 screws Spacer Step 3 Align the RJ45 plug with the RJ-45 connector in the chassis, and plug the M12 adapter into the chassis. Step 4 Tighten the M12 adapter captive screws into the chassis (2 in the following figure).
- Page 16 Installation Overview Connecting to the RJ-45 Port Using M12 Adapter M12-RJ45 adapter Captive screws Spacer Installation Overview...
Need help?
Do you have a question about the Catalyst IW9165E and is the answer not in the manual?
Questions and answers