
Related Manuals for Harvia BERGEN


Summary of Contents for Harvia BERGEN
- Page 1 K10180 Bedienungsanleitung Infrarot macht das Leben gesünder Aufgrund unserer kontinuierlichen Produktverbesserung kann das in dieser Bedienungsanleitung abgebildete Produkt leicht vom tatsächlichen Produkt abweichen.
- Page 2 Empfehlungen Lesen Sie diese Anleitung sorgfältig durch, bevor Sie Ihre Sauna zum ersten Mal in Betrieb nehmen. Wir empfehlen Ihnen, es an einem sicheren Ort aufzubewahren, damit Sie es in Zukunft wieder verwenden können. • Holz ist ein lebendiges Element. Um sein ursprüngliches Aussehen zu erhalten, ist es wichtig, die Außenseite des Holzes gegen Feuchtigkeit zu behandeln.
- Page 3 Sicherheit WICHTIG! Bitte lesen Sie die Sicherheitshinweise sorgfältig durch, bevor Sie Ihre Saunakabine aufstellen und benutzen. Die Hinweise sind wichtig für Ihre Sicherheit, also halten Sie sich bitte strikt an sie ein. Achten Sie auf Hyperthermie, Hitzschlag oder Hitzeerschöpfung, die durch Nichtbeachtung der Sicherheitshinweise verursacht oder verschlimmert werden können.
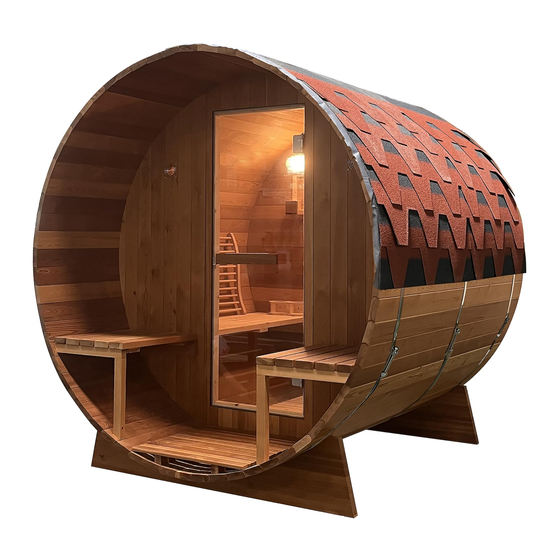
- Page 4 Beschreibung Sauna...
- Page 5 Beschreibung Sauna (1400x300x33mm)2x (426x398x30mm)2x (1800x93x30mm)2x (532x425x50mm)2x (1800x93x30mm)1x (990x585x40mm) 1x (1800x93x30mm)60x (535x585x40mm) 1x (520x330x65mm)2x (1800x93x30mm)1x (1758x575x30mm)1x (560x300x40mm)1x (1650x575x30mm)1x (378x300x40mm)2x (1758x952x30mm) 1x 3x Fassreifen (1404x80x20mm)1x (3000x1800mm) 1x (1404x80x20mm)1x (1000x320mm ) 60x (1574x488x30mm) 1x (250x50x45mm) 1x (1758x783x30mm) 1x (350x50x45mm) 1x (1574x488x30mm) 1x 1x Saunaofen (1152x425x50mm)2x (177x80x30mm)1x...
- Page 6 Beschreibung Sauna 1x Wasserschale 1x Hygrometer 2x Explosionsgeschützter Lampenschirm 1x Sanduhr 1x Schöpfer 2x Becherplatte 1x Kübel Ø5x50 Ø4x50 Ø4x30 Ø3x35 Ø4x12 Ø6x70 240x...
- Page 7 Lesen Sie die Montageanleitung sorgfältig durch, bevor Sie einen geeigneten Platz für Ihre Sauna gefunden haben. Die Sauna ist ausschließlich nur für die Installation im Außenbereich entworfen. Wählen Sie einen Raum: • In einem trockenen Raum, auf einer ebenen, stabilen Fläche, die das Gewicht der Sauna tragen kann. •...
- Page 8 Montageanleitung Ø 5 x 50 20PCS Ø 3 x 35 2PCS Ø 5 x 50 18PCS Die Vorder- und Rückwand müssen zunächst als Ganzes zusammengebaut werden. Die Vorderseite ist links und rechts in drei Teile unterteilt, die Rückseite ist oben und unten in drei Teile unterteilt.
- Page 9 Montageanleitung Ø 5 x 50 2PCS Basis AD=BC AB=BD Vorderseite R01 R02 R03 Jede Lamelle ist nummeriert und beschriftet. Die linke Seite ist L01 L02 L03..L38 von unten nach oben; Die rechte Seite ist R01 R02 R03..R38 von unten nach oben.
- Page 10 Montageanleitung Ø 5 x 50 4PCS Untere Lamelle Die obere Lamelle wird während des Einbaus vorübergehend als feste Schutzmaßnahme installiert.
- Page 11 Montageanleitung 1. Die Lamellen des Fasskörpers müssen bei der Installation dicht aneinander liegen, was der oberen Installation und der Dichtheit Ø 3 x 35 32PCS förderlich ist. R8-R23 Ø 3 x 35 32PCS 2. Schrauben (M3*35 64PCS ) werden verwendet, um die Lamellen L8- L8-L23 L23 und R8-R23 zu befestigen, die oberen Lamellen werden fest Lamelle...
- Page 12 Montageanleitung Bänder aus rostfreiem Stahl Wasser Ø 4 x 50 4PCS Wasser Ø 4 x 50 4PCS Fußstütze...
- Page 13 Montageanleitung Die Halterung der inneren und äußeren Sitzplatten ist vorinstalliert Die äußere Grundplatte benötigt einen weiteren Tragrahmen, und der Tragrahmen fixiert die Schrauben an den Lamellen. Die innere Grundplatte benötigt keinen weiteren Stützrahmen. Die Sitzplattenverriegelungsschrauben müssen an der Stützseite der vorderen und hinteren Platte befestigt werden.
- Page 14 Die Drähte der Leuchte sollten an den Kabelsockel des Saunaofens angeschlossen und über den Saunaofen mit Strom versorgt werden. Saunaofen 1 2 3 Saunaofen 1 2 3 4 5 6 7 Lampenleitung(3*0,75mm²) Kabel(5*2,5mm²) Ø 4 x 30...
- Page 15 Wasserdichtes Gewebe Asphaltschindel Ø 4 x 12 200PCS 1800mm...
- Page 16 Zeitschaltuhr Thermostatschalter 1.Heizgerät An Schalten Sie den Timer-Schalter auf "on". (Abschnitt A in Abbildung 2, 0-4 Stunden). Die Heizung beginnt sofort zu heizen. 2. Voreinstellung Zeit (zeitgesteuertes Einschalten) Stellen Schalter Zeitschaltuhr Abschnitt "Voreinstellung" (Abschnitt Abbildung Stunden). Heizgerät beginnt zu heizen, wenn der Timer den Schalter wieder auf "on"...
- Page 17 Wartung Schutz von Holz Bürsten Sie jede äußere Fasslatte und tragen Sie nach der vollständigen Montage ein Schutzmittel auf, um das Holz zu schützen. Der Schutzmittel musste entsprechend den Empfehlungen des verwendeten Produkts erneuert werden WICHTIG! Trennen Sie das Stromversorgungskabel der Kabine, bevor Sie irgendwelche Arbeiten durchführen. Ermittelte Probleme Mögliche Gründe Lösungen...
- Page 18 Infrared makes life more healthy Due to our continued product improvement, product illustrated on this instruction manual may vary slightly from the actual product.
- Page 19 Recommendations Read this manual carefully before using your sauna for the first time. We recommend you keep it in a safe place for future reference. • Wood is a living element, to maintain its original appearance, it is important to treat the outside of the wood against moisture. •...
- Page 20 Safety IMPORTANT : Please read the safety instructions carefully before installing and using your sauna cabin. They are essential for your safety, so please adhere strictly to them. Beware of hyperthermia, heat stroke or heat exhaustion which can be caused or aggravated by noncompliance with the safety instructions.
- Page 21 Description sauna...
- Page 22 Description sauna (1400x300x33mm)2x (426x398x30mm)2x (1800x93x30mm)2x (532x425x50mm)2x (1800x93x30mm)1x (990x585x40mm) 1x (1800x93x30mm)60x (535x585x40mm) 1x (1800x93x30mm)1x (520x330x65mm)2x (1758x575x30mm)1x (560x300x40mm)1x (1650x575x30mm)1x (378x300x40mm)2x (1758x952x30mm) 1x Barrel hoop (1404x80x20mm)1x (3000x1800mm)1x (1404x80x20mm)1x (1000x320mm )60x (1574x488x30mm) 1x (250x50x45mm)1x (1758x783x30mm) 1x (350x50x45mm)1x (1574x488x30mm) 1x Sauna stove (1152x425x50mm)2x (177x80x30mm)1x...
- Page 23 Description sauna Hygrometer Water pan Explosion proof lampshade Hourglass Wooden spoon Cup plate Wooden barrel Ø5x50 Ø4x50 Ø4x30 Ø3x35 Ø4x12 Ø6x70 240x...
- Page 24 Read the assembly instructions carefully before starting. Choice of location Designed solely for exterior installation. Select a space: • In a dry area, on a flat stable surface that can support the weight of your sauna. • The height must be sufficient for you to reach the ceiling and carry out electrical connections and maintenance. •...
- Page 25 Assemble instructions Ø 5 x 50 20PCS Ø 3 x 35 2PCS Ø 5 x 50 18PCS The front and rear panels need to be assembled as a whole first. The front panel is divided into three parts on the left and right, and the rear panel is divided into three parts on the top and bottom.
- Page 26 Assemble instructions Assemble steps Ø 5 x 50 2PCS Undersupport AD=BC AB=BD Front Each slat is numbered and labeled. The left side is L01 L02 L03..L38 from bottom to top; The right side is R01 R02 R03..R38 from bottom to top.
- Page 27 Assemble instructions Assemble steps Ø 5 x 50 4PCS Under slat The top Flat shall be temporarily installed as a fixed protective measure during installation.
- Page 28 Assemble instructions Assemble steps 1. The slats of the barrel body, please be placed tightly when installing, which is conducive to the top installation and tightness. Ø 3 x 35 32PCS Ø 3 x 35 32PCS 2. Screws (M3*35 64PCS ) are used to fix the slats L8-L23 and R8-R23, R8-R23 Slat the top slats are placed tightly, after forming a circle, the barrel...
- Page 29 Assemble instructions Assemble steps Stainless steel bands Ø 4 x 50 4PCS Ø 4 x 50 4PCS Footrest...
- Page 30 Assemble instructions Assemble steps The support of the inner and outer seat plates has been pre installed on the front and rear plates. The outer base plate needs another support frame, and the support frame locks the screws onto the Flat noodles. The inner base plate does not need another support frame.
- Page 31 The sauna stove is a universal cable connected to an external customer power supply. The wires of the lamp should be connected to the wiring base of the sauna stove and powered through the sauna stove. Sauna stove Sauna stove lamp line(3*0.75mm²)...
- Page 32 Waterproof cloth Asphalt shingle Ø 4 x 12 200PCS 1800mm...
- Page 33 Timer switch Thermostat switch 1. Heater Turn the timer switch to the ”on” section (section A in figure 2, 0–4 hours). The heater starts heating immediately. 2. Pre-setting Time (timed switch-on) Turn the timer switch to the ”pre-setting” section (section B in figure 2, 0–8 hours). The heater starts heating when the timer has turned the switch back to the ”on”...
- Page 34 Maintenance Protection of wood Brush each exterior barrel slat and apply a wood stain when full assembly to protect the wood. This wood stain had to be renewed according to the recommendations of the product used Maintenance IMPORTANT : Disconnect the cabin’s power supply cable before undertaking any work. Problems identified Possible reasons Solutions...
- Page 35 Dieses Produkt enthält <2> Lichtquellen der Energieeffizienzklasse <G> This product contains <2> light sources of energy efficiency class <G> Този продукт съдържа <2> светлинни източника с клас на енергийна ефективност <G> A termék <2> db <G> energiaosztályú fényforrást tartalmaz. Acest produs conține <2> surse de lumină din clasa de eficiență energetică <G> Tento produkt obsahuje <2>...
- Page 36 BC45, BC60, BC80 BC45E, BC60E, BC80E, BC90E Instructions for Installation and Use of Electric Sauna Heater Gebrauchs- und Montageanleitung des Elektrosaunaofens BC-E 20042011...
-
Page 37: Table Of Contents
these instructions for installation and use are Diese Montage- und Gebrauchsanleitung richtet intended for the owner or the person in charge of sich an den Besitzer der Sauna oder an die für die the sauna, as well as for the electrician in charge Pflege der Sauna verantwortliche Person, sowie an of the electrical installation of the heater. -
Page 38: Instructions For Use
1. INStRUCtIoNS FoR USE 1. BEDIENUNGSANLEItUNG 1.1. Piling of the Sauna Stones 1.1. Aufschichten der Saunaofensteine The piling of the sauna stones has a great effect on Die Schichtung der Ofensteine hat eine große Aus- the functioning of the heater (figure 1). wirkung auf die Effizienz des Ofens (Abb. -
Page 39: Heating Of The Sauna
1.2. Heating of the Sauna 1.2. Erhitzen der Saunakabine When operating the heater for the first time, both the Beim ersten Erwärmen sondern sich von Saunaofen heater and the stones emit smell. To remove the smell, und Steinen Gerüche ab. Um diese zu beseitigen, the sauna room needs to be efficiently ventilated. -
Page 40: Heater Off
1.3.3. Heater off 1.3.3. ofen aus The heater switches off, when the timer Der Ofen wird ausgeschaltet, wenn die turns the switch back to zero. You can Zeitschaltuhr den Schalter zurück auf null switch the heater off at any time by turn- gedreht hat. -
Page 41: Instructions For Bathing
1.5. Instructions for Bathing 1.5. Anleitungen zum Saunen Begin by washing yourself. Waschen Sie sich vor dem Saunen. • • Stay in the sauna for as long as you feel com- Bleiben Sie in der Sauna, solange Sie es als •... - Page 42 condition. Vergewissern Sie sich, dass die Sicherungen • Check that all heating elements glow when the des Ofens in gutem Zustand sind. • heater is on. Vergewissern Sie sich, dass bei • Turn the thermostat to a higher setting eingeschaltetem Ofen alle Heizelemente glühen. •...
-
Page 43: Sauna Room
2. SAUNA RooM 2. SAUNAKABINE 2.1. Sauna Room Structure 2.1. Struktur der Saunakabine Figure 4. Abbildung 4. Insulation wool, thickness 50–100 mm. The Isolierwolle, Stärke 50–100 mm. Die Saunaka- sauna room must be insulated carefully so that bine muss sorgfältig isoliert werden, damit der the heater output can be kept moderately low. -
Page 44: Sauna Room Ventilation
2.2. Sauna Room Ventilation 2.2. Belüftung der Saunakabine The air in the sauna room should change six times Die Saunaluft sollte sechsmal pro Stunde ausge- per hour. Figure 5 illustrates different sauna room tauscht werden. Abb. 5 zeigt verschiedene Optio- ventilation options. -
Page 45: Instructions For Installation
3. INStRUCtIoNS FoR INStALLAtIoN 3. INStALLAtIoNSANLEItUNG 3.1. Before Installation 3.1. Vor der Montage Before installing the heater, study the instructions Bevor Sie den Saunaofen installieren, lesen Sie die for installation. Check the following points:� Montageanleitung und überprüfen Sie folgende Din- Is the output and type of the heater suitable for ge:�... -
Page 46: Fastening The Heater On A Wall
3.2. Fastening the Heater on a Wall 3.2. Befestigung des Saunaofens an der Wand See figure 7. Siehe Abbildung 7. Remove both cardboard covers before Beide Schutzpappen vor der Montage entfernen! installation. Befestigen Sie das Montagegestell mit den Fasten the wall-mounting rack on the wall by dazu gelieferten Schrauben an der Wand. -
Page 47: Electrical Connections
3.3. Electrical Connections 3.3. Elektroanschlüsse the heater may only be connected to the electrical Der Anschluss des Saunaofens an das Stromnetz darf network in accordance with the current regulations nur von einem zugelassenen Elektromonteur unter Be- by an authorised, professional electrician. achtung der gültigen Vorschriften ausgeführt werden. -
Page 48: Installation Of The Control Unit And Sensors (Bc-E)
3.4. Installation of the Control Unit and 3.4. Anschluß des Steuergerätes und der Sensors (BC-E) Fühler (BC-E) The control unit includes detailed instructions for In Verbindung mit dem Steuergerät werden genaue- fastening the unit on the wall. Install the temperature re Anweisungen zu dessen Befestigung an der Wand sensor on the wall of the sauna room above the gegeben. - Page 49 Figure 11. Electrical connections of �C-E heater Abbildung 11. Elektroanschlüsse des Saunaofens �C-E Elektroanschlüsse des Saunaofens �C-E Figure 10. Electrical connections of �C heater Abbildung 10. Elektroanschlüsse des Saunaofens �C Elektroanschlüsse des Saunaofens �C Figure 12a. 3-phase electrical connections of control Figure 12b.
-
Page 50: Spare Parts
4. SPARE PARtS 4. ERSAtZtEILE...
Need help?
Do you have a question about the BERGEN and is the answer not in the manual?
Questions and answers