
Subscribe to Our Youtube Channel
Related Manuals for LawnMaster LGBQH9200


Summary of Contents for LawnMaster LGBQH9200
- Page 1 INVERTER GENERATOR SAFETY AND OPERATING MANUAL PLEASE READ THIS MANUAL CAREFULLY BEFORE OPERATING THE UNIT LGBQH9200(E) PROUDLY A STEELFORT PRODUCT NZ OWNED...
-
Page 2: Table Of Contents
TABLE OF CONTENTS OPERATOR SAFETY GETTING STARTED Unpacking Assembly FEATURES & CONTROLS Control Panel OPERATION Operation Checklist Operation Conditions Engine Oil Engine Fuel Operation Place Grounding Battery Connection STARTING THE GENERATOR Electric Start Wireless Remote Start Manual Start CONNECTING TO THE ELECTRICAL DEVICES Loading Capacity Wattage Reference Chart STOPPING THE ENGINE... -
Page 3: Operator Safety
These generators are designed for full time operation. No personal This manual contains important safety information modifications should be made to any part of the unit. and instructions to operate the LawnMaster Inverter Generator. DANGER PLEASE READ THIS MANUAL CAREFULLY BEFORE TOXIC FUMES USING THE UNIT. -
Page 4: Getting Started
• Empty the fuel tank before storing or it is in operation. Always turn off the generator transporting the generator. Keep fire prior to leaving the area. extinguisher handy at all times. ELECTRIC SHOCK BATTERY • The generator produces powerful voltage and •... -
Page 5: Assembly
2. ASSEMBLY ASSEMBLE REAR ARMREST ASSEMBLE WHEELS After aligning the rear armrest mounting holes with the generator mounting holes, fasten them with After fixing the wheel axle assembly on the frame, bolts. install the wheels and spacers on the wheel axle assembly in turn, and fix it with bolts. - Page 6 MOVING THE GENERATOR 1. Pin 8X45 2. Bolt M8X14 3. Nylon washers WARNING 4. Washer Failure to follow these instructions could result in 5. Retaining Ring personal injury or damage to the generator. 6. Spring 7. Handle Assembly (Left) CAUTION 8.
-
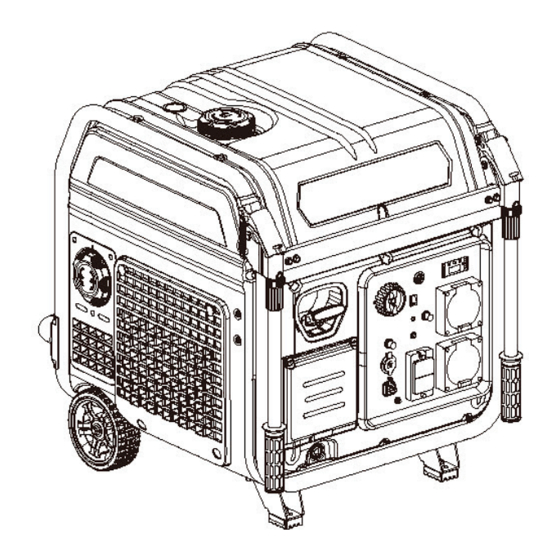
Page 7: Features & Controls
FEATURES & CONTROLS Lever Indicator Support Feet Assembly Air Filter Maintenace Cover Fuel Cap Recoil Starter Muffler Blind Window Rack Battery Maintenance Cover Muffler Control Panel Engine Inlet Shutter Oil Drain Cover Push Handle Wheel Oil Maintenace Cover Rear Armrest CONTROL PANEL Start/Stop Switch (Outer) Fuel Switch (Inner) - Page 8 FUEL SWITCH (INNER) START STOP SWITCH (OUTER) OIL ALARM LAMP (YELLOW) When the oil level drops below the lower limit, the oil protection system will stop the engine automatically and oil alarming lamp will blink when recoil starter is pulled. The engine will not run until the oil has been filled to the proper level.
-
Page 9: Operation
Consult with your local authorised LawnMaster dealer for high altitude kit information if you intend to operate the generator at altitudes above 5, 000 feet (1,500 meters). -
Page 10: Engine Oil
Oil is a major factor affecting performance and may result in property damage and or serious service life. personal injury. • We recommend using LawnMaster 4-Stroke • Remove excessive dirt or debris, especially 10W30 Oil (PP01020005). You can find more around the muffler and recoil starter. -
Page 11: Grounding
4. GROUNDING The generating set must be properly connected to an appropriate ground. It helps prevent electrical shock if a ground fault condition exists in the generating set or in connected electrical devices, especially when the unit is equipped with a wheel kit. -
Page 12: Starting The Generator
capacity of the generator, please refer to the Press the engine switch button to start the specification table for details. engine. STARTING THE GENERATOR WARNING If it fails to start, the generator will restart by itself. lf it fails to start after repeated 6 times, please allow WARNING the generator to cool for 1 minute and start again. -
Page 13: Manual Start
WARNING Remove the oil maintenance cover. Remote transmitter and genrator learning Move the carburetor choke lever to the right to The generator and the remote controller have been close the choke. successfully matched at the factory, and users do not When starting the engine, grasp the recoil need to perform matching when use. -
Page 14: Connecting To The Electrical Devices
CONNECT TO ELECTRICAL Select the electrical devices you will power at the same time. DEVICES The amount of power you need to run all the devices is the total rated (running) watts of Inspect power cord for damage before using. A these items. -
Page 15: Stopping The Engine
STOPPING THE ENGINE Turn off the electrical devices and then unplug all the electrical device plugs from the panel. WARNING NEVER stop the engine with electrical devices connected and with the connected devices turned “ON”. Press the “OFF” button on the remote. MAINTENANCE It is the operator’... -
Page 16: Maintenance Schedule
Contact your local erator, disconnect all electric devices and battery (if LawnMaster Service Dealer if the generator requires equipped) and allow the generator to cool down. maintenance. Follow the service intervals indicated in the chart Note 1: Applicable types (if available). -
Page 17: Generator & Engine Maintenance
Tampering with the factory reset governor will void your warranty 3. ENGINE MAINTENANCE 3.1 ENGINE OIL LawnMaster 10W30 Oil (PP01020005) is recommended. Other viscosities shown in the chart may be used when the average temperature in your area is within the indicated range. OIL MUST BE PLACED IN ENGINE BEFORE STARTING. -
Page 18: Air Filter
Place the machine on a level surface which is Fully insert the dipstick into the oil filling hole 300mm higher than the ground. and reinstall the oil maintenance cover. Remove the oil drain cover. Properly dispose of any used oil at an approved waste management facility. -
Page 19: Spark Killer
The speed has been pre-set at the factory and should SPARK PLUG GAP: 0.6MM - 0.8MM rarely require readjustment. Consult your local authorized LawnMaster dealer for such needs. WARNING Unapproved adjustment will damage your engine and/or your electrical devices and void your war- ranty. -
Page 20: Troubleshooting
Allow the generating set to cool completely TRANSPORTATION before storage. When generator is being transported or put into short Clean the generating set according to term storage, the generator should be in the normal instructions in Maintenance section. operating position and fixed vertically to prevent fuel Drain all fuel completely from the fuel tank, leakage. - Page 21 A STEELFORT PRODUCT...
-
Page 22: Specifcations & Wiring Diagrams
SPECIFICATIONS & WIRING DIAGRAMS 1. SPECIFICATION (PARAMETER TABLE) Note: The generating set with different specification and configurations may have different parameters and may change at any time without notice. A STEELFORT PRODUCT... - Page 23 2. WIRING DIAGRAMS BQH9000E ELECTRIC START Note: Because of the difference of generator, the wiring diagram is only for reference. A STEELFORT PRODUCT...
-
Page 24: Warranty
Any damage resulting from repair or that are identified by their unit serial number. maintenance by methods other than specified by Steelfort. In order to be eligible for the LawnMaster limited warranty, you must have, maintenance performed • Any product which has participated in a according to the schedule contained in the relevant competition racing or rally event. - Page 25 • Any repair and/or adjustment performed by All uses other than domestic use, including use for persons other than an authorised LawnMaster income-producing (including farming) or rental dealer, or damage resulting therefrom. All purposes have a 90-day warranty. NOTE: These maintenance and repairs conducted by warranty conditions apply in New Zealand only.
- Page 26 FIND US www.lawnmaster.co.nz lawnmasternz Steelfort Steelfort Auckland 500 Rangitikei Street, Private Bag 11045 880 Great South Road, Penrose Palmerston North, 4412, New Zealand Auckland, 1061, New Zealand 06 350 1350 09 573 1324...
Need help?
Do you have a question about the LGBQH9200 and is the answer not in the manual?
Questions and answers