Table of Contents

Related Manuals for EMPORIA TOUCH smart.2


Summary of Contents for EMPORIA TOUCH smart.2
- Page 1 Wi-Fi connection or mobile data tariff required Thank you for purchasing an emporia product! Please read this user guide before attempting to use your phone. TOUCH smart.2 Eveline Pupeter, emporia Telecom www.emporia.eu English...
-
Page 2: Glance
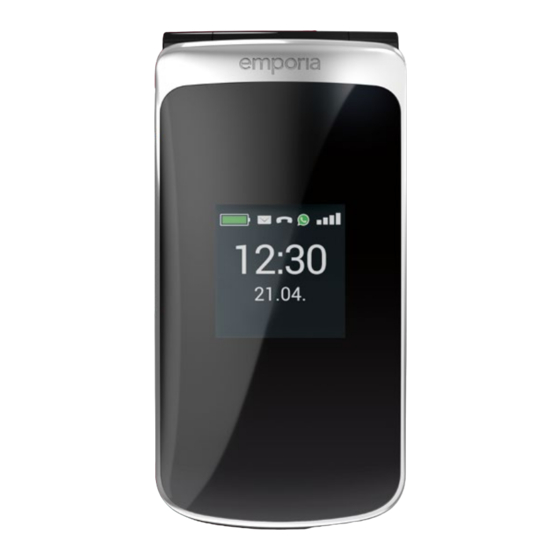
› YOUR MOBILE PHONE AT A GLANCE Loudspeaker Symbols on the external › Home screen display Navigation ring Reception indicator Left function key Battery Selection key 12:30 12:30 Time Right function key 21.08 21.08 Date Phone book key Camera key Incoming call Green key Missed call... -
Page 3: The Phone
› SYMBOLS AND OPERATING THE PHONE How do I return a missed call? › 1. Tap on the word Show on the screen below the notification Missed call. 2. The call function will open and the number or name of the caller will be highlighted by a red bar. -
Page 4: Table Of Contents
› CONTENTS › Your mobile phone at a 4 . Calls . . . . . . . . . . . . . . . . . . .13 glance . - Page 5 11 . Settings . . . . . . . . . . . . . . . .24 16 . Emporia emergency call 11.1 Alarm.
-
Page 6: Getting Started
1. GETTING STARTED 1.1 Inserting a SIM card 1. Remove the battery cover (opening in the bottom left-hand corner). 2. Slide the SIM card into the SIM card holder with the gold contacts facing down. 3. To add more storage, insert a memory card into the memory card holder with the gold contacts facing down. -
Page 7: Turning On The Phone
1.3 Turning on the phone • Press and hold the key for at least two seconds until the emporia logo appears. It will take a few seconds for the home screen to be displayed. • To turn the phone off, press and hold the for 2 seconds again. -
Page 8: Setting Up Your Phone
2. SETTING UP YOUR PHONE When you use a new SIM card for the first time, you need to set the language, date, time and any data connections. You can also configure and change these later in Menu _ Settings if you wish (See »11. -
Page 9: Personalising The Menu
2.2 Personalising the menu • The menu has been preset to display the following functions: Contacts, Messages, Chat app, Calendar, Camera, Photo album, Settings and Applications. • The placement of each of these functions can be altered individually, apart from that of the unmovable Applications button. -
Page 10: Using The Phone
3. USING THE PHONE This phone can be controlled both via its touchscreen and via its numeric keypad and navigation ring. In the following, operating the phone using the keys has been prioritised. 3.1 Using the home screen Left function key •... -
Page 11: Using The Menu
3.3 Using the menu 1. When on the home screen, press the left function key open the Menu. 2. Scroll through the menu items with the navigation ring. Your current selection will be highlighted by a blue border. 3. Press the selection key to open the selected menu item. -
Page 12: Writing Text
3.4 Writing text You enter text using the keypad. • To input text, press a number key multiple times (e.g. 2x 1x , 3x , 3x and 3x for Hallo). • Special characters and symbols have been assigned to the various keys, but can differ in some languages: . -
Page 13: Calls
4. CALLS 4.1 Accepting, rejecting or ending a call Open the phone and press Accept. To answer: • To reject or end a call: • Press the red button or close the phone. • To mute the ringtone temporarily, press the volume control button. -
Page 14: Contacts
5. CONTACTS 5.1 Searching for a contact in the phone book 1. When on the home screen, press the phone book or open Menu _ Contacts _ Phone key book. 2. Use the navigation ring to scroll through the entries or use the keypad to type the first letters of the contact you are looking for in the search bar. -
Page 15: Transferring Contacts
5.3 Transferring contacts Importing contacts from your SIM card › 1. Save all your contacts onto the SIM card while the SIM card is in your old phone. 2. As soon as you insert the SIM card into your new device for the first time, you will be asked if you want to transfer the contacts that are stored on the SIM card. -
Page 16: Opening And Editing
5.4 Opening and editing a contact record There are two ways to open a saved contact record. Using the physical buttons: › 1. Open Menu _ Contacts _ Phone book. 2. Use the navigation ring to select the contact record. Your current selection will be highlighted by a blue border. 3. -
Page 17: Contact Options
5.5 Contact options Send message › Write the contact currently open a text message. Send details › Copy the name and number of the contact currently open into a text message and send them to a third person. Call history for a contact ›... -
Page 18: Messages (Sms)
6. MESSAGES (SMS) 6.1 Writing and sending a message 1. Open Menu _ Messages. 2. Select Write message. 3. Enter the text using the keypad. 4. To specify a recipient for the SMS, open Options and select Send. 5. You can now select a Contact from the phone book, type in a Phone number using the keypad, select a number from your Recent calls list or select Multiple contacts at the same time. -
Page 19: Messaging App
(See »2.1 Setting up a messaging app« on page 08) 7.2 Using the messaging app • The emporia TouchSMART.2 doesn't have all the functions of a smartphone. With regard to messaging apps, the device has been designed in a way that enables messages in chats including photos, short videos and audio files to be received and replied to. -
Page 20: Info Centre
8. INFO CENTRE The Info centre basically collects all the information your phone wants to share with you. This gives you a better overview and ensures you don't miss any notifications. It can include missed call notifications, new messages, messaging app message notifications and update notices for new available system updates. -
Page 21: Camera
9. CAMERA 9.1 Taking a photo or recording a video • When on the home screen, press the camera key or open Menu _ Camera. • The current camera mode (photo or video) will be shown in the centre. 1. You can use the navigation ring to zoom in and out (left/right), and to adjust the brightness (up/down). -
Page 22: Photo Album
10. PHOTO ALBUM 10.1 Viewing a photo or video Open Menu _ Photo album. All the photos and videos you take will be sorted chronologically according to the month in which they were taken. • Press the selection key to open the highlighted photo. •... - Page 23 Backing up photos on your PC › 1. Plug the USB connector end of the USB cable supplied with the phone into your PC and the other end into your phone. 2. Tap on Info on the home screen or open the Info centre from the menu.
-
Page 24: Settings
11. SETTINGS Menu items › Alarm, Silent mode, Wi-Fi, Bluetooth, Mobile data, Flight mode, Location, Wi-Fi hotspot, Wallpaper and More settings Enabling a function › 1. If you tap on a grey Off button, it will change to a blue On button. -
Page 25: Wi-Fi
11.3 Wi-Fi • If you are already connected to a Wi-Fi network, the name of the network will be displayed in Settings in Wi-Fi. • To set up a Wi-Fi connection, you need the name of the Wi-Fi network and the corresponding password. If you have a Wi-Fi network at home, you can usually find this information on the underside of the Wi-Fi router. -
Page 26: Mobile Data
11.5 Mobile data • Turn the mobile data function On. • The overview will show you how much data you have already used in the current billing period. If you use the phone's mobile data facility, your network tariff must include mobile data. 11.6 Flight mode Flight mode will disable the phone's cellular radio and other communication functions like Bluetooth and Wi-Fi,... -
Page 27: Voice Assistant
11.9 Voice assistant If the voice assistant is enabled, a voice announcement will be added to the following functions: • You have received a new SMS message. • Someone is calling you. • The torch has been turned on or off. •... -
Page 28: More Settings
11.13 More settings Mobile network, Display, Tones, SIM card lock, Date and time, Language and input, Restore factory settings and About the phone Changing the font size › Normal to Small. The font size can be changed from 1. Open Menu _ Settings _ Advanced settings _ Display _ Font size. -
Page 29: Internet
Like you do on a computer, you use a browser on a smartphone to search for information on the Internet. The emporia Internet app is such a browser. 1. Open Menu _ Applications _ Internet. 2. The search bar is the main element of the browser. It is where you enter search terms you want to find information on. -
Page 30: Calendar
13. CALENDAR On the menu screen, select Applications and then open the Calendar. • The current month will be shown in the overview. The overview cannot be changed to display the current week instead of the current month. • Today's date will be in blue. •... -
Page 31: Opening An Event
13.2 Opening an event you've entered In the month calendar overview, the days you've entered events on will be highlighted. 1. If you tap on a day button, a list of all the hours of this day will be displayed. 2. -
Page 32: System Updates
14. SYSTEM UPDATES You can download the latest software for the phone yourself and therefore update the system and improve applications yourself. Use a Wi-Fi network to transfer the data here. 1. Check that the battery is at least 30% charged. If it isn't, the download cannot start. -
Page 33: Weather
15. WEATHER The emporia weather app is simple with a clear layout and also shows the current temperature on the home screen. Please note that the weather app requires constant access to the Internet, so that its data can be updated continuously. -
Page 34: Emporia Emergency Call
16. EMPORIA EMERGENCY CALL FUNCTION If you use the battery cover with the integrated emergency button, you can enable the phone's emergency call function. Read the instructions carefully and set the emergency function according to your needs. You can save up to five emergency contacts (family members, friends and official institutions). - Page 35 • From the moment you make an emergency call, your emporia phone will automatically answer any incoming calls for one hour. To disable this function, press and hold the button for approx. three seconds or turn your device off completely using the button and then turn it on again.
-
Page 36: Guarantee And Service
GUARANTEE AND SERVICE › Manufacturer: emporia telecom GmbH + CoKG Industriezeile 36, 4020 Linz, Austria Importer: Emporia UK and Ireland Limited · Cardinal Point, Park Road, Rickmansworth, Hertfordshire, WD3 1RE, United Kingdom Contact: www.emporiatelecom.co.uk or www.emporiatelecom.ie Brand name: emporia Model: emporiaTOUCHsmart.2 (V188.2) ›... - Page 37 › Frequencies › Safety information • BT: 2402 MHz - 2480 MHz • Turn off your phone in hospitals Transmitter power: < 0.0023 W and whenever you are near medical • BT LE: 2402 - 2480 MHz equipment. There should always be a Transmitter power: <...
- Page 38 › Intended use • The mains adapter serves as a separator • This phone is robust and designed for between the product and your mains mobile use. However, it still needs to be supply. The mains supply must be close protected from moisture (rain, bathroom to the device and easily accessible.
- Page 39 › Disposal › Declaration of conformity (DOC) • Disposing of the packaging emporia telecom GmbH + CoKG The packaging and pack- (Industriezeile 36, 4020 Linz, Austria), aging aids are recyclable hereby declares that the emporiaTOUCHsmart.2 (V188.2) and should be recycled. • Disposing of the battery...
- Page 40 Druckfehler, Irrtümer und technische Änderungen vorbehalten. Subject to mistakes, printing errors and technical changes. Con riserva di errori di stampa, inesattezze e modifiche tecniche. Toutes erreurs d'impression, erreurs et modifications techniques réservées. Drukfouten, vergissingen en technische wijzigingen voorbehouden. Part no.: V188·2_BDA-V3_56201-EN | 202207...
Need help?
Do you have a question about the TOUCH smart.2 and is the answer not in the manual?
Questions and answers