Table of Contents
Advertisement
The emporiaSMART.5 – your helpful companion
Wi-Fi
In keeping with true emporia tradition, we listened to
connection or
the real experts when developing this new smartphone:
mobile data tariff
required
our customers, people like you.
I therefore have no doubt that this new emporia
smartphone, a product featuring a great deal of Austrian
engineering, will bring you plenty of joy.
To help you learn how to use the new facilities on your
smartphone, emporia has written a handbook to assist
you as you try them out and practise using them. This
handbook comes with the phone by the way, so we hope
SMART.5
you enjoy it! In addition, there are detailed step-by-step
instructions on our website at www.emporia.eu that
answer a wide range of questions such as, »How do I create
a WhatsApp group?«
This smartphone is intended to be a helpful companion to
you. I hope your emporiaSMART.5 brings you plenty of joy.
Sincerely,
Eveline Pupeter
emporia Telecom
Installation manual
Advertisement
Table of Contents

Related Manuals for EMPORIA SMART.5


Summary of Contents for EMPORIA SMART.5
- Page 1 The emporiaSMART.5 – your helpful companion Wi-Fi In keeping with true emporia tradition, we listened to connection or the real experts when developing this new smartphone: mobile data tariff required our customers, people like you. I therefore have no doubt that this new emporia smartphone, a product featuring a great deal of Austrian engineering, will bring you plenty of joy.
- Page 2 › YOUR MOBILE PHONE AT A GLANCE...
- Page 3 Your mobile phone at a glance Smartcover with function buttons (see page 32) Headset port Loudspeaker (receiver) Front-facing camera lens Touchscreen Menu button (see page 37) Home button (see page 37) Back button (see page 37) Microphone USB port Loudspeaker Volume buttons (see page 38) On/Off button (see page 37) Camera lens with torch/flash...
-
Page 4: Table Of Contents
Setting up the emporia keyboard ....31 emporia Smartcover......32 Usage Battery-saving mode and locking the screen . - Page 5 Language & input .......59 Emporia Keyboard ......59 Display.
-
Page 6: Preparation
NFC-antenna cable (pre-installed) WiFi- Verbindung oder mobiler Datentarif notwendig SMART.5 Training book Installation manual Installation Training book manual The contents of this package are not suitable for young children and include small parts that can be swallowed. Google, Android, Google Play and other marks are... - Page 7 What to do if a part is defective or missing › Please call the Emporia Service Centre Mon. - Thu. 08:30 - 17:00 · Fri. 08:30-13:00 service@emporiatelecom.co.uk • UK-Hotline: +44 · 1923 · 947778 www.emporiatelecom.co.uk/service...
-
Page 8: Inserting A Sim Card And A Memory Card
Preparation 1.2 Inserting a SIM card and a memory card Always disconnect the phone from the charger and turn the phone off before removing the battery cover. Take off the battery cover. › Begin with the recess in the bottom left-hand corner of the cover. - Page 9 Preparation Insert a memory card (optional). › The memory card slot is located on the right above the battery compartment. Slide your memory card into the slot with the gold contact facing down. Only use a memory card that is compatible with this phone, such as a microSD®...
-
Page 10: Charging The Battery
Preparation 1.3 Charging the battery To avoid contact faults with the USB connector, only use the charging cable supplied with the phone for charging. Before you use the phone for the first time, charge the battery for at least four hours. If you don't charge the phone for this period of time, the battery life could be reduced. - Page 11 Preparation Using the mains plug › • Insert the USB plug into the USB port at the top of thephone. • Then plug the cable's mains plug into a wall socket. Using the charging cradle › The charging cradle allows you to charge your phone easily and also gives you a fixed place where you can leave your phone when you're at home.
-
Page 12: Turning On The Phone
• Before you use your phone for the first time, remove the protective film from the screen. • Press and hold the on/off button for at least two seconds. • The emporia logotype will appear on the screen and you will hear a short melody. -
Page 13: Entering A Pin Code
Preparation When you turn your phone on the first time, the start-up process can take up to two minutes. The emporia logo will be on the screen when this is happening. Please do not interrupt this process. 1.5 Entering a PIN code Enter the four-digit PIN code for your SIM card when asked to do so and confirm the entry. -
Page 14: Basic Android™ And Google Settings
2. USING THE PHONE FOR THE FIRST TIME 2.1 Basic Android™ and Google settings When you use your smartphone for the first time, you need to select a number of settings Selecting a language › English has been preselected as the standard system language. Hello If you would prefer to use a different language to operate your... - Page 15 Using the phone for the first time Connecting to a Wi-Fi network › 100 % If possible, establish a Wi-Fi connection, so that future updates Connecting to a Wi-Fi network Choose network and downloads don't use your MyWi-Fi mobile data. MyWi-Fi-Guest •...
- Page 16 Using the phone for the first time • You can check the password again by tapping on Show password. 100 % MyWLAN • When you have finished typing in Security WPA2 Personal Password the password, tap on the Connect Show password button to establish a connection to Advanced options the network.
- Page 17 Using the phone for the first time Copying apps and data › 100 % Your smartphone will now check whether any updates for Copying apps and data You can specify exactly what you want the Android operating system to be copied: your apps, your photos, your contacts, your Google account are available and install them automatically.
- Page 18 Using the phone for the first time Setting up your Google Account › 100 % In the next step, you will be asked to sign in with your Google Account. Signing in Sign in with your Google account. Enter your Gmail address and the Learn more Email address or phone number password for the account to do this.
- Page 19 Using the phone for the first time • You now have to enter the same password a second time to ensure you haven't made any typing errors. • Tick the checkboxes for the terms and conditions and the data privacy statement, and then you can tap on Create account.
- Page 20 Using the phone for the first time Protecting your smartphone › Now select a screen lock, so that your phone cannot be operated by anyone not authorised to do so. • Also choose whether the code has to be entered when the device is first started.
- Page 21 Changing the wallpaper and font size › Finally, you can personalise your smartphone's wallpaper and adjust the font size. These settings will be applied to all your phone's system, but not to the emporia app. You can now conclude the installation process.
-
Page 22: Installing The Emporia App
Legal information › Agree to the terms and conditions, the data privacy policy and the app permissions for the emporia app by tapping on the box beside »I have read everything and am in agreement with it.«. Confirm your selection by tapping on Next. - Page 23 Using the phone for the first time Setting the emporia app as your › 12:30 100 % home screen Activation Now specify the emporia app Select the following settings to as your start app. To do this, tap on (1) Next and make your smartphone start with (2) emporia.
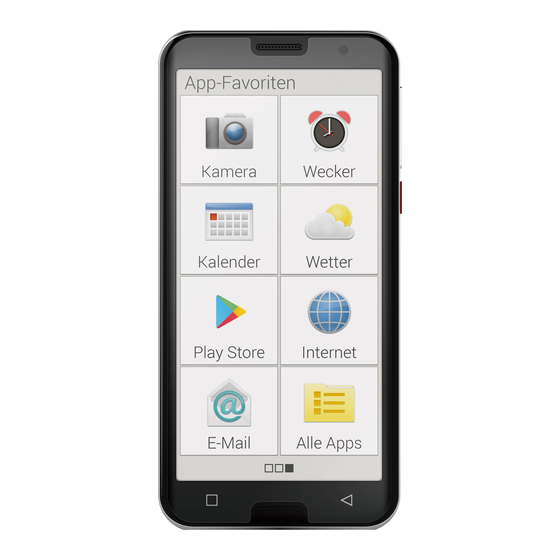
- Page 24 • On the Favourite apps screen Camera, Alarm, Calendar, Weather, Play Store, Internet and Email If you want to set everything up perfectly for an elderly relative, it is best to try out all the emporia app's functions briefly and input any necessary settings.
-
Page 25: Setting Up The Home Screen And Favourites
2.3 Setting up the home screen Favourite Apps and favourites After you've installed the Camera Alarm emporia app, the emporia functions will appear on the Calendar Weather home screen and the app screen. The placement of the apps can Play Store... - Page 26 Using the phone for the first time Delete apps › • Open All apps on the app page. • Swipe to the bottom of the list. • Tap on Delete. Deletable apps are now marked with a box. • Tap on the box of the app that you want to delete. •...
-
Page 27: Creating Contacts
Using the phone for the first time 2.4 Creating contacts Back Find Entering contacts on the › Add contact smartphone from scratch Voicemail • To create a new contact, Ann Fischer open the Calls app +43732777717 • Tap on Phone book •... - Page 28 Using the phone for the first time Next, tap on the on the black background. If you then select Edit, you can change all the details, including the photo. Don't forget to save any changes! Importing contacts from your SIM card ›...
-
Page 29: Linking Personal Contacts
Using the phone for the first time 2.5 Linking personal contacts Favourites Favourites › You can specify four contacts that are already stored in your phone book as favourites. • Tap on one of the four placeholders. My phone number: +4366498765432 •... - Page 30 Emergency calls › The emporia emergency call feature enables you to call up to five people in an emergency. Detailed instructions on setting up the emergency call function are provided in the chapter »Emergency call function«...
-
Page 31: Setting Up The Emporia Keyboard
Using the phone for the first time 2.6 Setting up the emporia keyboard The emporia app also includes a keyboard that was specially developed for the digital newcomer target group. Open Quick settings on the home screen and tap on emporia keyboard. You can now input settings regarding capitalisation, button press responses, autocorrect, suggested words and many other features. -
Page 32: Emporia Smartcover
Using the phone for the first time 2.7 emporia Smartcover The emporia Smartcover is a unique accessory. The protective case opens like a book and its front is equipped 12:30 So, 21.04. with four buttons that can each be assigned a different function. - Page 33 Using the phone for the first time If the phone is in battery-saving mode, activate the screen by pressing the on/off button. Linking the function buttons › • From the home screen, open the following: Quick Settings – More Settings – Smartcover. •...
- Page 34 Using the phone for the first time Red button – will take you one step back, decline incoming calls and end an ongoing call Arrow keys – allow you to move to the next item available in a list. Camera button – turns the camera function on Options for the camera: Flash function Record video...
-
Page 35: Usage
3. USAGE 3.1 Battery-saving mode and locking the screen If you don't use your phone for a certain period of time, the screen will switch to battery-saving mode and go black. You can reactivate the screen by pressing the on/off button briefly. Locking the screen can also protect your phone from unintentional input on the touchscreen. - Page 36 Usage Unlocking the screen › If the screen is black, press the on/off button briefly to activate the screen. If a lock hasn't been set, the home screen will appear straight away, otherwise the locked screen will be displayed. Functions on the locked screen ›...
-
Page 37: Buttons On The Phone
Usage 3.2 Buttons on the phone On/Off button › • Press the power button for more than two seconds to switch the phone on or off. • Short press this button to wake the phone from sleep mode to wake it up or put it into this mode. Home button ›... - Page 38 Usage Volume buttons › The volume buttons on the side of your phone allow you to adjust the volume, mute the phone when it is ringing or mute the alarm clock. 12:30 24°C Sun, 21.04. Audio profiles for ringer volume: Ringer sounds for calls and notifications Calls and notifi...
-
Page 39: Establishing Connections
4. ESTABLISHING CONNECTIONS 4.1 Setting up a Wi-Fi connection To set up a Wi-Fi connection, you need the name of the Wi-Fi network (network SSID) and the corresponding password. If you already have a Wi-Fi network at home, you can usually find this information on the underside of the Wi-Fi router. - Page 40 Establishing connections Selecting and connecting to a › 100 % Wi-Fi network MyWLAN • Tap on the Wi-Fi text button Security WPA2 Personal Password A list of available Wi-Fi networks Show password will now be displayed. Advanced options • Tap on the network you want to Cancel Connect connect your phone to.
- Page 41 Establishing connections Checking your Wi-Fi connection › • The connection between your Wi-Fi Use Wi-Fi smartphone and the Wi-Fi network MyWiFi Connected will be established. MyWiFi-Guest Add network • As soon as the connection has Wi-Fi-preferences Wi-Fi doesn't turn back on automatically been established, the detail text Saves networks 1 network...
-
Page 42: Setting Up A Mobile Data Connection
Establishing connections 4.2 Setting up a mobile data connection If you allow your phone to use mobile data, you can use the Internet, receive notifications, etc. any time. • Open Quick Settings on the home screen by tapping on Mobile network Mobile data Access data using mobile network the gear icon. -
Page 43: Setting Up An Email Account
Establishing connections 4.3 Setting up an email account If you want to use the emporia email app, you need the following information in order to set up your account: • Your personal email address • The password for your personal email address •... -
Page 44: Bluetooth
Establishing connections 4.4 Bluetooth Bluetooth is a wireless connection between electronic devices. It enables you to connect your phone to other Bluetooth-compatible devices such as a hands-free kit or an external speaker. Turning on Bluetooth › Open Quick Settings and turn on Bluetooth in More Settings. -
Page 45: Establishing An Nfc Connection
Establishing connections Coupling a Bluetooth device › Select the device you want to connect to your phone. Usually you will have to enter a code on your phone or the Bluetooth device for the connection to be established. In most cases, this code will be 0000 or 1234. -
Page 46: Connecting To A Pc To Transfer Data
Establishing connections 4.6 Connecting to a PC to transfer data You can plug your emporiaSMART.4 into your PC and then transfer data easily. Plug the USB connector end of the USB cable supplied into the PC and the other end into your phone. The phone will detect the connection and the following message will appear in the Info centre: Charging this device via USB. -
Page 47: Software Updates
Establishing connections 4.7 Software updates With the emporiaSMART.5, you can download the latest software for the phone yourself and therefore update the system and improve applications yourself. 1. Open System update in All apps. 2. Check that the battery is at least 30% charged. If it isn't, the download cannot start. -
Page 48: Downloading Apps
Establishing connections 4.8 Downloading apps emporiaSMART.5 and these are listed in All apps on the app screen. You can also install other apps from the Internet any time, however. To do this, turn on Wi- Fi or enable mobile data usage. Download thousands of apps on »Google Play«. -
Page 49: Emergency Call Function
5. EMERGENCY CALL FUNCTION Your phone is equipped with an emergency call function. You can use it to call for help quickly in an emergency. button has been preset to be off, as this function will only work efficiently if it is adapted to your needs. - Page 50 Emergency call function Inform the people you are setting as emergency contacts and discuss with them what they should do in an emergency. • If you want to add a help organisation or an official institution such as a rescue service, the police or the fire brigade as an emergency contact, it is imperative that you check this is okay with the respective institution beforehand.
- Page 51 Emergency call function What happens after the emergency button is › pressed? If you press and hold the button on the back of the phone for three seconds, the emergency call sequence will begin. Warning tone › A continuous warning tone will start sounding immediately to draw the attention of people nearby to you.
- Page 52 Emergency call function Emergency call message › Help organisations are not sent emergency text messages. Private emergency contacts will be sent a text informing them of the incoming emergency call. You will receive an emergency call with loud beep-signal during conversion. Please press the 0 key three times to establish the connection.
- Page 53 All five contacts will be called a maximum of five times. After this, your emporia phone will automatically answer any incoming calls for one hour. Emergency call status ›...
- Page 54 Emergency call function What does the emergency call recipient have to do? › If you have set a private individual as an emergency contact, they will have to confirm your emergency call as follows: • An automatic announcement will be played when the call is answered.
- Page 55 Emergency call function Saving emergency contacts › You can set up to five contacts as emergency contacts. You can use the numbers of private individuals and help organisations. If possible, you should save private individuals at the beginning of the list and then help organisations.
- Page 56 Emergency call function Editing emergency contacts › To change an emergency contact, tap on the contact in the emergency contact list and follow the instructions in the section Saving emergency contacts. Deleting emergency contacts › 1. Select Delete and tap on the contacts you no longer wish to use as emergency contacts.
-
Page 57: Quick Settings
6. QUICK SETTINGS 6.1 Audio profiles • Media volume: Volume for media such as audio files and videos • Call volume: Volume for telephone conversations • Ring volume: Volume for the ringtone and the notification tone • Alarm volume: Volume at which the alarm rings •... -
Page 58: Wallpaper
Individualising your smartphone: Quick Settings 6.2 Wallpaper Select a photo from the photo album and set it as the wallpaper for the home screen. -
Page 59: More Settings
• The following general settings can be activated for the Emporia keyboard. • Auto-capitalisation: The first letter of every sentence will be capitalised. • Vibrate on keypress: The phone will vibrate every time a button on the emporia keyboard is pressed. - Page 60 Individualising your smartphone: More Settings • Sound on keypress: Every press of a button on the Emporia keyboard is accompanied by a clicking sound. • Pop-up on keypress: Every time a button on the keyboard is pressed, the selected letter is shown as a pop-up.
-
Page 61: Display
Individualising your smartphone: More Settings 7.4 Display Select settings for the screen such as Brightness level, Night light, Adaptive brightness, Screen timeout, Auto-rotate, Font size … 7.5 Face unlock When face unlock is activated, your smartphone can only be unlocked by you. Setting up face unlock ›... -
Page 62: Security Settings
Individualising your smartphone: More Settings Using face unlock to unlock your smartphone › Activate the screen by pressing the on/off button. • Hold the phone in front of you, so that front camera can scan your face. The scanning process will start automatically. -
Page 63: System Settings
Individualising your smartphone: More Settings 7.7 System settings Open the settings for the operating system Android 10 in System settings. To restore factory settings on your device, select the following: System – Reset options. The network, apps and the phone itself (Erase all data - delivery condition) can be reset. -
Page 64: Safety Information
The warranty is only valid if original batteries supplied by emporia have been used. To the maximum extent permitted by applicable law, emporia is under no circumstances responsible for the following situations: •... - Page 65 • UK-Hotline: +44 · 1923 · 947778 www.emporiatelecom.co.uk/service • IE-Hotline: +353 · 1 592 6339 www.emporiatelecom.ie/service 8.3 Declaration of conformity (DOC) emporia telecom GmbH + CoKG (Industriezeile 36, 4020 Linz, Austria) hereby declares that the emporiaSMART.5 (S5) telecommunication or radio device complies with Directive 2014/53/EU.
- Page 66 Safety information 8.4 Technical product details • Dimensions: 138.2 × 66.0 × 10.65 mm • Dimensions: 155 g with battery • Screen size: 5.5" capacitive multitouch • Screen resolution: 720 × 1440 px • Operating temperature range: 0 - 40° C •...
- Page 67 Safety information 8.5 Frequencies • BT (BDR+EDR): 2402 MHz~2480 MHz; transmitter power: < 0.0088 W • BT (LE): 2402 MHz~2480 MHz; transmitter power: < 0.0003 W • GPS: 1575.42 MHz~1575.42 MHz • WIFI: 2412 MHz~2472 MHz; transmitter power: < 0.0524 W •...
- Page 68 Safety information 8.6 Safety information Please read all the safety information in this user guide carefully and follow the advice. This is the only way you will avoid hazards and infringements. • Turn off your phone in hospitals and whenever you are near medical equipment.
- Page 69 Safety information • As a precaution, we recommend disconnecting the phone from the charger during thunderstorms. • The mains adapter serves as a separator between the product and your mains supply. The mains supply must be close to the device and easily accessible.
- Page 70 Safety information Proper use › • This phone is robust and designed for mobile use. However, it still needs to be protected from moisture (rain, bathroom water, etc.) and heavy impacts. • It is only designed for European network standards (AT, BE, CZ, DE, DK, ES, FI, FR, GB, HR, HU, IE, IT, NL, NO, PL, PT, SE, SI, SK, SZ, TR).
- Page 71 Safety information 8.7 Disposal • Disposing of the packaging • The packaging and packaging aids are recyclable and should be made available for reuse. • Disposing of the battery • Batteries should never be disposed of as domestic refuse! As a consumer you are legally required to return used batteries.
- Page 72 Misprints, errors and technical changes excepted. PartNo: S5_BDA-V1a_10410-001-ENG | 202103 | ENGLISH...
Need help?
Do you have a question about the SMART.5 and is the answer not in the manual?
Questions and answers