Table of Contents
Advertisement
Available languages
Available languages
Quick Links
Advertisement
Table of Contents

Subscribe to Our Youtube Channel
Related Manuals for EUROM HKG 30-DE


Summary of Contents for EUROM HKG 30-DE
- Page 1 Bedienungsanleitung (DE) (Seite 4) Instruction Manual (EN) (page 16) HKG 30-DE Art.nr. 322200 Dieses Produkt eignet sich nicht als Hauptheizgerät. This product is not suitable for primary heating purpose.
- Page 3 Wichtige Warnungen und Sicherheitshinweise Sorgen Sie immer für ausreichende Belüftung. Bewahren Sie brennbare Materialien immer mit mindestens 3,5 Meter Abstand zum Gerät auf (4 Meter von der Frontseite). Important warnings and safety instructions Make sure there is sufficient ventilation. ...
-
Page 5: Warnungen Und Sicherheitshinweise
Herzlichen Dank! Herzlichen Dank, dass Sie sich für dieses EUROM-Produkt entschieden haben: es wurde so produziert, dass Sie es sicher und problemlos anwenden können. Lesen Sie diese Bedienungsanleitung vor der Anwendung sorgfältig durch, sorgen Sie dafür, dass Sie die Anleitungen verstehen und danach handeln. Bewahren Sie diese Bedienungsanleitung zum eventuellen späteren Nachschlagen auf und sorgen Sie... - Page 6 Drehen Sie den Hahn an der Gasflasche nach dem Gebrauch immer fest zu. Tauschen Sie die Gasflasche immer im Freien, oder in Räumen mit ausreichender Belüftung aus. Tauschen Sie die Gasflache immer in einer flammenfreien Umgebung aus. Prüfen Sie vor der Verwendung und nach dem Austausch der Gasflasche das gesamte Gastransportsystem und alle Anschlüsse auf Gasaustritt (siehe Anleitung).
- Page 7 Richten Sie den Heizer nie auf eine Gasflasche oder einen Gasschlauch. Gasflasche und Gasschlauch dürfen sich nie vor dem Heizer befinden. Suchen Sie immer eine sichere, stabile Stelle für die Gasflasche, von leicht brennbaren Materialien entfernt. Blockieren Sie nie den Ein- oder Auslass des Ofens und verwenden Sie keine Schläuche oder Rohre am Ein- oder Auslass.
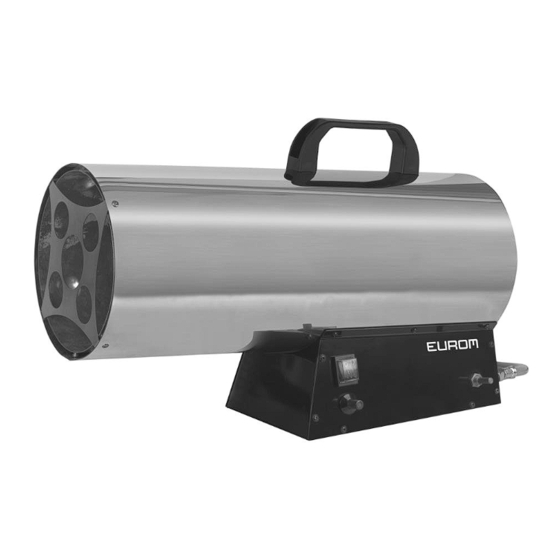
- Page 8 Stromkabel + Stecker Ventilator Gitter Rückseite Kontrollbox: Gasventil Anschlussnippel Gaszufuhr Schutzkappe Zündung AN/AUS-Schalter 10. Handgriff 11. Gehäuse 12. Ausblasgitter Technische Daten Abmessungen: Direktes Bestimmungsland Deutschland Gaskategorie I3B/P (1500) – Propan oder Butan Internationaler Schutzklasse IPX0 Versorgung Gasdruck 1500 mBar Spannung 220-240V~50Hz Stromverbrauch 65 W...
- Page 9 Der Geruch von Gas Dem Gas wird ein Riechstoff beigefügt, damit austretendes Gas sofort mit dem Geruchssinn wahrgenommen werden kann. Gas ist schwerer als Luft, daher sollten Sie versuchen, den Geruch in Bodennähe aufzuspüren! Folgende Maßnahmen sind sofort zu ergreifen, wenn Sie Gasgeruch wahrnehmen! ...
- Page 10 8. Führen Sie eine Dichtheitsprüfung mit Seifenwasser durch. Wenn sich Seifenblasen bilden, wird die Verbindung nicht geschlossen. Schließen Sie sofort den Gashahn oben auf der Gasflasche. Ziehen Sie die Überwurfmutter des Druckreglers fest. 9. Wenn keine Leckage festgestellt wurde, können Sie das Gerät zünden. B.
- Page 11 Kontrollieren Sie, ob das Gerät korrekt an die Gasflasche angeschlossen ist und führen Sie einen kompletten Gasaustrittstest durch, siehe Beschreibung an anderer Stelle in diesem Heft. Wenn alles in Ordnung ist, öffnen Sie den Gashahn. (Abb. 1) Stecken Sie jetzt den Stecker in die Steckdose. Schalten Sie den Stromschalter auf I (an) (Abb.
-
Page 12: Reinigung Und Wartung
offenen Flamme nach undichten Stellen suchen! Während des Gasaustrittstests darf nicht geraucht werden. Drehen Sie bei einem Gasaustritt (achten Sie auf den Gasgeruch) sofort den Gashahn der Gasflasche zu und entfernen Sie das Gerät von anderen Wärmequellen, Feuer und Funken. ... - Page 13 werden (siehe Aufdruck Schlauch). Verwenden Sie ausschließlich einen zugelassen Gasschlauch. Wenn der Gashahn der Gasflasche einen Defekt aufweist und die Gaszufuhr nicht normal abgeschlossen werden kann, schalten Sie erst den Stromschalter aus (O) und nehmen dann den Stecker aus der Steckdose. Das Gasventil blockiert jetzt die Gaszufuhr und der Heizer erlischt.
- Page 14 2. Elektromagnetisches Ventil (2) 3. Gasdüse (3) 4. Brennerkopf (5), am Zündungspunkt durch einen Funken der Zündkerze (6) 5. Thermoelement (4), das durch die Wärme des verbrannten Gases erhitzt wird 6. Überhitzungsschutz (7), der das elektromagnetische Ventil im Gasventil bedient. Verdrahtungsschema Zündung Schaltung Flammenschutz...
-
Page 15: Rating Label
Teile Rating Label Abfallentsorgung Entsorgen Sie das Gerät am Ende seiner Lebensdauer gemäß den örtlichen Gesetzen und Vorschriften oder liefern Sie es an Ihren Lieferanten. - Page 16 Permanent pilot flame power requirement with black bulb sensor Permanent pilot flame power Ppilot requirement (if applicable) Contact details Eurom - Kokosstraat 20 - 8281 JC - Genemuiden - The Netherlands...
-
Page 17: Warnings And Safety Instructions
Thank you Thank you for choosing this EUROM product: It is designed to be of service to you safely and without any hassle. Therefore, please read this user manual carefully, make sure you understand it and act as described therein. Keep the manual in order to consult it later and make sure that every other user will read and understand the manual beforehand. - Page 18 gas to escape. In the meantime, don’t use any fire or equipment that could cause sparks. Fix the leak, and check again for gas leakage before you use the heater again. Device category A3. Do not use the heater in the vicinity of flammable or explosive materials such as paint, etc., highly flammable liquids such as thinner, gas, turpentine, alcohol or volatile and gaseous flammable substances.
- Page 19 Never look inside the exhaust opening of the heater and do not stand in front of it. Do not make changes to the heater; that can cause dysfunction and hazardous situations. Immediately close the gas bottle when you detect a malfunction, defect or gas leakage. Do not make repairs to the heater and only have it repaired by a qualified person and only use original parts.
- Page 20 Technical details Dimensions: Direct country of destination Germany Gas category I3B/P (1500) – propane or butane International protection rating IPX0 Supply gas pressure 1500 mBar Voltage 220-240V~50Hz Power consumption 65 W Gas consumption 2400 g/hour Heat capacity 33 kW Airflow 1000 m³/hour Classification gas appliance The smell of gas...
-
Page 21: Operation
Operation A. How do I safely connect a (new) gas bottle? Uncouple the old gas bottle 1. Switch off the patio heater with the control knob and close the gas tap on top of the gas bottle by hand. Even with an empty gas bottle. (Note: turn closed = turn clockwise) 2. - Page 22 C. Operation general Check the heater for damage or defects. Do not use a damaged heater, but contact your supplier. Make sure to use undamaged, full gas bottles with propane or butane, suitable for use. Select a place for the heater that meets all the safety instructions and place it on a level, stable, horizontal surface with non-flammable material.
-
Page 23: Cleaning And Maintenance
not bent or kinked. Avoid twisted and tensile stress. This can damage it and gas leakage can occur! Always use the correct, supplier-provided pressure regulator and gas hose. If you have questions about the gas hose, contact your supplier. A length of 1.5 metres is advised. Gas leakage test To rule out the possibility of damage during transport or due to high pressure, wear and tear, etc., a complete gas leakage test must be performed during installation, after... -
Page 24: Gas Supply Circuit
If the gas tap on the gas bottle falters and the gas supply cannot be turned off normally, first press the power regular to (O) and unplug the unit. The gas valve will now block the gas supply and the heater will shut off. Allow the unit to cool off, but don't disconnect the gas hose! Take the gas bottle and the connected device to your gas supplier to have the problem solved. - Page 25 Electric circuit Ignition Circuit Flame Protection...
- Page 26 Spare Parts Rating label Disposal At its end of life, discard the device according to the local laws and regulations, or deliver the device to your supplier.
- Page 28 EUROM Kokosstraat 20 8281 JC Genemuiden The Netherlands info@eurom.nl www.eurom.nl 210322...
Need help?
Do you have a question about the HKG 30-DE and is the answer not in the manual?
Questions and answers