Table of Contents
Advertisement
Quick Links
Advertisement
Table of Contents

Related Manuals for EF BO GE 1771MW M


Summary of Contents for EF BO GE 1771MW M
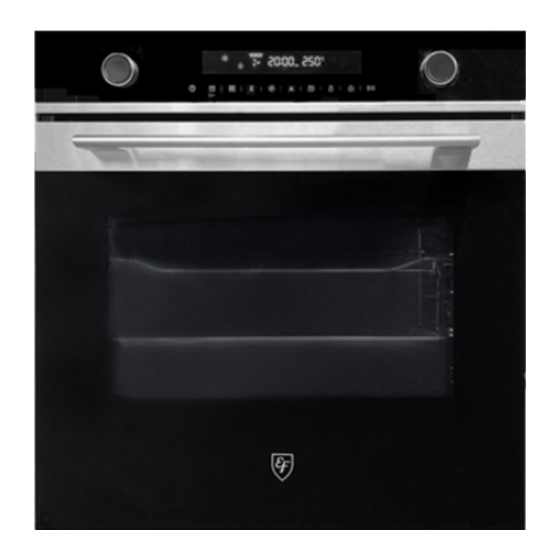
- Page 1 Model: BUILT‐IN OVEN BO GE 1771MW M 60CM EMBRACING FINEST MOMENTS USER MANUAL ...
-
Page 2: Table Of Contents
CONTENTS SAFETY INFORMATION Intended use Warning Causes of damage INSTALLATION OPERATING THE APPLIANCE Identifying the appliance Component Before using the appliance Types of heating Using your appliance AUTOMATIC RECIPES ACCESSORIES ENERGY EFFICIENT USE ENVIRONMENT HEALTH MAINTENANCE YOUR APPLIANCE TROUBLE SHOOTING TIPS AND TRICKS TEST FOOD ACCORDING TO EN 60350-1 DATASHEET... -
Page 3: Safety Information
SAFETY INFORMATION Intended Use Thank you for buying EF Built-in Microwave Combination Oven. Before unpacking it, please read these instructions carefully. Only then will you be able to operate your appliance safely and correctly. Warmly recommend retain the instruction manual and installation instructions for future use or for subsequent owners. - Page 4 The cable insulation on electrical appliances may melt when touching hot parts of the appliance. Never bring electrical appliance cables into contact with hot parts of the appliance. Do not use any high-pressure cleaners or steam cleaners, which can result in an electric shock.
- Page 5 Risk of fire! Combustible items stored in the cavity may catch fire. Never store combustible items in the cavity. Never open the appliance door if there is smoke inside. Switch o the appliance and unplug it from the mains or switch o the circuit breaker in the fuse box. A draught is created when the appliance door is opened.
-
Page 6: Causes Of Damage
Causes of Damage Accessories, foil, greaseproof paper or ovenware on the cavity floor: do not place accessories on the cavity floor. Do not cover the cavity floor with any sort of foil or greaseproof paper. Do not place ovenware on the cavity floor if a temperature of over 50 ºC has been set. -
Page 7: Installation
INSTALLATION min.35 min. min. min. min. min.585 min. min. max.595 min.35 min.35 To operate this appliance safe , please be sure that it has been installed to a professional standard respecting the installation instructions . Damages occur because of incorrect installation are not within the warranty. - Page 8 INSTALLATION Once the oven has been lifted into place inside the appliance housing, locate the two holes in the casing of the oven and fix it into place using Caution Do not over tighten the screws to avoid damage to the oven or appliance housing - use a screwdriver only!
-
Page 9: Operating The Appliance
OPERATING THE APPLIANCE IDENTIFYING THE APPLIANCE Confirm the model number. You can distinguish model number by the control panel. COMPONENT 1. Oven – Function Turn this knob to change cooking mode. Cancel Cancel the current state and enter standby mode. 3. -
Page 10: Before Using The Appliance
BEFORE USING THE APPLIANCE First using for the first time Before using the appliance to prepare food for the first time, you must clean the cavity and accessories. Remove all stickers, surface protection foils and transport protection parts. Remove all accessories and the side-racks from the cavity. Clean the accessories and the side-racks thoroughly using soapy water and a dish cloth or soft brush. -
Page 11: Types Of Heating
TYPES OF HEATING Your appliance has various operating modes which make your appliance easier to use. To enable you to find the correct type of heating for your dish, we have explained the di erences and scopes of application here. Types of Heating Temperature For traditional baking and roasting on one... -
Page 12: Using Your Appliance
Notes To defrost big portions of food, it is possible to remove the side-racks and place the container on the cavity floor. To warming tableware, it is beneficial to remove the side-racks and the heating modes “Hot Air Grilling” and “Fan Heating” with temperature setting of 50°C are useful. “Hot Air Grilling”... - Page 13 Quick preheat You can use quick preheat to shorten the preheat time. Then you select a function, touch the quick preheat symbol , the mark of quick preheat in the screen will lights up. If this function can’t quick preheat, then there will be a “beep”, there is no quick preheat in auto recipes, defrost and dough proving.
- Page 14 Caution! After the appliance switched o , it becomes very hot especially inside the cavity. Never touch the interior surfaces of the appliance or the heating elements. Use oven gloves to remove accessories or ovenware from the cavity, and allow the appliance to cool down. Keep children at a safe distance at the same time to avoid the injury of burns.
- Page 15 Note The wire rack can be used not only for grill cooking, but also for microwave cooking. And, the tray can't be used for microwave cooking . The second layer of the appliance is recommended for microwave function which cook- ing best.
-
Page 16: Automatic Recipes
AUTOMATIC RECIPES Your oven has a wide range of Automatic programs to enable you to achieve excellent results with ease. Simply select the appropriate program for the type of food you are cooking and follow the instructions in the display. Weight Recipes Microwave... -
Page 17: Accessories
ACCESSORIES Your appliance is accompanied by a range of accessories. Here, you can find an overview of the accessories included and information on how to use them correctly. Accessories included Your appliance is equipped with the following accessories: Wire Rack Baking Tray For ovenware, cake tins and For tray bakes and small... - Page 18 Inserting accessories The cavity has five shelf positions. The shelf positions are counted from the bottom up. The accessories can be pulled out approximately halfway without tipping. Notes Ensure that you always insert the accessories into the cavity the right way round. Always insert the accessories fully into the cavity so that they do not touch the appliance door.
- Page 19 Inserting accessories The ceramic clips...
-
Page 20: Energy Efficient Use
ENERGY EFFICIENT USE Remove all accessories, which are not necessary during the cooking & baking process. Do not open the door during the cooking & baking process. If you open the door during cooking & baking, switch the mode to “Lamp” (Without change the temperature setting). -
Page 21: Health
HEALTH Acrylamide occurs mainly by heating up starchy food (i.e. potato, French fries, bread) to very high temperatures over long times. Tips Use short cooking times. Cook food to a golden yellow surface color, do not burn it to dark brown colors. Bigger portions have less acrylamide. - Page 22 Area Appliance exterior Cleaning Hot soapy water: Clean with a dish cloth and then dry with a soft cloth. Remove flecks of limescale, grease, starch and albumin (e.g. egg Appliance exterior white) immediately. Stainless steel front Corrosion can form under such flecks. Special stainless steel cleaning products suitable for hot surfaces are available from our after-sales service or from specialist retailers.
- Page 23 Area Appliance exterior Cleaning Hot soapy water: Accessories Soak and clean with a dish cloth or brush. If there are heavy deposits of dirt, use a stainless steel scouring pad. Hot soapy water: Rails Soak and clean with a dish cloth or brush. Notes Slight di erences in color on the front of the appliance are caused by the use of di erent materials, such as glass, plastic and metal.
- Page 24 Rails When you want have a good cleaning for the rails and cavity, you can remove the shelves and clean it. In this way your appliance will retain its appearance and remain fully functional for a long time to come. 1.
-
Page 25: Trouble Shooting
TROUBLE SHOOTING If a fault occurs, before calling the after-sales service, please ensure that is not because of incorrect operations and refer to the fault table, attempt to correct the fault yourself. You can often easily rectify technical faults on the appliance yourself. If a dish does not turn out exactly as you wanted, you can find many tips and instruc- tions for preparation at the end of the operating manual. - Page 26 The temperature setting is too high, or the shelf level could be optimized. Double check the recipe and settings. The surface finish and or color and or material of the Uneven browning baking ware were not the best choice for the select- ed oven function.
-
Page 27: Tips And Tricks
TIPS AND TRICKS You want to cook your Try to use settings of similar recipes first and optimize own recipe the cooking process due to the result. Put a wooden stick inside the cake about 10 minutes before the given baking time is reached. If there is no raw Is the cake baked ready? dough at the stick after pulling out, the cake is ready. - Page 28 Every heat resistant baking ware can be used. It is Which kind of baking recommended not to use aluminum in direct contact with ware can be used? food, especially when it is sour. Please ensure a good fitting between container and lid. Preheat the oven for 5 minutes and place the food in the level given by this manual.
-
Page 29: Test Food According To En 60350-1
1 and filled with some water. The burger patties should turned around after 2/3 of the time. DATASHEET (EU 65/2014 & EU 66/2014) BO GE 1771MW M Weight of the Oven 45kg No of Cavities... -
Page 30: Customer Service
Above, thank you again for buying EF Built-in Microwave Combination Oven, and we wish that our appliance will bring you delicious food and happy life. - Page 31 WARRANTY & SERVICE • To activate your warranty, please register your appliance. • Warranty registration can be done via our website or scan the QR code below Website https://shop.casa.sg/E-Warranty QR Code Scan the QR Code below. It will redirect straight to our “Warranty Registration” page. Casa (S) Pte Ltd.
- Page 32 PN:16170000A97371...
Need help?
Do you have a question about the BO GE 1771MW M and is the answer not in the manual?
Questions and answers