Table of Contents
Advertisement
Quick Links
Advertisement
Table of Contents

Related Manuals for EF BO GE 1770SA M


Summary of Contents for EF BO GE 1770SA M
- Page 1 Model: BUILT‐IN OVEN BO GE 1770SA M 60CM EMBRACING FINEST MOMENTS USER MANUAL 1 ...
- Page 2 Please read this user manual before usage! Dear Customer, Thank you for purchasing this EF product. We hope that you obtain the greatest performance from our products which has been manufactured with excellent quality, state-of-the-art technology that will be able to contribute to making your everyday life even easier.
-
Page 3: Table Of Contents
CONTENTS 1 SAFETY GUIDELINES.....................4 GENERAL SAFETY.....................4 ELECTRICAL SAFETY....................4 DISPOSAL INSTRUCTIONS..................5 SAFETY DURING / AFTER OPERATION..............5 CHILD SAFETY......................6 CLEANING AND MAINTENANCE................7 2 GENERAL INFORMATION..................8 MAINTAINING EFFICIENCY..................8 CONTACTING QUALIFIED PERSON / CUSTOMER SERVICE.........8 3 INSTALLATION......................9 BEFORE INSTALLATION....................9 INSTALLATION OF BUILT-IN OVENS................9 ELECTRICAL CONNECTION...................10 4 PRODUCT OVERVIEW..................12 OVEN CONTROLS....................12 ACCESSORIES......................13... -
Page 4: Safety Guidelines
1 SAFETY GUIDELINES This section contains safety instructions that will help reduce the risk of injury, electric shock and property damage. GENERAL SAFETY Before unpacking the appliance, please read the instructions carefully. Always place oven racks in desired location while oven is cool. If a rack must be moved while oven is hot, do not let potholder contact the heating elements. -
Page 5: Disposal Instructions
Switch off the Main power supply before replacing the lamp to avoid the possibility of electric shock. Never store flammable materials in the oven and avoid using flammable liquids near the appliance. DISPOSAL INSTRUCTIONS The material used to package this appliance is recyclable. ... -
Page 6: Child Safety
Fruit juices will leave stains, which can become indelible on the enamel surfaces of the oven. When cooking very moist cakes, use the deep pan/baking tray. Do no rest bakeware on the open oven door. Over an extended period of time, moisture in the cavity may lead to corrosion. Allow the appliance to dry after each use. -
Page 7: Cleaning And Maintenance
CLEANING AND MAINTENANCE - Do not clean the appliance while it is still hot. Some cleaners produce noxious fumes when applied to a hot surface. Wet clothes or sponges can cause burns from steam. 1. Oven Exterior For cleaning both the interior and exterior of the oven, use a cloth and a mild cleaning agent or warm soapy water. -
Page 8: General Information
Method : 1. Remove all accessories from the oven. 2. Set the oven to conventional function. 3. Set the heat to 250 °C. 4. Run the oven for approximately 1 hour. The length of time cleaning with this temperature will depend on the degree of soiling. -
Page 9: Installation
3 INSTALLATION The manufacturer may not be responsible for any damage due to incorrect installation and improper, incorrect and irrational use. Self-preparation of location and electrical installation for the appliance is under customer’s responsibility BEFORE INSTALLATION A safety distance must be left between the appliance and the kitchen walls and furniture. ... -
Page 10: Electrical Connection
The panels of the adjacent cabinets must be made of heat-resistant material. In particular, cabinets with a veneer exterior must be assembled with glues which can withstand temperatures of up to 100°C. In compliance with the current safety standards, contact with the electrical parts of the oven must not be possible once it has been installed. - Page 11 3. Changing the Power Supply Cable Opening the terminal board (A) ‐ Using a screw driver unscrew the bolt on the side tabs of the terminal box ‐ Using a screwdriver unhooking the 2 fixing hooks (1,2), pull open the cover of the terminal board. ...
-
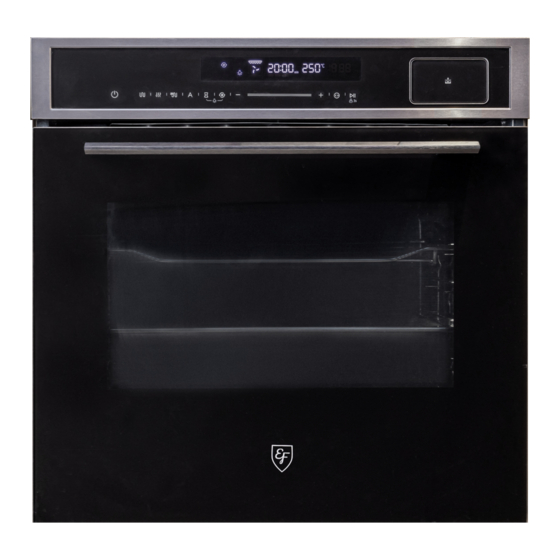
Page 12: Product Overview
4 PRODUCT OVERVIEW OVEN CONTROLS 2 3 4 5 6 7 8 10 11 No. Symbol Description /Off / Cancel Button 1 Power 2 Bake Function 3 Pure Steam Function 4 Steam Assisted Bake Function 5 Auto Menu Function 6 Cooking Time Setting Function 7 Light (press 6&8 simultaneously) ... -
Page 13: Accessories
ACCESSORIES The appliance is accompanied by a range of accessories as below Items Usage For ovenware, dishes, cake tins For roasting and grilling Wire Rack For moist cakes, biscuits, bread and other baked items Can be used to catch dripping oil when grilling directly on wire rack Baking Tray ... - Page 14 Locking Function Wire tray can be pulled halfway out until they lock in place. The locking function prevents accessories from tilting while they get pulled out. Accessories should be inserted into cavity correctly for the tilt protection. When inserting the wire rack, ensure the wire rack is onto the right facing direction like the picture 1 and 3 as above.
-
Page 15: Preparation
5 PREPARATION INTIAL USE Before using the appliance to prepare food for the first time, you must clean the cavity and accessories. 1. Remove all stickers, surface protection foils and transport protection parts. 2. Remove all accessories and the side-racks from the cavity. 3. -
Page 16: Oven Function
6 OVEN FUNCTION BAKE FUNCTION General operation: select grill function, adjust time or temperature, start cooking. Types of Heating Temperature For traditional baking and roasting on one Conventional 30~250℃ level. Especially suitable for cakes with moist toppings. For baking and roasting on one or more Convection 50~250℃... -
Page 17: Pure Steam Function
PURE STEAM FUNCTION General operation: adjust the cooking time for steaming and start cooking. Steam function cannot choose the intensity for steam (only 100%). STEAM ROAST FUNCTION General operation: select the steam roasting function, adjust the cooking time/temperature/ steam amount, and start cooking. -
Page 18: Automatic Menu
AUTOMATIC MENU General operation: Select automatic menu function, select menu, start cooking. Bake menu Function or Display Menu Cooking time Preheating Temperature Roasted pumpkin with goat's 230°C 10 min cheese and rocket Aubergine gratin 180°C 30 min Ratatouille 160°C 40 min Crab in a salt crust 200°C... -
Page 19: Operating Of Appliance
7 OPERATING OF APPLIANCE Power on the appliance. Set the clock if required (refer to the oven clock setting). If no setting is applied for 10minutes, the appliance will be switched off automatically. STARTING THE APPLIANCE Press the oven function symbol ( ) to choose the desired cooking function. - Page 20 If no setting is applied after pressing the symbol “ ”, it will go back to the preset temperature and cooking time. Press “ ” to cancel the cooking process Caution! During cooking operation, the appliance becomes very hot especially inside the cavity. Never touch the interior surfaces of the appliance or the heating elements.
- Page 21 Filling the Water Tank To fill the water tank, there are 2 ways Method 2 Method 1 Press the water tank, take out the Press the water box, pull out the water tank halfway and fill water entire water tank and fill water Notes Only use cold, fresh, tap water or softened water When filling the water, do not exceed the maximum level indicated on the water tank...
- Page 22 When the core temperature set is reached, there will be audible sound of 3 times and the cooking will be cut- off. When meat probe is inserted to the connection point on the appliance, the icon “ ” will show, Notes The meat probe measures the temperature inside the food, between 50°C to 100°C.
- Page 23 Core Temperature of Different Meat The value shown in the table below is guideline only. Do not use frozen food Food Core temperature in C Poultry Chicken 80-85 Chicken breast 75-80 Duck 80-85 Duck breast,medium rare 55-60 Turkey 80-85 Turkey breast 80-85 Goose 80-90 Pork Shoulder of pork 85-90 Fillet of pork, medium rare...
- Page 24 END COOKING TIME SETTING You can set the End cooking time for the dish using the time setting function. 1. Press the timer symbol “ ”, the timer will flash. 2. Set the desired end time by touching " " or +/- key. 3.
-
Page 25: Cleaning And Care
8 CLEANING AND CARE To extend the life of your oven, it must be cleaned frequently, keeping in mind that; The enamelled or stainless steel parts should be washed with lukewarm water without using any abrasive powders or corrosive substances which could ruin them, ... - Page 26 Area Appliance exterior Cleaning Hot soapy water: Clean with a dish cloth and then dry with a soft cloth. Door handle If descaler comes into contact with the door handle, wipe it off immediately. Otherwise, any stains will not be able to be removed. Enamel surfaces Observe the instructions for the surfaces of the cooking com- and self-cleaning...
-
Page 27: How To Remove The Oven Door
Caution! Risk of surface damage Do not use: 1. Harsh or abrasive cleaning agents. 2. Cleaning agents with a high alcohol content. 3. Hard scouring pads or cleaning sponges. 4. High-pressure cleaners or steam cleaners. 5. Special cleaners for cleaning the appliance while it is hot. Wash new sponge cloths thoroughly before use. -
Page 28: How To Dismantle The Oven Glass
Fitting the appliance door Reattach the appliance door in the opposite sequence to removal. 1. When attaching the appliance door, ensure that both hinges are placed right onto the installing holes of the front panel of the cavity. Ensure that the hinges are inserted into the correct position. You must be able to insert them easily and without resistance. -
Page 29: Tips For Energy Savings
Caution! After the appliance door is installed, the door cover can also be removed at this time. 1. Removing the door cover means to set the inner glass of the appliance door free, the glass can be easily moved and cause damage or injury. 2. -
Page 30: Faqs And Troubleshooting
10 FAQS AND TROUBLESHOOTING In the event of any abnormal occurs during operation of the appliance, you may do a self check before contacting . customer service officer Fault Possible Cause Notes/remedy Faulty fuse. Check the circuit breaker in the fuse box. The appliance Check whether the kitchen light or other kitchen does not work. - Page 31 Cooking Compartment Bulbs To light the interior of your cooking compartment, your appliance has two long-life LED bulbs. If the bulb is faulty, contact customer service and do not attempt to remove the lamp cover. TIPS AND TRICKS You want to cook your Try to use settings of similar recipes first and optimize own recipe the cooking process due to the result.
- Page 32 Every heat resistant baking ware can be used. It is recommended not to use aluminum in direct contact with Which kind of baking ware can be used? food, especially when it is sour. Please ensure a good fitting between container and lid. Preheat the oven for 5 minutes and place the food in the How to use the level given by this manual.
- Page 33 Lasangne Rack and glass plate 75-80 Cheese Cake Springform Φ20cm 80-90 DATASHEET (EU 65/2014 & EU 66/2014) EF: BO GE 1770SA M No of Cavities Heat Source Electric Usable Volume ECelectric, cavity (Conventional) 1.06kWh/cycle ECelectric, cavity (Forced Air) 0.63kWh/cycle EEICavity Energy E˝ciency Class (A+++ to D)
-
Page 34: Warranty & Service
11 WARRANTY & SERVICE To activate your warranty, please register your appliance. Warranty registration can be done via our website or scan the QR code below Website https://shop.casa.sg/E-Warranty QR Code Scan the QR Code below. It will redirect straight to our “Warranty Registration” page. Casa (S) Pte Ltd.
Need help?
Do you have a question about the BO GE 1770SA M and is the answer not in the manual?
Questions and answers