Advertisement
Quick Links
Advertisement

Subscribe to Our Youtube Channel
Related Manuals for Logitech G Pro X Superlight


Summary of Contents for Logitech G Pro X Superlight
- Page 1 All manuals and user guides at all-guides.com PRO X SUPERLIGHT SETUP GUIDE 设置指南 設定指南 설치 가이드...
- Page 2 All manuals and user guides at all-guides.com ENGLISH 简体中文 繁體中文 한국어...
-
Page 3: Package Contents
All manuals and user guides at all-guides.com PACKAGE CONTENTS Mouse Optional grip tape Receiver (installed in extension adapter) USB charging and data cable Surface preparation cloth Optional POWERPLAY aperture door with PTFE foot 3 ENGLISH... -
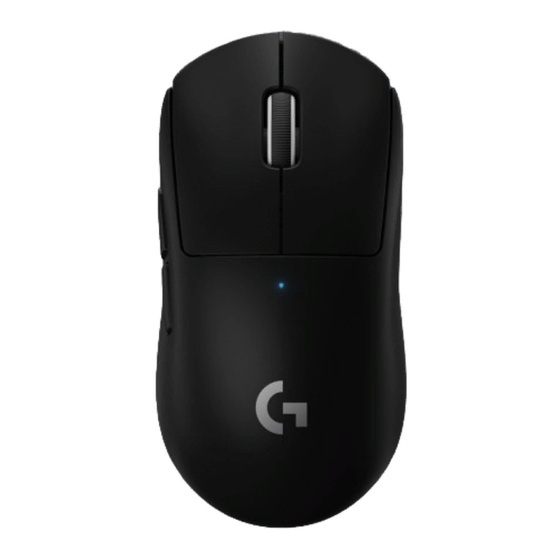
Page 4: Mouse Features
All manuals and user guides at all-guides.com MOUSE FEATURES Left Click Right Click Middle Click/Scroll Browser Forward Browser Back Power LED USB charging/data port Power on/off POWERPLAY™ Aperture door 4 ENGLISH... - Page 5 All manuals and user guides at all-guides.com SETUP Plug charging/data cable into PC, then plug extension adapter and receiver into charging/data cable Turn on mouse 5 ENGLISH...
- Page 6 All manuals and user guides at all-guides.com To configure mouse settings like DPI, download G HUB software from logitechG com/GHUB logitechG.com/ghub 6 ENGLISH...
- Page 7 All manuals and user guides at all-guides.com For optimal wireless performance, use mouse within 20cm of receiver and greater than 2m from sources of 2.4GHz interference (such as wifi routers). > 2 m ~ 20 cm 7 ENGLISH...
- Page 8 All manuals and user guides at all-guides.com To install optional grip tape, first clean surface of mouse with provided surface preparation cloth to remove any oil or dust. Then, carefully align grip tape to mouse surfaces. 8 ENGLISH...
- Page 9 The USB receiver can be stored inside the mouse by removing the POWERPLAY aperture door. This can prevent the receiver from being lost when using the mouse with the Logitech G POWERPLAY wireless charging system. Removing this door also allows the included, optional aperture door with PTFE foot to be installed instead of the default aperture door.
- Page 10 All manuals and user guides at all-guides.com 包装内容 鼠标 可选握胶 接收器 (预装于扩展适配器中) USB 充电/数据线 表面清洁布 带 PTFE 脚垫的可选 POWERPLAY 底盖 10 简体中文...
- Page 11 All manuals and user guides at all-guides.com 鼠标特性 左键单击 右键单击 中键单击/滚轮 浏览器前进 浏览器后退 LED 电量指示灯 USB 充电/数据端口 电源开关 POWERPLAY™ 底盖 11 简体中文...
- Page 12 All manuals and user guides at all-guides.com 设置 将充电/数据线插入 PC, 然后将扩展适配器和接 收器插入充电/数据线 打开鼠标 12 简体中文...
- Page 13 All manuals and user guides at all-guides.com 要配置 DPI 等鼠标设置, 请访问 logitechG com/GHUB 下载 G HUB 软件 logitechG.com/ghub 13 简体中文...
- Page 14 All manuals and user guides at all-guides.com 为获得出色的无线性能, 请在距接收器不超过 20 厘米处且距 2 4GHz 干扰源 (如 wifi 路由器) 超过 2 米的位置使用鼠标。 > 2 m ~ 20 cm 14 简体中文...
- Page 15 All manuals and user guides at all-guides.com 要安装供选配的握胶, 请先使用随附的表面清洁布清洁鼠标的表面, 去除 油脂和灰尘。 随后, 将握胶仔细地对齐鼠标表面。 15 简体中文...
- Page 16 All manuals and user guides at all-guides.com 可以卸下 POWERPLAY 底盖将 USB 接收器收纳于鼠标内部。 如此一来, 搭配罗技 G POWERPLAY 无线充电系统使用鼠标时, 可以避免遗失接收器。 卸下底盖还可以安装随附的带 PTFE 脚垫的可选底盖以替换默认底盖。 PTFE 16 简体中文...
- Page 17 All manuals and user guides at all-guides.com 包裝內容 滑鼠 選用握把貼布 接收器 (已安裝在延長轉接器中) USB 充電與資料連接線 表面處理布 具有 PTFE 腳墊的選用 POWERPLAY 底蓋 17 繁體中文...
- Page 18 All manuals and user guides at all-guides.com 滑鼠功能 按下左鍵 按下右鍵 按下中鍵 / 捲動 瀏覽器下一頁 瀏覽器前一頁 電源 LED 指示燈 USB 充電/資料連接埠 電源開啟/關閉 POWERPLAY™ 底蓋 18 繁體中文...
- Page 19 All manuals and user guides at all-guides.com 設定 將充電/資料連接線插入到 PC , 然後將延長轉接器 和接收器插入到充電/資料連接線 開啟滑鼠電源 19 繁體中文...
- Page 20 All manuals and user guides at all-guides.com 若要指定滑鼠的 DPI 等設定 , 請到 logitechG com/GHUB 下載 G HUB 軟體 logitechG.com/ghub 20 繁體中文...
- Page 21 All manuals and user guides at all-guides.com 為獲得最佳無線效能 , 請在接收器 20 公分範圍內與距離 2 4GHz 干擾來源 (例如 wifi 路由器) 2 公尺以上的地方使用滑鼠 。 > 2 m ~ 20 cm 21 繁體中文...
- Page 22 All manuals and user guides at all-guides.com 若要安裝選用的握把貼布 , 請先使用隨附的表面整理布清潔表面 , 以清除任 何油垢或灰塵 。 然後 , 小心地將貼布對齊滑鼠表面貼上 。 22 繁體中文...
- Page 23 All manuals and user guides at all-guides.com USB 接收器可以透過取下 POWERPLAY 底蓋來存放在滑鼠內部 。 這可以在滑鼠搭配羅技 G 系列 POWERPLAY 無線充電系統使用時 , 防止接收器遺失 。 取下此底蓋也讓您可以安裝隨附之具 PTFE 腳墊的選用底蓋 , 而非預設的底蓋 。 PTFE 23 繁體中文...
- Page 24 All manuals and user guides at all-guides.com 패키지 내용물 마우스 그립 테이프(선택 사항) 수신기(확장 어댑터에 설치됨) USB 충전 및 데이터 케이블 표면 정리용 천 PTFE 발이 있는 POWERPLAY 개구부(선택 사항) 24 한국어...
- Page 25 All manuals and user guides at all-guides.com 마우스 특징 왼쪽 클릭 오른쪽 클릭 가운데 클릭/스크롤 앞으로 브라우즈 뒤로 브라우즈 전원 LED USB 충전/데이터 케이블 전원 켜기/끄기 POWERPLAY™ 개구부 25 한국어...
- Page 26 All manuals and user guides at all-guides.com 설치 충전/데이터 케이블을 PC에 연결한 다음, 확장 어댑터 및 수신기를 충전/데이터 케이블에 연결합니다 마우스를 켭니다 26 한국어...
- Page 27 All manuals and user guides at all-guides.com DPI 등 마우스 설정을 구성하려면logitechG com/GHUB에서 G HUB 소프트웨어를 다운로드합니다 logitechG.com/ghub 27 한국어...
- Page 28 All manuals and user guides at all-guides.com 최적의 무선 성능을 원한다면, 수신기로부터 20cm 이내 거리 및 2 4GHz 간섭(라우터 등)으로부터 2m 이상의 거리에서 마우스를 사용하십시오 > 2 m ~ 20 cm 28 한국어...
- Page 29 All manuals and user guides at all-guides.com 선택 사항인 그립 테이프를 사용하려면 먼저 동봉된 표면 정리용 천으로 마우스의 표면에 있는 기름기나 먼지를 제거합니다 그다음 마우스의 표면에 그립 테이프를 조심스럽게 붙입니다 29 한국어...
- Page 30 All manuals and user guides at all-guides.com POWERPLAY 개구부를 제거하면 USB 수신기를 마우스 내부에 보관할 수 있습니다 로지텍 G PowerPlay 무선 충전 시스템이 내장된 마우스를 사용할 때도 수신기를 안전하게 보관할 수 있습니다 또한 개구부를 열어 기본 개구부 대신 PTFE 발이 있는 개구부(선택 사항)를 설치할 수 있습니다...
- Page 31 All manuals and user guides at all-guides.com ©2020 Logitech. Logitech, Logitech G, 罗技, 罗技G Logi and their respective logos are trademarks or registered trademarks of Logitech Europe S.A. and/or its affiliates in the U.S. and other countries. All other trademarks are the property of their respective owners.
Need help?
Do you have a question about the Pro X Superlight and is the answer not in the manual?
Questions and answers