
Related Manuals for Bresser OMNI-5GC


Summary of Contents for Bresser OMNI-5GC
- Page 1 GC2MP-TS OMNI-5GC INSTRUCTION MANUAL 5.0 MP* TIME & DATE PHOTOS *Interpolated 4GB MICRO CARD INCLUDED IR LIGHTS INFRARED DAY & NIGHT FLASH RANGE OPERATION...
-
Page 2: General Information
GENERAL INFORMATION Please read the safety instructions in this manual carefully. To avoid damage to the unit and the risk of injury, only use this product as described in the manual. Keep the instruction manual handy so that you can easily look up information on all the functions. -
Page 3: Battery Warning
BATTERY WARNING: – Battery guidelines: This device contains electronic components that are powered by batteries. Batteries should be kept out of children’s reach. When inserting batteries, please ensure the polarity is correct. Insert the batteries according to the displayed +/- information. Never mix old and new batteries. Replace all batteries at the same time. - Page 4 INTRODUCTION Bresser’s OMNI-5GC game camera has the versatility to meet all of your surveillance needs whether you are recording wildlife or trespassers. Working with an ample field of view and a fast trigger speed, this model can capture photos to document some of your property’s most elusive visitors.
-
Page 5: Parts And Controls
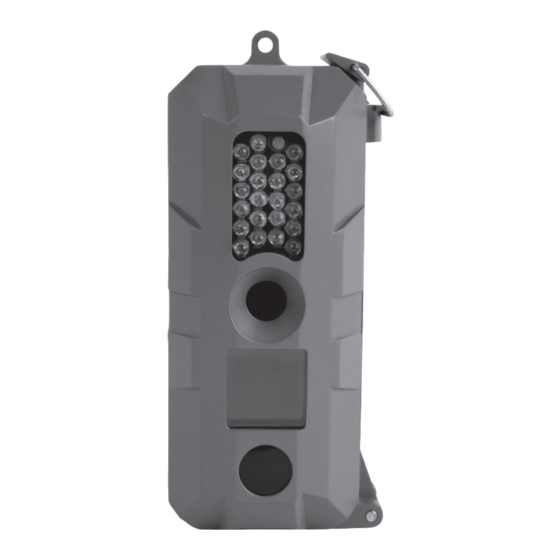
PARTS AND CONTROLS NAIL OR SCREW HANGER IR LIGHTS HANGER FOR LATCH MOUNTING STRAP LENS PREVIEW SCREEN MOTION SENSOR SIDE DOOR... - Page 6 PARTS AND CONTROLS MENU/SELECT MICRO ON/OFF BUTTONS CARD SLOT SWITCH MENU PREVIEW BATTERY BUTTONS MINI USB PORT TRAY for viewing and transferring photos 8 AA BATTERY TRAY...
-
Page 7: Battery Installation
BATTERY INSTALLATION 1. Unlock the side latch and open the trail camera’s side door 2. Turn silver tabs outward and remove battery tray from trail camera 3. Insert 8 AA batteries (not included) in the battery tray NOTE: To ensure the chip’s initialization process complete, please wait 4 seconds after installing the batteries to turn on the trail camera. - Page 8 BATTERY INSTALLATION 4. Insert battery tray back into the trail camera and turn the tabs inward to lock into place. NOTE: Battery tray must be inserted with the curves at the edge of the tray orientated the correct way. Failure to orientate the tray correctly will break plastic tabs on the corrners of the camera housing which will reduce the intergrity of the camera body.
-
Page 9: Setup And Operation
SET UP AND OPERATION 1. Insert Micro Card (up to 32GB) into the Micro Card card slot NOTE: This device requires class 6 or above TF card. There is no programming required to set up the trail camera. MICRO CARD SLOT MENU 2. - Page 10 SET UP AND OPERATION 5. In preview screen, press the MENU button for settings. Menu settings includes DATE/TIME, DEFAULT, FORMAT, SENSITIVITY, STAMP, PHOTO SIZE, DELAY. Press the UP/DOWN buttons to select menu options, press MENU button to get back to preview screen. DATE/TIME In DATE/TIME menu screen, press OK button to scroll between each section, to set year, month, date, hour, minutes, and seconds.
-
Page 11: Photo Size
STAMP Stamp setting is to choose whether picture taken will show stamp or not. In STAMP menu, press OK to get into settings, press UP/DOWN to choose YES/NO, press OK again to save stamp setting and return back to main menu. - Page 12 VIEWING IMAGES ON CAMERA To view pictures recorded by the camera from the micro card, press down one of the Preview Buttons for a few seconds and the camera will switch into “view mode”. You can advance or go back by pressing the Preview Buttons.
-
Page 13: Mounting Camera
MOUNTING CAMERA Mounting can be done with the nylon strap provided or by screw or nail through the screw or nail hanger located on top of the camera. NAIL OR SCREW HANGER HANGER FOR MOUNTING STRAP... - Page 14 COMPONENT SPECIFICATIONS Picture Size 5.0 MP* (*interpolated) Lens Angle 45 Degrees IR-Flash 22 IR Lights Display Screen 1.44 TFT LCD Memory Micro Card up to 32GB Operation Day/Night/24hr Trigger Speed 1.2 Seconds Power Supply 8 AA Batteries USB Cable Micro-USB Mounting Tree Strap Dimension...
Need help?
Do you have a question about the OMNI-5GC and is the answer not in the manual?
Questions and answers