Table of Contents
Advertisement
Available languages
Available languages
Quick Links
2-Cycle Chain Saw
TB4620H XP
All information, illustrations, and specifications in this manual are based
on the latest product information available at the time of printing. We
reserve the right to make changes at any time without notice.
The product may vary slightly from the illustrations contained in this
manual.
Copyright© 2023 MTD SOUTHWEST INC, All Rights Reserved.
IMPORTANT: Read this manual thoroughly before using this product. Follow all instructions.
769-26304 / 01
Operator's Manual
TABLE OF CONTENTS
Service . . . . . . . . . . . . . . . . . . . . . . . . . . . . . . . . . . . . . . . . . . . . . .1
Safety . . . . . . . . . . . . . . . . . . . . . . . . . . . . . . . . . . . . . . . . . . . . . . .2
Know Your Unit . . . . . . . . . . . . . . . . . . . . . . . . . . . . . . . . . . . . . . . .6
Specifications . . . . . . . . . . . . . . . . . . . . . . . . . . . . . . . . . . . . . . . . .7
Assembly . . . . . . . . . . . . . . . . . . . . . . . . . . . . . . . . . . . . . . . . . . . . .8
Oil and Fuel . . . . . . . . . . . . . . . . . . . . . . . . . . . . . . . . . . . . . . . . . . .9
Starting and Stopping . . . . . . . . . . . . . . . . . . . . . . . . . . . . . . . . . .10
Operation . . . . . . . . . . . . . . . . . . . . . . . . . . . . . . . . . . . . . . . . . . . .11
Maintenance . . . . . . . . . . . . . . . . . . . . . . . . . . . . . . . . . . . . . . . . .16
Cleaning and Storage . . . . . . . . . . . . . . . . . . . . . . . . . . . . . . . . . .24
Troubleshooting . . . . . . . . . . . . . . . . . . . . . . . . . . . . . . . . . . . . . . .25
Warranty . . . . . . . . . . . . . . . . . . . . . . . . . . . . . . . . . . . . . . . . . . . .26
SAVE THESE INSTRUCTIONS
SERVICE
DO NOT RETURN THIS UNIT TO THE RETAILER. PROOF OF
PURCHASE WILL BE REQUIRED FOR WARRANTY
SERVICE.
For assistance regarding the assembly, operation or maintenance of
the unit, please call 1-800-828-5500 (in the United States) or 1-800-
668-1238 (in Canada). Additional information can be found at
www.troybilt.com (in the United States) or www.troybilt.ca (in
Canada).
Warranty service is available through an authorized service center.
To locate a service center in your area, please visit our website or
call the number listed above. Service on this unit, both within and
after the warranty period, should only be performed by an authorized
and approved service center. When servicing, use only identical
replacement parts.
Register your product at www.troybilt.com (US) or www.troybilt.ca
(Canada) to have parts, owner manuals, and warranty information at
your fingertips.
02/23
Advertisement
Table of Contents

Related Manuals for Troy-Bilt TB4620H XP


Summary of Contents for Troy-Bilt TB4620H XP
- Page 1 Service ..........1 TB4620H XP Safety .
- Page 2 SAFETY SPARK ARRESTOR NOTE The purpose of safety symbols is to attract your attention to possible dangers. The safety symbols, and their explanations, NOTE: For users on U.S. Forest Land and in the states of deserve your careful attention and understanding. The safety California, Maine, Oregon and Washington.
- Page 3 • This saw is classified by UL as a Class 1C saw in accordance WHILE OPERATING with CSA Z62.1-03. It is intended for infrequent use by • Wear safety glasses or goggles that meet current ANSI Z87.1 homeowners, cottagers and campers, and for general standards and are marked as such.
- Page 4 • Only use wedges made of wood or plastic. Do not use metal to Rotational hold a cut open. Kickback • Follow the manufacturer’s sharpening and maintenance instructions for the saw chain. • Only use replacement bars and chains specified by the manufacturer or the equivalent.
- Page 5 • SAFETY & INTERNATIONAL SYMBOLS • This operator's manual describes safety and international symbols and pictographs that may appear on this product. Read the operator's manual for complete safety, assembly, operating and maintenance and repair information. SYMBOL MEANING SYMBOL MEANING •...
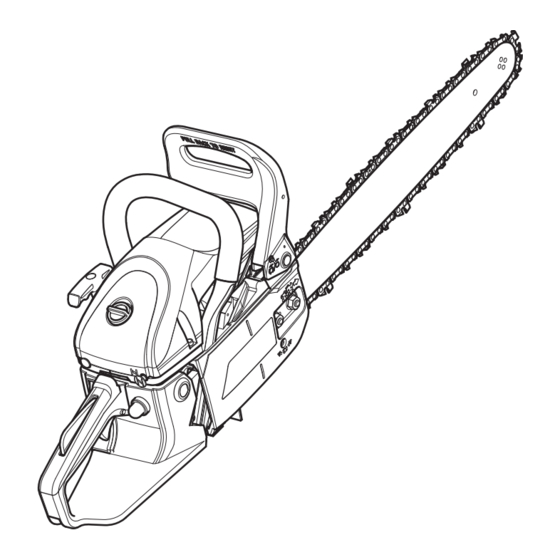
- Page 6 KNOW YOUR UNIT APPLICATIONS • Felling and limbing trees • Cutting logs (bucking) • Pruning trees Scabbard ASSEMBLY TOOLS REQUIRED: • Flat-head screwdriver or scrench (provided) Air Filter Cover Front Handle (Spark Plug and Air Filter) Chain Brake Lever / Front Hand Guard Rear Handle / Boot Loop...
- Page 7 SAFETY FEATURES • LOW-KICKBACK SAW CHAIN significantly reduces the chance of kickback and the intensity of kickback, due to specially designed depth gauges and guard links. • The SPARK ARRESTER SCREEN retains carbon and other flammable particles over 0.023 inches (0.6mm) in size from the engine exhaust flow.
- Page 8 ASSEMBLY ADDING BAR AND CHAIN OIL: INITIAL USE This unit comes from the factory with the chain oil reservoir empty. Refer to Adding Bar and Chain Oil instructions in the Maintenance section. ADJUSTING THE CHAIN TENSION: INITIAL USE The saw chain must be properly tensioned before attempting to start or operate the unit.
- Page 9 OIL AND FUEL FUELING THE UNIT OIL AND FUEL MIXING INSTRUCTIONS The use of old and/or improperly mixed fuel is the most common cause WARNING: Gasoline is extremely flammable. Ignited of performance problems. Use only fresh, clean unleaded gasoline. vapors may explode. Always stop the engine and allow it to Follow the instructions carefully for the proper gasoline/oil mixture.
- Page 10 STARTING AND STOPPING WARNING: Operate this unit only in a well-ventilated On ( I ) / Start Throttle Control outdoor area. Carbon monoxide exhaust fumes can be lethal in a confined area. WARNING: Avoid accidentally starting the unit. To avoid Throttle Lockout serious injury, the operator and the unit must be in a stable position when pulling the starter rope (Fig.
- Page 11 • Keep the work area clean. Cluttered areas invite injuries. Do not - 16 in. / 40.6 cm (TB4620H XP) start cutting until the work area is clear and free from obstructions. Make sure there is secure footing and a planned retreat path from falling trees or branches.
- Page 12 HOLDING THE UNIT Correct Grip WARNING: Always hold the front handle with the left hand and the rear handle with the right hand. Always keep all body parts to the left of the chain line. • Firmly encircle the handles with the thumbs and fingers (Fig. 6). This will help reduce the chance of losing control of the unit if kickback occurs.
- Page 13 • Consider the force and direction of the wind. Consider the lean and balance of the tree. Consider the location of large branches. 135º From Planned All of these factors influence the direction that the tree will fall. Do Line of Fall not try to fell a tree in a direction other than its natural fall line.
- Page 14 3. Periodically glance up during the felling back cut to see if the tree is going to fall in the correct direction. If there is a chance that the tree might not fall in the desired direction, or if the tree might rock Wedge back and bind the chain saw, remove the guide bar from the cut, stop the unit and use wedges to open the cut and direct the fall...
- Page 15 DANGER: Use extreme caution when cutting a fallen Log Supported First Cut (1/3 Diameter) Two Ends tree that is still attached to the root structure. When the trunk is separated from the roots, the stump has a high Load potential for rocking back into the hole created by the roots. This can result in serious injury or death.
- Page 16 PRUNING Second Cut Fourth Cut WARNING: Do not cut above shoulder height. Use a pole saw to cut limbs above shoulder height or hire a professional. Do not operate the unit in a tree or on a ladder unless specifically trained to do so. WARNING: Falling branches can cause serious injury.
- Page 17 NOTE: Always use Troy-Bilt bar and chain oil, which has been designed for optimal performance. Other lubricants could clog or damage the dispenser. Always use a high-quality, biodegradable bar and chain oil for proper saw chain and bar lubrication.
- Page 18 ADJUSTING THE CHAIN TENSION CAUTION: The guide bar, saw chain, and saw bearings will wear more rapidly if the saw chain is not properly tensioned. Maintaining proper chain tension will improve cutting performance and prolong the life of the saw chain. WARNING: To prevent serious injury, never touch the saw chain or adjust the chain tension while the unit is...
- Page 19 REMOVING AND INSTALLING THE GUIDE BAR AND SAW CHAIN WARNING: The saw chain is very sharp. Always wear heavy-duty protective gloves when handling or performing Bar Cover maintenance on the saw chain. The guide bar and saw chain need to be removed when certain maintenance procedures are performed, such as when rotating the guide bar.
- Page 20 SHARPENING THE SAW CHAIN Depth Gauge Clearance WARNING: The saw chain is very sharp. Always wear 1/32 inch (0.6 mm) heavy-duty protective gloves when handling or performing Depth Gauge maintenance on the saw chain. WARNING: An improperly sharpened saw chain Top Plate increases the chance of kickback.
- Page 21 Restore original rounded shape Fig. 37 MAINTAINING THE GUIDE BAR Oil Passage 1. Rotate the guide bar frequently, at regular intervals (for example, after every 5 hours of operation), to ensure even wear on the top and bottom of the guide bar. Refer to Removing and Installing the Guide Bar and Saw Chain.
- Page 22 REPLACING THE GUIDE BAR AND SAW CHAIN Guide Bar Sprocket Tip Lubrication Hole WARNING: Always use a low-kickback saw chain, which significantly reduces the danger of kickback. Low-kickback saw chain does not completely eliminate kickback. A low- kickback or “safety chain,” should never be regarded as total protection against injury.
- Page 23 ADJUSTING THE IDLE SPEED WARNING: The saw chain may spin during idle speed adjustments. Wear protective clothing and observe all safety instructions to prevent serious personal injury. Idle Speed Screw NOTE: Careless adjustments can seriously damage the unit. An authorized service dealer should make carburetor adjustments. If, after checking the fuel and cleaning the air filter, the engine still will not idle, adjust the idle speed screw as follows: 1.
- Page 24 CLEANING AND STORAGE CLEANING WARNING: To avoid serious personal injury, always stop the engine and allow it to cool before cleaning or maintaining the unit. 1. Loosen the saw chain if the chain tension was adjusted during operation. The saw chain will contract as the unit cools, which could damage the unit if the chain is too tight.
- Page 25 TROUBLESHOOTING PROBLEM SOLUTION THE ENGINE WILL NOT START The fuel tank is empty Fill the fuel tank with properly mixed fuel The primer bulb was not pressed enough Press the primer bulb 10 times or until fuel is visible Move the choke knob to Position 2, press the throttle lockout, The engine is flooded squeeze the throttle control and pull the starter rope The fuel is old (over 30 days) and/or improperly mixed...
- Page 26 Troy-Bilt for use with the product(s) covered by this manual will void your warranty as to any resulting damage. This warranty is limited to ninety (90) days from the date of original retail purchase for any Troy-Bilt product that is used for rental or commercial purposes, or any other income-producing purpose.
-
Page 27: Table Of Contents
Servicio ..........27 TB4620H XP Seguridad . -
Page 28: Seguridad
SEGURIDAD NOTA SOBRE EL PARACHISPAS El propósito de los símbolos de seguridad es llamar la atención sobre posibles peligros. Los símbolos de seguridad y sus NOTA: Para usuarios de la Zona Forestal de EE. UU., y los explicaciones merecen toda su atención y comprensión. Las estados de California, Maine, Oregón y Washington. - Page 29 • No fuerce la unidad, especialmente cerca del extremo de un ADVERTENCIAS DE SEGURIDAD PARA LAS UNIDADES corte. Si se usa a la velocidad para la que fue diseñada, A GASOLINA realizará un trabajo más eficiente y seguro. • Apague siempre el motor cuando la operación se demora, ADVERTENCIA: cuando apoya la unidad o cuando la traslada de un lugar a otro.
- Page 30 SEGURIDAD AL REBOTAR Precauciones de seguridad contra rebotes Siga los siguientes pasos para reducir la posibilidad de un accidente ADVERTENCIA: o una lesión: Puede haber un rebote • No confíe exclusivamente en los dispositivos de seguridad cuando la punta de la barra de guía toca un objeto, o incorporados en la unidad.
- Page 31 • Una cadena de sierra de retroceso bajo es una cadena que cumple con los requisitos de funcionamiento de retroceso bajo de ANSI/OPEI B175.1-2012 cuando se la prueba según las normas establecidas en ANSI/OPEI B175.1-2012. Una cadena de sierra de retroceso bajo es una cadena que también cumple con CSA Z62.3.
- Page 32 • SÍMBOLOS INTERNACIONALES Y DE SEGURIDAD • Este manual del operador describe símbolos y pictografías internacionales y de seguridad que posiblemente aparezcan en este producto. Lea el manual del operador para informarse bien sobre la seguridad, ensamblaje, operación, mantenimiento y reparación. SÍMBOLO SIGNIFICADO SÍMBOLO...
-
Page 33: Conozca Su Unidad
CONOZCA SU UNIDAD USOS • Tala y desramado de árboles • Corte de troncos (tronzado) • Poda de árboles Funda HERRAMIENTAS NECESARIAS PARA EL ENSAMBLAJE: • Destornillador de cabeza plana o llave/destornillador (provisto) Tapa del filtro de aire Manija delantera (Bujía y filtro de aire) Palanca del freno de cadena / Protección delantera de la mano... -
Page 34: Especificaciones
CARACTERÍSTICAS DE SEGURIDAD • CADENA DE SIERRA DE RETROCESO BAJO reduce significativamente la posibilidad de retroceso y su intensidad debido a los calibres de profundidad y los eslabones de protección diseñados especialmente. • La PANTALLA DE PARACHISPAS retiene las partículas de carbono y otras partículas inflamables de más de 0,023 pulgadas (0,6mm) de tamaño provenientes del flujo de escape del motor. -
Page 35: Ensamblaje
ENSAMBLAJE AGREGADO DE ACEITE DE LA CADENA Y BARRA: USO INICIAL Esta unidad viene de fábrica con el depósito de aceite de la cadena vacío. Consulte las instrucciones de Agregado de aceite de la cadena y barra en la sección Mantenimiento. AJUSTE DE TENSIÓN DE LA CADENA: USO INICIAL La cadena de la sierra debe estar debidamente tensada antes de utilizar la unidad. -
Page 36: Aceite Y Combustible
ACEITE Y COMBUSTIBLE INSTRUCCIONES PARA LA MEZCLA DEL ACEITE Y EL COMBUSTIBLE El uso de combustible viejo y/o mal mezclado es la causa más frecuente de los problemas de rendimiento. Sólo se debe utilizar gasolina nueva, limpia y sin plomo. Siga atentamente las instrucciones para que la mezcla de gasolina/aceite sea adecuada. -
Page 37: Arranque Y Parada
ARRANQUE Y PARADA Encendido ( I ) / Arranque ADVERTENCIA: Opere esta unidad solamente en un Control del acelerador área exterior bien ventilada. El monóxido de carbono de los gases de escape puede ser letal en un área confinada. Bloqueo del ADVERTENCIA: Evite arrancar la unidad por acelerador... -
Page 38: Operación
• Practique cortar algunos troncos pequeños antes de comenzar una operación importante de corte. • No intente cortar árboles o troncos con diámetros mayores de: - 16 pulgadas / 40.6 cm (TB4620H XP) - Page 39 PREPARACIÓN DEL ÁREA DE TRABAJO • Despeje la zona de niños, observadores y mascotas; manténgalos fuera de un radio de 50 pies (15 m), como mínimo. Incluso a esa distancia, sigue el riesgo de ser alcanzados por los objetos arrojados por el aire. Sugiérales a los observadores que usen protección ocular.
- Page 40 ASPECTOS BÁSICOS DEL PROCEDIMIENTO DE CORTE 1. Arranque la unidad. Consulte Instrucciones de arranque en la Línea de la cadena sección Arranque y detención. 2. No coloque los dedos sobre el control del acelerador hasta estar listo para cortar. 3. Acelere la unidad a la máxima velocidad antes de cortar. Postura correcta 4.
- Page 41 TALA: PROCEDIMIENTO Segundo corte Los árboles pequeños de hasta 6 - 7 pulgadas (15 - 18 cm) de diámetro generalmente se talan en un solo corte. Los árboles más Raíz de apoyo grandes necesitan de una secuencia de dos operaciones de corte: un corte inferior de muesca seguido de un corte final de tala.
- Page 42 4. A medida que se achica la bisagra, el árbol debería comenzar a Vara tensionada caer. Cuando esto sucede, retire la sierra de cadena del corte, detenga el motor y apoye de inmediato la unidad. Salga rápidamente del área por la senda de retirada, pero siga observando el árbol mientras cae.
- Page 43 PELIGRO: Tenga sumo cuidado cuando corte un árbol Tronco sostenido Primer corte (1/3 del diámetro) en ambos extremos talado que todavía está unido a la raíz. Al separarlo de ellas, el tocón tiene gran potencial para balancearse hacia Carga atrás y volver al agujero creado por las raíces. Esto puede causar lesiones graves o la muerte.
- Page 44 PODA Cuarto Segundo corte corte ADVERTENCIA: No corte por arriba de la altura del hombro. Utilice una sierra de pértiga para cortar ramas por encima de la altura del hombro o contrate a un profesional. No opere la unidad en un árbol o sobre una escalera a menos que esté...
-
Page 45: Mantenimiento
MANTENIMIENTO RESPONSABILIDAD DEL CLIENTE ADVERTENCIA: Para evitar lesiones graves, nunca realice el mantenimiento ni las reparaciones con la unidad en funcionamiento. Siempre deje que se enfríe la unidad FRECUENCIA MANTENIMIENTO REQUERIDA antes de hacer el mantenimiento o las reparaciones de la Antes de cada •... - Page 46 NOTA: Siempre use aceite de barra y cadena Troy-Bilt, que ha sido diseñado para desempeño óptimo. Otros lubricantes podrían obstruir o dañar el dispensador.
- Page 47 AJUSTE DE LA TENSIÓN DE LA CADENA PRECAUCIÓN: Si la cadena de la sierra no está correctamente tensionada, la barra de guía, la cadena y los cojinetes se gastarán más rápidamente. Mantener la tensión adecuada de la cadena de la sierra mejora el rendimiento del corte y prolonga la vida útil de la cadena.
- Page 48 RETIRO E INSTALACIÓN DE LA BARRA GUÍA Y LA CADENA DE LA SIERRA ADVERTENCIA: La cadena de la sierra es muy filosa. Cubierta Cuando manipule o efectúe el mantenimiento de la cadena de la barra de la sierra, use siempre guantes de protección reforzados. Es necesario retirar la barra guía y la cadena de la sierra cuando se efectúan los procedimientos de mantenimiento, por ejemplo, cuando se gira la barra guía.
- Page 49 • Las astillas de madera son pequeñas y pulverulentas. • La cadena de la sierra debe ser forzada a través de la madera. Espacio libre del calibre de • La cadena corta hacia un lado. profundidad 1/32 pulgadas (0,6 mm) Si existe cualquiera de estas condiciones, afile o reemplace la Calibre de cadena de la sierra.
- Page 50 3. Utilice un calibre de profundidad (no incluido) para medir el espacio libre del calibre de profundidad (Fig. 36) de cada Devuelva la forma redondeada original cortador. El espacio libre del calibre de profundidad debe mantenerse a 1/32 pulgada (0,6 mm). El espacio libre del calibre de profundidad determina la profundidad a la cual el cortador ingresa en la madera durante la operación y el tamaño de las astillas de madera producidas.
- Page 51 3. Rote la cadena de la sierra manualmente. Utilice siempre guantes de protección reforzados. Compruebe que el freno de la cadena esté desenganchado. 4. Repita el proceso de lubricación hasta la lubricación total de la punta de la rueda dentada de la barra guía. REEMPLAZO DE LA BARRA GUÍA Y LA CADENA DE LA Punta de rueda dentada Orificio de lubricación...
- Page 52 AJUSTAR LA VELOCIDAD DE MARCHA EN VACÍO ADVERTENCIA: La cadena de la sierra puede girar durante los ajustes de la velocidad de ralentí. Use ropa de Tornillo de protección y observe todas las instrucciones de seguridad marcha en vacío para evitar lesiones personales graves. NOTA: Los ajustes negligentes pueden dañar seriamente la unidad.
-
Page 53: Limpieza Y Almacenamiento
NOTA: Si usa una llave dinamométrica, use un par de torsión de: 110-120 pulgada•libra (12.3-13.5 N•m). No apriete demasiado. 9. Vuelva a ponerle la pipa (capucha). 10. Coloque la cubierta del filtro de aire nuevamente sobre la unidad. Inserte la lengüeta de la cubierta del filtro de aire dentro de la ranura del alojamiento de la sierra de cadena (Fig. - Page 54 ALMACENAMIENTO • Afloje la cadena de la sierra si se graduó la tensión de la cadena durante la operación. La cadena se contraerá a medida que se enfríe la unidad, lo cual puede dañar la unidad si la cadena está demasiado ajustada.
-
Page 55: Localización Y Solución De Problemas
LOCALIZACIÓN Y SOLUCIÓN DE PROBLEMAS PROBLEMA SOLUCIÓN EL MOTOR NO ARRANCA El tanque de combustible está vacío Llene el tanque de combustible con la mezcla adecuada La pera del cebador no se oprimió lo suficiente Oprima la pera del cebador 10 veces o hasta que se vea el combustible Mueva la perilla del cebador a la Posición 2, apriete el bloqueo del El motor está... -
Page 56: Garantía
Estados Unidos, sus posesiones y territorios. Troy-Bilt garantiza este producto por defectos materiales y de fabricación por un período de tres (3) años a partir de la fecha de la compra original y reparará o cambiará sin cargo cuando lo considere pertinente todas las piezas con defectos materiales o de fabricación. Esta garantía limitada sólo se aplicará...
Need help?
Do you have a question about the TB4620H XP and is the answer not in the manual?
Questions and answers