Table of Contents
Advertisement
Quick Links
Western Products, PO Box 245038, Milwaukee, WI 53224-9538 • www.westernplows.com
February 24, 2020
Lit. No. 76455, Rev. 04
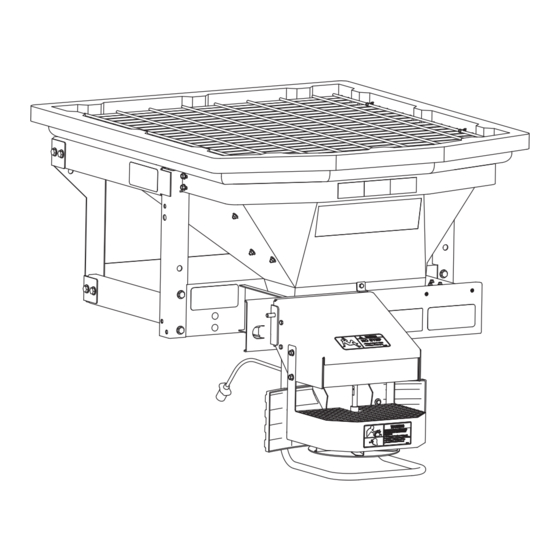
Tornado™ UTV Hopper Spreader
#78600
Owner's Manual
Original Instructions
CAUTION
Read this document before operating
or servicing the spreader.
This manual is for WESTERN
Tornado UTV hopper spreaders
®
with serial numbers beginning with 160901 and higher.
This manual supersedes all editions with an earlier date.
Advertisement
Table of Contents

Related Manuals for Western Tornado 78600


Summary of Contents for Western Tornado 78600
- Page 1 Western Products, PO Box 245038, Milwaukee, WI 53224-9538 • www.westernplows.com February 24, 2020 Lit. No. 76455, Rev. 04 Tornado™ UTV Hopper Spreader #78600 Owner's Manual Original Instructions CAUTION Read this document before operating or servicing the spreader. This manual is for WESTERN Tornado UTV hopper spreaders ®...
-
Page 3: Table Of Contents
TABLE OF CONTENTS PREFACE ..............5 OPERATING THE SPREADER ......14 Owner's Information Form ........5 Cab Control ............14 SAFETY ..............6 Starting and Stopping Motor ......14 Safety Defi nitions ..........6 Adjusting Auger/Spinner Speed ...... 14 Warning/Caution Labels ........6 Spreading Tips ............ -
Page 5: Preface
PREFACE This manual has been prepared to acquaint you with When service is necessary, bring your hopper the safety information, operation, and maintenance of spreader to your distributor. They know your spreader your new hopper spreader. Please read this manual best and are interested in your complete satisfaction. -
Page 6: Safety
SAFETY SAFETY DEFINITIONS WARNING/CAUTION LABELS Please become familiar with the warning and caution WARNING labels on the spreader. Indicates a potentially hazardous situation that, if not avoided, could result in death or NOTE: If labels are missing or cannot be read, see serious personal injury. -
Page 7: Serial Number Label
SAFETY ROTATING AUGER CAN CAUSE SERIOUS INJURY OR DEATH • Keep arms, hands, and loose clothing away from auger. • Shut off control and unplug spreader before servicing. D6335 SERIAL NUMBER LABEL Code Defi nition 2-Digit Year 2-Digit Month 2-Digit Day 2-Digit Location Code XXXX 4-Digit Sequential Number... -
Page 8: Safety Precautions
SAFETY SAFETY PRECAUTIONS CAUTION If rear directional, CHMSL light, or brake Improper installation and operation could cause stoplights are obstructed by the spreader, the personal injury and/or equipment and property damage. lights shall be relocated, or auxiliary directional Read and understand labels and the Owner's Manual or brake stoplights shall be installed. -
Page 9: Fuses
SAFETY FUSES FIRE AND EXPLOSION The electrical system contains several automotive-style WARNING fuses. If a problem should occur and fuse replacement Gasoline is highly fl ammable and gasoline is necessary, the replacement fuse must be of the vapor is explosive. Never smoke while same type and amperage rating as the original. -
Page 10: Torque Chart
SAFETY TORQUE CHART CAUTION Read instructions before assembling. Fasteners should be fi nger tight until instructed to tighten according to the torque chart. Use standard methods and practices when attaching spreader, including proper personal protective safety equipment. Recommended Fastener Torque Chart Inch Fasteners Grade 5 and Grade 8 Torque (ft-lb) Torque (ft-lb) -
Page 11: Loading
LOADING DETERMINING VEHICLE PAYLOAD This Owner's Manual covers vehicles that have been recommended for carrying the hopper spreader. Please see your local dealer for proper vehicle applications. 1. Install the hopper spreader and optional equipment according to the instructions. WARNING 2. -
Page 12: Mounting The Spreader
MOUNTING THE SPREADER MOUNTING THE SPREADER 4. Install the chute/defl ector assembly to the spinner assembly using the four 5/16" x 1-1/2" tapping screws and 5/16" locknuts in the supplied NOTE: Periodically throughout the snow and ice hardware kit to complete the drive assembly. control season, verify that mounting devices are secure. - Page 13 MOUNTING THE SPREADER 8. Looking at the inside corners of the spreader NOTE: Pay special attention when drilling or frame, you will notice four holes in the bottom of clamping dissimilar metals to aluminum bodies. the frame. Using a paint pen or similar marking Galvanic corrosion can occur if not handled device, mark the hole locations on the vehicle bed.
-
Page 14: Operating The Spreader
OPERATING THE SPREADER – CAB CONTROL Adjusting Auger/Spinner Speed WARNING Never operate equipment when under the 1. Turn the speed dial clockwise to increase infl uence of alcohol, drugs, or medications that speed. When the POWER switch is set to the might alter your judgment and/or reaction time. -
Page 15: Spreading Tips
OPERATING THE SPREADER SPREADING TIPS AUTO-REVERSE "Ar" FEATURE • Spread ice melters with the storm to prevent 1. If your control displays the "OL" code, this could unmanageable levels of ice. indicate a jammed auger. • Never exceed 10 mph (16 km/h) when spreading. 2. -
Page 16: Maintenance
MAINTENANCE STORAGE WARNING Never remove spreader with material in hopper. Store control in a cool dry place during the off -season. AT THE END OF EACH SEASON or CAUTION AFTER EXTENDED STORAGE Disconnect electric power at spreader electrical wiring harness connection and •... -
Page 17: Troubleshooting Guide
TROUBLESHOOTING GUIDE Defi nition: Switch OFF & ON Control turns ON, Spreader OL Code amperage draw Jammed material for auto-reverse Clear jam beeps, shuts OFF, does not run too high function displays error code Bad motor; Contact distributor Test turn shaft by Bad transmission;... - Page 18 TROUBLESHOOTING GUIDE Check baffl e Material free fl ows 18" correct Material issue length Should touch Check baffl e hopper Material issue position on three sides Material does not Material Remove Material issue fl ow obstruction obstruction Run 12V to auger Auger runs Auger runs Replace vehicle...
- Page 20 Western Products or the vehicle manufacturer may require or recommend optional equipment for spreaders. Do not exceed vehicle ratings with a spreader. Western Products off ers a limited warranty for all spreaders and accessories.
Need help?
Do you have a question about the Tornado 78600 and is the answer not in the manual?
Questions and answers