Table of Contents
Advertisement
Quick Links
Advertisement
Table of Contents

Subscribe to Our Youtube Channel
Related Manuals for MAC PARA Colorado2


Summary of Contents for MAC PARA Colorado2
-
Page 2: Table Of Contents
Contents MAC PARA COMMUNITY ..................2 GENERAL ........................3 PILOT LEVEL REQUIREMENTS................4 DESIGN ........................5 TECHNICAL DESCRIPTION ..................5 RISERS........................7 TRIMMING ........................ 11 MATERIALS......................12 GLIDER CHECKLIST....................13 SETTING UP THE CONTROLS................13 FLYING THE COLORADO 2 ..................15 TOWING, JUMPS FROM AIRCRAFT, AEROBATICS.......... -
Page 3: General
Numerous safety tests have been made to allow you to safely enjoy the performance of this glider. The entire MAC PARA team welcomes you and we wish you many pleasant flights. To stay safe you MUST read this manual carefully before flying. -
Page 4: Pilot Level Requirements
If you have read this manual and still have questions, suggestions or criticisms regarding the Colorado 2, please do not hesitate to contact your dealer or MAC PARA directly. Our mission is to design quality performance gliders that allow you the freedom of flight while keeping you as safe as possible. -
Page 5: Design
DESIGN Glider's label on the Top surface central main rib Bottom surface Leading edge Stabilizer Trailing edge Brake lines WTST line 2D Steering Main lines Main brake line Rapid links Brake handle Risers Main carabiner TECHNICAL DESCRIPTION Construction of the canopy: The canopy of the Colorado 2 has a wingspan with 58 cells. - Page 6 This ensures optimized sail tension and guarantees high canopy stability. Large cross ports allow effective airflow inside the canopy providing good re-inflation without interrupting the profiles shape. The Colorado 2 is mainly made from proven high quality Nylon fabrics. Polyamid 6.6 RIPSTOP 40, 38 and 32 g/m are the carefully selected materials.
-
Page 7: Risers
RISERS The Colorado 2 is equipped with 5 risers per side (A, A1,B, C, D). The two central A-lines per side are attached to the main A-risers (red in colour) while the outermost A main lines are attached to A1 risers. The 3 B-main lines and the stabilizer lines are attached to the B-riser. - Page 8 Brake handles: Special semi rigid brake handles are equipped with swivels and two neodymium magnets. Strong neodyme magnets hold the brake handles perfectly to the D risers. Attaching and releasing the brakes from the risers work very easily and quickly during flight. This minimises the danger of getting them caught in a spinning propeller.
- Page 9 2D Steering: 2D steering is quite different from classic steering system. It allows the pilot to control the glider more precisely. By pulling the steering toggle and simultaneously moving the hand away from the body or closer to the body, the amount of buoancy, degree of bank in a turn or rate of descent in a turn can be easily controlled.
- Page 10 Speed system: The Colorado 2 is equipped with a speed bar operated speed-system which returns automatically to the normal position when released. The speed system affects the A, A1, B and C-risers and changes the angle of attack. In normal flight all risers have an overall length of 50 cm without quick links.
-
Page 11: Trimming
TRIMMING... -
Page 12: Materials
MATERIALS Tissue (PORCHER SPORT,) Top Sail - Leading Edge - Polyamid 6.6 RIPSTOP, 38 g/m Top Sail - Trailing Edge - Polyamid 6.6 RIPSTOP, 32 g/m Bottom Sail - Leading Edge - Polyamid 6.6 RIPSTOP, 38 g/m Bottom Sail -Trailing Edge - Polyamid 6.6 RIPSTOP, 32 g/m Ribs, Diagonals - Polyamid 6.6 RIPSTOP, 40 g/m Ribs, Diagonals -... -
Page 13: Glider Checklist
Your Colorado 2 glider comes from the MAC PARA factory with brake lines set to this position. - Page 14 This makes the brake position perfect for a paragliding harness because of their lower hang points. Attention!! All new gliders leave the MAC PARA factory set up for “lower- middle” hang points! Fitting the speed-system: Most modern paramotoring harnesses have pulleys for speed system fitting.
-
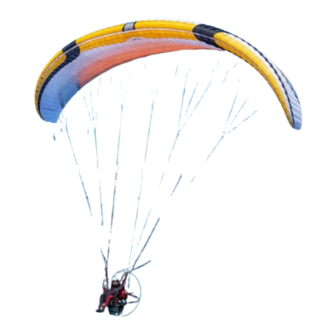
Page 15: Flying The Colorado 2
FLYING THE COLORADO 2 The following information is NOT under any circumstances a manual for practising paramotoring. We would like to advise you of important information to increase safer flights and security while flying the Colorado 2. Paraglider Preparation After unpacking and laying out the paramotoring glider in a slight horseshoe pattern, the following checks must be made: Checklist before every flight: Checking and inspecting the wing:... - Page 16 All lines and risers should be carefully checked, untangled and arranged in a way that they do not catch on anything. It is equally important to untangle the brake lines so that they are free and clear so they do not catch on anything during launch. The brake lines should run freely through the pulleys to the trailing edge of the canopy.
- Page 17 1. Paragliding forward technique – Follow the above technique to get the glider overhead. As soon as the glider is above you, stop pulling on the A-risers. A good progressive run ensures your Colorado 2 will inflate and come up equally and quickly. If the canopy should surge forward, control it by gently braking.
- Page 18 Reverse launch Technique The Colorado 2 is easy to reverse launch. The most important skill to perform the reverse launch successfully is to fully understand ground handling. You need to be able to keep the wing directly overhead and into wind while taking off on flat ground.
- Page 19 If this does happen contact your nearest MAC PARA dealer for replacement lines or glider repair. Wind Trim settings Launching technique &...
- Page 20 We recommend that your first flights with your Colorado 2 be done with trimmers set on or just below the neutral setting (the white stitching mark) This is where the Colorado 2 will feel more like a conventional paraglider wing. With this trimmer setting, try to fly with a small amount of brake at the point where they just begin to feel heavier.
- Page 21 Release the speed system immediately by releasing the pressure on the speed bar. Do not use the speed system in very turbulent conditions, close to the ground or near other airspace users. Always fly with sufficient clearance from the ground/obstacles and always keep the brake handles in your hands! Steering - turns: The Colorado 2 is a very responsive paramotoring glider and reacts directly and instantly to...
- Page 22 Released trimmers with brakes applied Even slight brake input (especially on full speed bar) produce lift close to the trailing edge. The centre of gravity of the airfoil is moved back and the higher pitching moment significantly decreases the stability. Warning!! Especially in turbulence this can lead to a collapse on full speed with trimmers released! Therefore we strongly recommend you only steer by pulling on the WTST lines and not touching the main brakes.
- Page 23 Approach and Landing: It is important to start to prepare for landing at an adequate altitude to avoid surprises. This leaves you enough time to observe and appropriately deal with wind direction and any other aircraft in your vicinity. The Colorado 2 is very easy to land. The final leg of the landing approach must be into the wind.
-
Page 24: Towing, Jumps From Aircraft, Aerobatics
TOWING, JUMPS FROM AIRCRAFT, AEROBATICS WARNING!! The Colorado 2 is not suitable for towing. WARNING!! The Colorado 2 is not suitable for jumps from aircraft. WARNING!! The Colorado 2 is not designed to be used for aerobatics. EXTREME FLYING MANOEUVRES WARNING!! All the critical flight conditions described here require thorough knowledge. - Page 25 “Cravat” / Line-over: In the event of some lines becoming tangled during flight (caused by whatever), the following action is recommended: Stabilize the glider by gently applying the opposite brake. Please be aware that in this condition the brake pressure can be higher and the brake travel shorter. Without pilot input, a line-over will result in a stable spiral dive.
- Page 26 Full-stall: A full stall practically never occurs. It happens only as a result of serious neglect or intentional action of the pilot. To avoid a full stall you have to be careful when flying at low speeds until fully familiar with brake operation. The Colorado 2 recovers spontaneously in the initial phase of stall, otherwise use standard procedures.
- Page 27 Wingover: To induce a wingover the pilot flies consecutive alternating turns to gradually steepen the angle of bank. During wingovers with a high bank angle, the outside wing begins to unload. Continually increasing the angle of bank must be avoided to avoid dynamic collapses. WARNING! Full-stall, spin and wingovers (over 90 degree angle of bank) are prohibited aerobatic manoeuvres and may not be performed during normal flying.
-
Page 28: Rapid Descent Techniques
RAPID DESCENT TECHNIQUES Spiral dive: Attention! Set trim setting in slow or neutral and turn your paramotor off when executing spiral dive. A spiral dive is the fastest way to lose altitude; however, the very high G-forces make it difficult to sustain a spiral dive for long. It also places high loads on the pilot and glider. By tensing ones abdominal muscles and a higher body tension you can to some extent resist the high G-forces. - Page 29 Big ears: There is a lot of load on the “A’s” performing big ears especially on the faster trim settings. We do not recommend using big ears as descent technique under power. With a hard pull on the outermost A-lines there is higher risk of collapse. A spiral may be a more efficient way to get down.
-
Page 30: Golden Rules
GOLDEN RULES Summary: For all extreme manoeuvres and rapid descents please note: First practise manoeuvres with an instructor during safety training. Before inducing any manoeuvre the pilot must check that there are no other airspace users below him. ... -
Page 31: Care And Maintenance
CARE AND MAINTENANCE Looking after your canopy correctly will prolong the life of your paramotoring glider and enjoyment. Deterioration: a few tips! The canopy is mainly made of NYLON cloth which like any synthetic material, deteriorates through excessive exposure to UV. Hence, it is recommended that you reduce UV exposure to a minimum by keeping the paramotoring glider packed away when not in use. - Page 32 Repairs and checks: Tears in the canopy must be professionally sewn. Adhesive patches are only adequate for very minor damage. Contact your dealer or MAC PARA directly if you are unsure. Repairs should only be carried out by the manufacturer, distributor or authorized workshops.
- Page 33 MAC PARA approved facility. Consult your closest MAC PARA dealer or MAC PARA directly with the type of line you may need. Identifying which line you require to replace the broken line can be found by laying out your glider outside, looking at where the damage line is and referencing the line plan guide near the end of this manual.
-
Page 34: Respect Nature
Warranty is only valid if: Every flight is correctly registered in a logbook of the wing. Conditions and temperatures of each flight are registered in the logbook The paraglider is handled in accordance with this operating manual. ... -
Page 35: Line Plan - Scheme
LINE PLAN – SCHEME... -
Page 36: Riser Lengths
RISER LENGTHS The lengths are measured from main attachment point to the lower edge of rapid links. Riser lengths [mm] Trimmers closed Trimmers neutral Trimmers fully released Trimmers closed + Accelerated Trimmers neutral + Accelerated Trimmers released + Accelerated * Read more on the page 20. Colorado 2 Brakeline lenghts... -
Page 37: Full Line Lengths
FULL LINE LENGTHS Colorado 2 - 22 (S) Colorado 2 - 24 (M) Center Brakes Center Brakes 6867 6799 6868 7025 7133 7280 7143 7072 7143 7307 7419 7585 6847 6780 6849 7016 7112 7120 7122 7053 7123 7298 7397 7415 6879 6814... -
Page 38: Checks
CHECKS Name Company Date Signature & Stamp... -
Page 39: Paraglider & Serial Number
PARAGLIDER & SERIAL NUMBER Paraglider type: Serial number: Manufacturing date: ............Commisioning date: ............TECHNICAL SPECIFICATIONS Colorado 2 - Paraglider for Powered F 18 (XXS) 20 (XS) 22 (S) 24 (M) 26 (L) 29 (XL) 31 (XXL) Size Zoom flat 87.5 Area flat [m2]...
Need help?
Do you have a question about the Colorado2 and is the answer not in the manual?
Questions and answers