Advertisement
Table of Contents
- 1 Table of Contents
- 2 Important Safeguards
- 3 Special Cordset Instructions
- 4 Before the First Use
- 5 Parts & Features
- 6 Controls & Functions
- 7 Getting to Know Your Control Panel
- 8 Oven Rack Position Guide
- 9 When Cooking with Steam
- 10 Operating Instructions
- 11 Cooking Functions
- 12 Auto Presets and Dual Cook Functions
- 13 Cleaning & Maintenance
- Download this manual
Advertisement
Table of Contents

Related Manuals for Cuisinart Gourmet Pro


Summary of Contents for Cuisinart Gourmet Pro
- Page 1 Scan to access delicious recipes and cooking charts to use with Gourmet Pro your Cuisinart Combi Oven with Convection, Steam & Air Fry Gourmet Pro...
-
Page 2: Table Of Contents
CONTENTS Important Safeguards ................3 Special Cordset Instructions .............. 4 Before the First Use ................5 Parts & Features .................. 6 Controls & Functions ................7 Getting to Know Your Control Panel ............ 8 Oven Rack Position Guide ..............9 When Cooking With Steam .............. -
Page 3: Important Safeguards
• Always unplug from the electrical outlet when not in use before putting on or taking off parts and before cleaning. • The use of attachments not recommended by Cuisinart may be hazardous. • At no time, before or during cooking and cleaning immerse unit, plug or cord in water, or any other liquids –... -
Page 4: Special Cordset Instructions
• Do not cover crumb tray or any part of the oven except the baking pan with aluminium foil – this will cause overheating of the oven. Do not place paper, plastic or cardboard products in the oven. • The top of the oven, steam vents and any other opening should always be clear 15cms of any other object while in use. -
Page 5: Before The First Use
BEFORE THE FIRST USE Before using your Gourmet Pro Oven for the first time, remove any dust from shipping by wiping the base, cover and controls with a damp cloth. Be sure to thoroughly clean all accessories before first use. The oven rack, baking tray, cooking basket and crumb tray are dishwasher safe. -
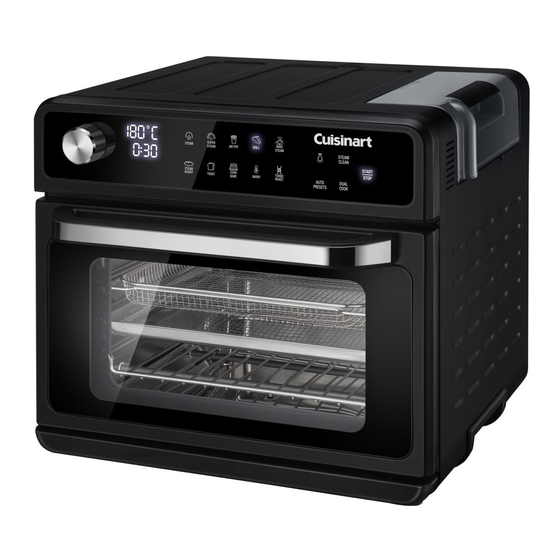
Page 6: Parts & Features
PARTS & FEATURES... -
Page 7: Controls & Functions
1. Water Reservoir 1L removable water tank (BPA Free) used for all functions that require steam as well as for oven steam cleaning. 2. Touch Control Panel & LCD display Displays information such as cooking mode, menu functions, pre-heating, temperature, timer, oven light, steam cleaning, clock, water refilling and descaling reminders. -
Page 8: Getting To Know Your Control Panel
GETTING TO KNOW YOUR CONTROL PANEL 1. Selector Dial Turn the dial to set the cooking time and temperature, adjust measurements eg weight in preset menu, change the toast settings (toast color, number of slices) or set the clock. Press down on the dial to confirm selection. 2. -
Page 9: Oven Rack Position Guide
FUNCTION DEFAULT TEMPERATURE TIME TEMPERATURE CONVECTION PRE- CHANGE CHANGE REQUIRES SETTING RANGE RANGE INCREMENTS FAN SPEED HEAT TEMP TIME WATER IN TANK 180°C 50-230°C 1-120 10°C MINS MINS 60°C 50-150°C 1-120 10°C MINS MINS 180°C 180-230°C 1-120 5°C HIGH MINS MINS 4. -
Page 10: When Cooking With Steam
SUGGESTED RACK/PAN/BASKET POSITIONS Position 1 Position 2 Position 3 (Bottom shelf) (Middle shelf) (Top shelf) Function Steam Super Steam Air Fry Grill Bake Steam Steam Assist Toast Conv Bake Warm Turbo Roast * Using suitable steaming trays or containers WHEN COOKING WITH STEAM The following functions require water in the reservoir to operate: STEAM, SUPER STEAM, BAKE STEAM, STEAM ASSIST and TURBO ROAST. -
Page 11: Operating Instructions
OPERATING INSTRUCTIONS When you use the oven for the first time, once you have set up the clock, the touch screen will be blank except for the Start/Stop light . To activate the functions screen press START /STOP or turn the selector dial . The functions will illuminate to 50% brightness. SETTING THE CLOCK When the appliance starts for the first time, it will display the clock and the hours in the default time of 12:00 will be flashing. -
Page 12: Cooking Functions
CHANGING THE OVEN LIGHT BULB WARNING: Always unplug the oven and allow to cool before replacing the bulb. Use only a G9 type 220~240V 25W halogen bulb. The light is positioned at the rear of the oven cavity on the right hand side, however access to the light bulb is outside of the oven on the back wall. - Page 13 STEAMING COOKING CHART Food Qty. Preparation Approx. Cooking Times Artichokes 4 (large) Trimmed 100-120 mins Asparagus 450g Trimmed 10-12 mins Broccoli 2 cups 4cm florets 20 mins Cauliflower 2 cups 4cm florets 20-25 mins Corn 2 cobbs Husked 20 mins Green Beans 2 cups Trimmed...
- Page 14 • When cooking all vegetables/proteins, we recommend placing the ingredients on a baking pan or suitable heatproof container and then placing them into the oven for cooking. • When cooking seafood, we recommend adding a small amount of wine or other flavored liquid to the bottom of the baking pan to enhance the flavor.
- Page 15 AIR FRY TIPS Most oils can be used for air-frying. Olive oil is preferred for a richer flavour. Vegetable, canola or grapeseed oils are recommended for milder flavours. An assortment of coatings can be used on air fried foods. Some examples of different crumb mixtures include;...
- Page 16 AIR FRYING COOKING CHART The chart below lists recommended amounts, cooking times and temperatures for various types of food that can be air-fried in the Gourmet Pro oven. If portions exceed recommendations, you can toss occasionally while cooking to ensure crispiest, and even browning results.
- Page 17 TURBO ROAST This function uses the unique combination of a high speed fan with convection heat and steam to achieve a crisp outside, tender juicy inside and less time it takes to roast in a standard oven. For a roast chicken quicker than ordering takeaway, use the "TurboRoast Chicken" Auto Pre-set N.1 (page 21) to cook a roast you can boast in 40mins (1.5kg or less size).
- Page 18 CONVECTION BAKE Almost anything you bake in a standard oven can be baked in your Gourmet Pro oven, but usually with reduced cooking time. Baking is recommended for a variety of foods you would normally prepare in a conventional oven such as cakes, cookies, custards, pies and breads.
- Page 19 STEAM ASSIST The Steam Assist function simulates a bakers oven with an initial burst of steam followed by convection baking for crispy crusts & perfectly soft risen interiors. Use the Steam Assist function for other recipes that use yeast as the leavening agent and bakery / pastry items. When using this mode, please ensure that water in the tank is sufficient.
- Page 20 TOAST Suggested rack placement: position 2. Place in middle shelf. Both top and bottom elements activate. From standby mode: 1. Select Toast on the touch control panel. The Toast function will be solid at 100% brightness. The default number of bread slices is 3-4 pieces and the default toast shade is 4. 2.
-
Page 21: Auto Presets And Dual Cook Functions
AUTO PRESETS AND DUAL COOK FUNCTIONS AUTO PRESETS Auto presets take the guesswork out of cooking with in-built programs for the cooking functions, times and temperatures for commonly cooked recipes such as roasts, lasagnes, chips, rice, vegetables and cakes. Select the program number from the chart below, enter the weight (or other details) when prompted, press START / STOP and let the oven do all of the work (and cooking) for you! USING THE AUTO PRESET MENU... - Page 22 AUTO PRESET COOKING MENU Shelf/ What you Preset Preset Menu Options Rack Instructions need to Description Position know Temperature Select by Weight and times may 1.5kg or less - Ensure the water tank is full adjust on the Default cooking Turbo Fast before starting.
- Page 23 What you Preset Preset Shelf/Rack Menu Options Instructions need to Description Position know Baked vegetables Temperature with steam and times can Ensure the water Baking tray - Roast finished with be changed at tank is full before vegetables a higher the start and position 3 starting.
- Page 24 What you Preset Preset Shelf/Rack Menu Options Instructions need to Description Position know Temperature Select by Weight Cooking basket For best results, High and times can 500g or less - Default in position 3 Frozen temperature shake the basket be changed at cooking time 20 mins Chips for golden...
- Page 25 What you Preset Preset Shelf/Rack Menu Options Instructions need to Description Position know Steamed Frozen dumplings Cooking rack Ensure the water tank 500grams with a glossy Dumplings position 2 is full before starting. finish Oven will PREHEAT beforehand for a Cooking rack For baking Use a 20cm...
- Page 26 DUAL COOK Dual Cook is a special feature that enables you to combine two cooking functions with different temperatures and timings and run them consecutively. This is ideal for recipes that require multiple cooking steps, e.g. • Starting a casserole or a dish like nachos, use CONV BAKE to heat through and then switch to Grill for a melted and browned cheese top.
-
Page 27: Cleaning & Maintenance
CLEANING & MAINTENANCE • Always wait for the machine to completely cool down before cleaning. • Check and empty the drip tray before each use. This slides out of the front base of the oven. • Be sure to unplug the oven from the power socket. •... - Page 28 AFTER USING, THE STEAM FUNCTIONS OR SELF-CLEAN • Always remove any excess water or moisture from the oven walls and racks using kitchen paper or cloth after using any steam functions or self-clean. • Leave the door in the ajar position to allow oven to air dry for a period. •...
- Page 29 TROUBLESHOOTING: The oven is making a gurgling and/or This is the operation of the steam pump and is completely pumping sound during operation. normal when using a function / preset using steam. Why is my unit beeping? Steam reservoir is empty and will indicate 'ADD WATER' on the display screen.
- Page 30 NOTES:...
- Page 31 NOTES:...
- Page 32 ©2023 Cuisinart Suite 101 Ground Floor 18 Rodborough Rd Frenchs Forest NSW, 2086 Australia Visit our Website: cuisinart.com.au Printed in China IB-23/169A...
Need help?
Do you have a question about the Gourmet Pro and is the answer not in the manual?
Questions and answers
Why does my pro continuously beep? The water is full, there is no condensation inside. Even after turning the power off and unplugging it, it still won't work properly. It has been used 6 times for scones and cakes.