
Related Manuals for Cuisinart CTO-140PC


Summary of Contents for Cuisinart CTO-140PC
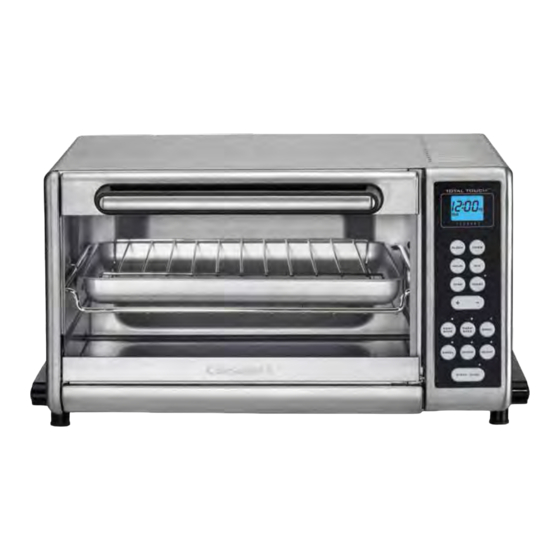
- Page 1 Recipe Booklet Reverse Side INSTRUCTION AND RECIPE BOOKLET Convection Toaster Oven Broilers CTO-140PC...
-
Page 2: Important Safeguards
23. Where applicable, always attach plug to appliance and check that the mechanical or electrical adjustment. cooking cycle is stopped before plugging cord into wall outlet. To 7. The use of accessory attachments not recommended by Cuisinart disconnect, press the start/stop button to cancel the cooking cycle, then may cause injury. -
Page 3: Table Of Contents
QUICK REFERENCE OVEN OPERATION NOTICE This appliance has a polarized plug (one blade is wider than the other). As (See pages that follow for detailed instructions.) a safety feature, this plug will fit in a polarized outlet only one way. If the PIZZA/BAKE or CONVECTION BAKE plug does not fit fully in the outlet, reverse the plug. -
Page 4: Features And Benefits
Defrosts and then toasts frozen bread or bagels by adding time to the toast cycle. 9. Pizza/Bake or Convection Bake Bake everything from a 12-inch pizza, stuffed mushrooms and a 4-pound chicken to cakes and pies. Because the Cuisinart ® Convection Toaster Oven Broiler has been designed with our Exact Heat™ sensor everything comes out mouth-watering and delicious. -
Page 5: Oven Rack Position Guide
OVEN RACK 13. Total Touch Browning Selection ™ Select from seven browning settings memorized by the toaster oven POSITION GUIDE broiler. Combine with custom settings for toast the way you want it. Push the "+" and "-" for lighter or darker toast. Your browning selection All of our recipes give you is indicated at the bottom of the display and will remain in the oven’s step-by-step directions... -
Page 6: Before First Use
BEFORE THE FIRST USE Turning off the toaster oven broiler: The Start/Stop button, when pushed the first time, will start the oven. When pushed the second time, during oven Place your oven on a flat surface. Remove any packaging and promotional operation, the Start/Stop button will turn the oven off. -
Page 7: Convection Bake
CONVECTION BAKE TIMER Convection baking uses a fan to circulate heated air around food as it Timer is only operational with Pizza/Bake, Convection Bake or Broil. You cooks. may change the time by first pressing the Timer button and then pressing Most baking recipes recommend reducing temperatures by 25˚... -
Page 8: Toast
TOAST Stop Toasting To toast, make sure the oven rack is in the Upper position, as indicated in When the toasting cycle is finished, the oven will beep 5 times and turn off. the diagram on page 5. Always center food on the rack. If you wish to stop the toasting cycle before it is finished, simply press the Press the Toast button and the Start/Stop button to toast. -
Page 9: Bagels
BAGEL simply press the Start/Stop button to interrupt. The bagel feature adds the appropriate amount of extra time to the toasting Reheat Button cycle to toast your bagels at the color level selected with the touchpad The reheat feature allows you to reheat toasted bread or bagels without shade control. -
Page 10: Cleaning, Storage And Maintenance
CLEANING, STORAGE AND MAINTENANCE Always allow the oven to cool completely before cleaning. 1. Always unplug the oven from the electrical outlet. 2. Do not use abrasive cleansers, as they will damage the finish. Simply wipe the exterior with a clean damp cloth and dry thoroughly. Apply the cleansing agent to a cloth, not to the toaster oven, before cleaning. -
Page 11: Warranty
(A) to the store where replacement parts or repair service other than those authorized by Cuisinart. it was purchased or (B) to another retail store that sells Cuisinart products This warranty does not cover any damage caused by accident, misuse, of the same type. - Page 12 NOTES: ©2013 Cuisinart 150 Milford Road East Windsor, NJ 08520 Printed in China Any other trademarks or service marks of third parties used herein are 12CE136595 the trademarks or service marks of their respective owners. IB-11849...
Need help?
Do you have a question about the CTO-140PC and is the answer not in the manual?
Questions and answers