
Related Manuals for Atag CX4592D


Summary of Contents for Atag CX4592D
- Page 1 Combi-magnetron oven instructions for use Combi microwave oven CX4511D CX4592D...
- Page 2 Handleiding NL 3 - NL 38 Manual EN 3 - EN 38 Gebruikte pictogrammen - Pictograms used Belangrijk om te weten - Important information Tip - Tip...
-
Page 3: Table Of Contents
UW OVEN Uw oven Inleiding Bedieningspaneel Beschrijving Geleiderails Deur Koelventilator Hoofdfuncties Toetsen Navigatie Eerste gebruik Eerste gebruik Bediening Uw functie kiezen Functie instelstand Voortgangsstand Eindscherm Instellingen wijzigen tijdens voortgang Gebruik Functietabel De magnetron gebruiken Menu 'Instellingen' Plusmenu Informatie over bereiding Snel voorverwarmen Uitgestelde start Gratineren... -
Page 4: Inleiding
UW OVEN Inleiding Gefeliciteerd met uw keuze voor deze Atag combi-magnetron oven. In het ontwerp van dit product heeft eenvoudige bediening en optimale gebruiksvriendelijkheid centraal gestaan. De oven heeft een groot aantal instellingen waardoor u telkens de juiste methode kunt kiezen. -
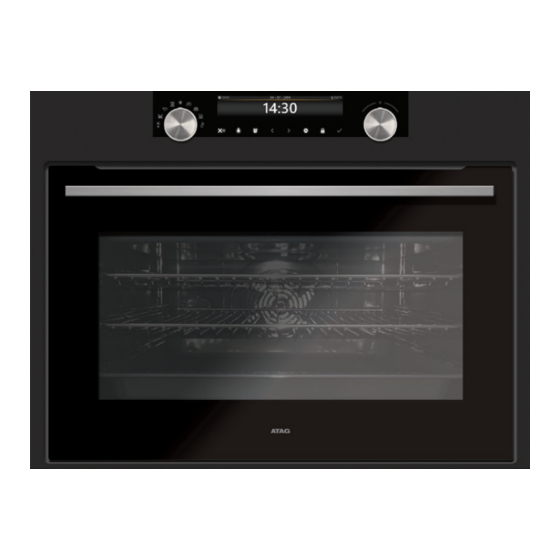
Page 5: Bedieningspaneel
UW OVEN Bedieningspaneel 6 7 8 9 1. Functieknop (in de ‘Uit’ stand) 2. Ontdooien 3. Programma's & favorieten 4. Snel voorverwarmen 5. Oven 6. Magnetron 7. Combi magnetron 8. Verwarmen 9. Aqua clean 10. Display 11. Keuzeknop 12. Aan/uittoets en stoptoets (cancel) 13. -
Page 6: Beschrijving
UW OVEN Beschrijving Niveau 4 Niveau 3 Niveau 2 Niveau 1 1. Bedieningspaneel 2. Insteekniveaus 3. Ovendeur 4. Deurgreep De volgende accessoires worden met uw oven meegeleverd: • Bakplaat; wordt gebruikt voor gebak en cakes. Gebruik de bakplaat niet bij de magnetronfuncties! •... -
Page 7: Deur
UW OVEN Deur • De deurschakelaars onderbreken de werking van de oven wanneer de ovendeur tijdens het gebruik wordt geopend. De werking wordt hervat wanneer de deur wordt gesloten. • Deze oven heeft een systeem om de ovendeur zachtjes te sluiten. Wanneer de ovendeur wordt gesloten, dempt dit systeem de kracht van de beweging, vanuit een bepaalde hoek, en wordt de deur rustig gesloten. -
Page 8: Toetsen
UW OVEN Ontdooien Handmatig ontdooien Magnetron Mijn magnetron Magnetron Combi magnetron Hetelucht + magnetron Grote grill + ventilator + magnetron Verwarmen Bordenwarmen Warmhouden Aqua clean Toetsen In de onderstaande tabel vindt u de beschrijving van de verschillende toetsen. Toetsen Beschrijving van de toetsen Aan/uittoets en stoptoets - Kort indrukken: instelling annuleren of één stap teruggaan in het menu. -
Page 9: Navigatie
UW OVEN Navigatietoets rechts - Het actieve gebied naar rechts verplaatsen. Plustoets - Het instellingenmenu openen of sluiten (in stand-bystand). - Het plusmenu openen of sluiten; dit menu bevat de extra opties die op dat moment mogelijk zijn (in de stand 'Aan'). - Page 10 UW OVEN In elk menu is de navigatie als volgt: • Gebruik de navigatietoetsen of druk op de keuzeknop om het actieve gebied (grijze achtergrond) te verplaatsen. • De instelling van het actieve gebied kan worden gewijzigd door aan de keuzeknop te draaien (naar links = verminderen, naar rechts = vermeerderen).
-
Page 11: Eerste Gebruik
EERSTE GEBRUIK Eerste gebruik • Reinig de binnenkant van de oven en de accessoires met heet water en afwasmiddel. Gebruik geen agressieve schoonmaakmiddelen, schuursponsjes en dergelijke. • De oven geeft een vreemde geur af wanneer deze voor de eerste keer wordt gebruikt; dat is normaal. Zorg voor goede ventilatie tijdens het eerste gebruik. - Page 12 EERSTE GEBRUIK De tijd instellen TIJD | UUR 1. Draai aan de keuzeknop om de uren te wijzigen. 2. Bevestig deze instelling door op de navigatietoets rechts te drukken of door op de keuzeknop te drukken. 3. Draai aan de keuzeknop om de minuten te wijzigen. 4.
-
Page 13: Bediening
BEDIENING Uw functie kiezen Kies een functie die geschikt is voor de maaltijd die u wilt bereiden. Raadpleeg de tabel in het hoofdstuk ‘Functietabel’ om te zien welke functies beschikbaar zijn. • Ga direct naar de voortgangsstand door op de bevestigingstoets te drukken (deze toets begint te knipperen wanneer het mogelijk is het programma te starten). - Page 14 BEDIENING 4. Draai aan de keuzeknop om de instelling te wijzigen. OVEN l TEMPERATUUR 14:30 °C °C 5. Bevestig de instelling door op de navigatietoets rechts te drukken of door op de keuzeknop te drukken. De volgende subfunctie-instelling wordt actief. OVEN l BEREIDINGSTIJD 14:30 °C...
-
Page 15: Voortgangsstand
BEDIENING Voortgangsstand • Aan de linkerkant van het scherm worden de temperatuur en/ of het vermogen weergegeven (als de ingestelde temperatuur nog niet is bereikt, schakelt de temperatuur heen en weer tussen oventemperatuur (grijs) en ingestelde temperatuur (wit)). Als de ingestelde temperatuur is bereikt, verschijnt een pop-up met de tekst 'de ingestelde temperatuur is bereikt'. - Page 16 BEDIENING De voortgang stoppen. 1. Kies 'Einde'. Het Eindscherm wordt gesloten en het stand-by scherm wordt weergegeven. ▷ Na 10 minuten inactiviteit schakelt de display over naar stand-by. Extra tijd toevoegen 1. Druk op de navigatietoets rechts om ‘Extra tijd toevoegen’ te selecteren.
-
Page 17: Instellingen Wijzigen Tijdens Voortgang
BEDIENING Instellingen wijzigen tijdens voortgang • Als u tijdens de voortgang op de navigatietoetsen drukt, wordt het actieve gebied weergegeven. De geselecteerde instelling kan nu worden gewijzigd, zie hoofdstuk 'Functie instelstand'. • Na bevestiging met de bevestigingstoets wordt het voortgangsscherm met de gewijzigde instellingen weergegeven. •... -
Page 18: Gebruik
GEBRUIK Functietabel Kies aan de hand van de tabel de gewenste functie. Raadpleeg ook de bereidingsinstructies op de verpakking van het gerecht. • Magnetrongebruik: gebruik met de magnetronfunctie geen metalen kookgerei of bestek en verwarm de oven niet voor. • Gebruik alleen glazen schalen die tegen een temperatuur van 275 °C kunnen. - Page 19 GEBRUIK Functie Beschrijving Grote grill • Verwarming door middel van het bovenste verwarmingselement en het grillelement. • Deze stand kan worden gebruikt voor schotels en gebakken gerechten die een echte bodemkorst of bruining nodig hebben. Gebruik dit net voor het einde van de bak- of braadtijd.
- Page 20 GEBRUIK Functie Beschrijving Bovenwarmte • Verwarming alleen door middel van het bovenste verwarmingselement. • Deze stand wordt gebruikt wanneer u de bovenlaag van uw gerecht wilt bakken/braden. • Plaats de bakplaat of het ovenrooster op niveau 2. • Aanbevolen temperatuur: 150 °C Onderwarmte •...
- Page 21 GEBRUIK Functie Beschrijving ECO hetelucht • Verwarmen met behulp van hete lucht. ECO hetelucht gebruikt minder energie maar geeft hetzelfde resultaat als de hetelucht-instelling. De bereiding duurt enkele minuten langer. • Deze stand kan worden gebruikt voor het braden van vlees en het bakken van deegwaren. •...
-
Page 22: De Magnetron Gebruiken
GEBRUIK Functie Beschrijving Magnetron + Grill met ventilator • Het gerecht wordt bereid met een combinatie van microgolven en de grill met ventilator. • Gebruik deze combinatie voor kleinere porties vlees, vis en groenten. • Het bereiden gaat snel en het gerecht krijgt een lekker bruin, knapperig korstje. - Page 23 GEBRUIK Kookbeginselen 1. De microgolven die door de magnetron worden gegenereerd, worden gelijkmatig verspreid door een distributiesysteem. Daardoor wordt het gerecht gelijkmatig gegaard. 2. Het voedsel absorbeert de microgolven tot een diepte van ongeveer 2,5 cm. Het garen gaat daarna nog door, omdat de warmte door het gerecht is verspreid.
- Page 24 GEBRUIK Richtlijnen voor kookgerei voor de magnetron Kookgerei dat u gebruikt voor de magnetron mag de microgolven niet blokkeren. Metalen zoals roestvrij staal, aluminium en koper weerkaatsen microgolven. Daarom dient u geen metalen kookgerei of bestek te gebruiken. Kookgerei waarvan wordt aangegeven dat het veilig is voor de magnetron kan wel worden gebruikt.
-
Page 25: Menu 'Instellingen
GEBRUIK Magnetron- Kookgerei Opmerkingen veilig Papier Voor korte bereidingstijden en verwarmen. Voor het • Borden, bekers, absorberen van overtollig vocht. keukenpapier Gerecycled Kan vonkontlading veroorzaken. • papier Kunststof Vooral hittebestendig thermoplastisch materiaal. Andere soorten plastic kunnen kromtrekken of verkleuren bij hoge temperaturen. -
Page 26: Plusmenu
GEBRUIK Algemeen In dit menu kunt u het volgende instellen: • Taal (taal van de display) • Tijd (altijd in 24-uurs indeling) • Tijdweergave (24 uurs- of 12 uurs-indeling) • Datum (altijd in de indeling dag-maand-jaar) • Datumweergave (ddmmjjjj of mmddjjjj) •... - Page 27 GEBRUIK • Een klein pictogram naast de huidige tijd geeft aan welke functies in het plusmenu zijn geactiveerd. De kleur van het pictogram geeft aan of het actief (wit) of inactief (grijs) is. • U kunt het plusmenu verlaten door op de stoptoets of de plustoets te drukken;...
-
Page 28: Informatie Over Bereiding
GEBRUIK Informatie over bereiding Het scherm met bereidingsinfo geeft meer informatie over de gekozen functie, zoals het benodigde accessoires en de doelen waarvoor de functie wordt gebruikt. Snel voorverwarmen Er zijn twee manieren om snel voorverwarmen te gebruiken: Snel voorverwarmen activeren in het menu Instellingen (standaard aan of uit). -
Page 29: Uitgestelde Start
GEBRUIK ▷ Door het indrukken van de bevestigingstoets wordt niet aan de bereidingstijd begonnen maar wordt het toestel op de ingestelde temperatuur gehouden. Die toestand blijft gehandhaafd totdat de deur wordt geopend. Uitgestelde start Gebruik de functie ‘Uitgestelde start’ om op een later moment te beginnen met koken door het instellen van de gewenste eindtijd. -
Page 30: Ga Naar Handmatige Bereiding
GEBRUIK 3. Druk op de bevestigingstoets Een klein pictogram wordt weergegeven naast de wereldtijd. De eerste fase is al gevuld met de huidige instellingen voor de functie. Als er geen bereidingstijd is toegevoegd, wordt in de eerste fase de standaardtijd toegevoegd. ▷... -
Page 31: Kookwekker
GEBRUIK Programma's en favorieten Automatische programma's • U kunt automatische programma's gebruiken voor bakken en braden door een gerecht te kiezen uit de lijst met voorgeprogrammeerde gerechten. Kies eerst het soort gerecht en dan het gerecht zelf uit de beschikbare lijst. •... -
Page 32: Kinderslot
GEBRUIK Kinderslot Het bedieningspaneel van de oven kan worden vergrendeld met het kinderslot om onbedoeld gebruik van de oven te voorkomen. 1. Druk op de slottoets en houd deze ingedrukt. Het apparaat wordt daarmee vergrendeld. Er wordt een pop- up weergegeven. Na 3 seconden sluit de pop-up met de tekst ‘Toetsvergrendeling is actief’. -
Page 33: Reinigen
REINIGEN Het apparaat reinigen Reinig de oven regelmatig om te voorkomen dat vet en voedselresten zich ophopen, vooral op de interne en externe oppervlakken, de deur en de afdichting. • Activeer de toetsvergrendeling (om te voorkomen dat het apparaat per ongeluk wordt ingeschakeld). •... - Page 34 REINIGEN Verwijderen en reinigen van de geleiderails Gebruik enkel conventionele schoonmaakmiddelen om de geleiderails te reinigen. • Verwijder de schroef met een schroevendraaier. • Haal de geleiderails los uit de gaten in de achterwand. Bewaar de afstandshouders van de geleiderails zorgvuldig. Plaats de afstandhouders na het reinigen terug.
-
Page 35: Ovenlampje Vervangen
REINIGEN Het ovenlampje vervangen De lamp in dit huishoudelijke apparaat is uitsluitend bedoeld voor verlichting van dit apparaat. De lamp is niet geschikt voor de verlichting van een huishoudelijke ruimte. De lampen (2x) (halogeen G9, 230 V, 25 W) zijn gebruiksartikelen en vallen daarom niet onder de garantie. -
Page 36: Problemen Oplossen
PROBLEMEN OPLOSSEN Algemeen Raadpleeg het onderstaande overzicht met oplossingen als u problemen hebt met uw oven. Neem contact op met de afdeling klantenservice als de problemen zich blijven voordoen. Het voedsel blijft rauw • Controleer of de timer is ingesteld en of u op de bevestigingstoets hebt gedrukt. - Page 37 Als er onderhoud nodig is, verwijdert u de stekker uit de contactdoos en neemt contact op met de klantenservice van ATAG. Zorg dat u het volgende bij de hand hebt als u opbelt: • Het modelnummer en serienummer (vermeld op de binnenzijde van de ovendeur) •...
-
Page 38: Uw Oven En Het Milieu
UW OVEN EN HET MILIEU Afvoeren van het apparaat en de verpakking Dit product is gemaakt van duurzame materialen. Aan het einde van de gebruiksduur moet het echter op een verantwoorde manier worden afgevoerd. De overheid kan u hierover informeren. De verpakking van het apparaat is recyclebaar. - Page 39 YOUR OVEN Your oven Introduction Control panel Description Guide rails Door Cooling fan Main functions Keys Navigation Initial use What to do first Operation Selecting your function Functions settings mode Progress mode Finish display Changing settings during the progress Functions table Using the microwave Settings menu Plus menu...
-
Page 40: Introduction
YOUR OVEN Introduction Congratulations on choosing this Atag combi microwave oven. This product is designed to offer simple operation and optimum user-friendliness. The oven has a wide range of settings enabling you to select the correct cooking method every time. -
Page 41: Control Panel
YOUR OVEN Control panel 6 7 8 9 1. Function knob (in ‘Off’ position) 2. Defrost 3. Programs & Favourites 4. Fast preheat 5. Oven 6. Microwave 7. Combi microwave 8. Warming 9. Aqua clean 10. Display 11. Selection knob 12. -
Page 42: Description
YOUR OVEN Description Level 4 Level 3 Level 2 Level 1 1. Control panel 2. Oven levels 3. Oven door 4. Door handle The following accessories are supplied with your oven: • Baking tray; used for pastries and cakes. Do not use the baking tray for the microwave functions! •... -
Page 43: Door
YOUR OVEN Door • The door switches interrupt the operation of the oven when the door is opened during use. The oven continues operating when the door is closed. • This oven has a ‘Soft close door system’. When closing the oven door, this system dampens the movement, from a certain angle, and silently closes the oven door. -
Page 44: Keys
YOUR OVEN Defrost Manual defrost Microwave My microwave Microwave Combi microwave Hot air + microwave Large grill + fan + microwave Warming Plate warming Keep warm Aqua clean Keys In the table below you can find the discription of the different keys. Keys Description of the keys On/off key and stop key... -
Page 45: Navigation
YOUR OVEN Plus key - To open or exit the settings menu (in standby- mode). - To open or exit the plus menu with the extra options possible at that moment (in on-mode). Child lock key - Press and hold the lock key to lock the appliance. Confirm key - To confirm all the white settings/elements in the screen. - Page 46 YOUR OVEN Within every menu the navigation is as follows: • Use the navigation keys or press the selection knob to move the active area (grey background). • The setting in the active area can be changed by turning the selection knob (left = less, right = more).
-
Page 47: Initial Use
INITIAL USE What to do first • Clean the oven interior and accessories with hot water and washing-up liquid. Do not use aggressive cleaning agents, abrasive sponges and similar. • The oven will emit a strange smell when it is used for the first time; this is normal. - Page 48 INITIAL USE Setting the time TIME l HOUR 1. Turn the selection knob and select the hours. 2. Confirm this setting by pressing the right navigation key or by pressing the selection knob. 3. Turn the selection knob and select the minutes. 4.
-
Page 49: Operation
OPERATION Selecting your function Select a function appropriate for the meal you are cooking. Consult the table in chapter ‘Functions table’ to see which functions are available. • Go directly to the progress mode by pressing the confirm key (this key is blinking if it is possible to start the program). - Page 50 OPERATION 4. Turn the selection knob and change the setting. OVEN l TEMPERATURE 14:30 °C °C 5. Confirm the setting by pressing the right navigation key or by pressing the selection knob. The next sub-function setting becomes active. OVEN l COOKING TIME 14:30 °C ▷...
-
Page 51: Progress Mode
OPERATION Progress mode • Left side on the screen, the temperature or/and the power is displayed (if the set temperature is not reached, the temperature will switch between cavity temp (grey) and set temp (white)). If the set temp is reached a pop-up will appear ‘set temperature is reached’. •... - Page 52 OPERATION Add extra time 1. Press the right navigation key to select ‘Add extra time’. 2. The time setting becomes active and can be changed directly by rotating the selection knob. 3. Confirm by means of the confirm key. The previous process is activated again. Gratin 1.
-
Page 53: Changing Settings During The Progress
OPERATION Changing settings during the progress • During progress, pressing the navigation keys will show the active area. The selected setting can now be changed, see chapter ‘Function settings mode’. • After confirmation with the confirm key the progress screen will be shown with the changed settings. -
Page 54: Use
Functions table Consult the table to select the preferred function. Also consult the instructions for preparation on the dish packaging. • In ‘Microwave function’: do not use metal cookware or utensils and do not preheat the oven. • Only use glass dishes that can withstand temperatures of 275 °C. - Page 55 Function Description Large Grill • Heating by means of the upper element and grill element. • This mode can be used with dishes and baked goods that require a distinctive bottom crust or browning. Use just before the end of the baking or roasting time.
- Page 56 Function Description Top Heat • Heating only by means of the upper heating element. • This mode can be used when you wish to bake/ roast the top part of your dish. • Place the baking tray or oven rack on level 2. •...
- Page 57 Function Description ECO Hot air • Heating by means of hot air. ECO hot air uses less energy but gives the same result as the hot air setting. Cooking takes a few minutes longer. • This mode can be used for roasting meat and baking pastry.
-
Page 58: Using The Microwave
Function Description Microwave + Grill with Fan • The food is cooked with a combination of microwaves and grill with fan. • Use this combination for smaller chunks of meat, fish and vegetables. • It allows fast cooking and the food will have a nicely browned crispy crust. - Page 59 The microwave is used for: • the microwave function. • the combi functions. Cooking principle 1. The microwaves generated by the microwave are spread evenly by a distribution system. This cooks the dish evenly. 2. The food absorbs the microwaves to a depth of approximately 2.5 cm. Cooking then continues, because the heat is spread in the dish.
- Page 60 Guidelines for microwave cookware Cookware that you use for the microwave function should not block the microwaves. Metals such as stainless steel, aluminium and copper reflect microwaves. For that reason, do not use metal cookware. Cookware which is designated as microwave-safe can be used safely. For more information about suitable cookware, consult the following guidelines and always use the glass baking tray on level 1 if you use the microwave function.
-
Page 61: Settings Menu
Cookware Microwave safe Remarks Plastic Especially heat-resistant thermoplastic material. Other types of plastic can warp or discolour at high temperatures. Do not use melamine plastic. Can be used to hold moisture. May not touch the food. Be careful when you remove the film; hot steam can escape. Only if boil-proof or ovenproof. - Page 62 General You can set the following from this menu: • Language (language of the display) • Time (always in 24H format) • Time display (24H or 12H format) • Date (always day-month-year format) • Date display (ddmmyyyy or mmddyyyy) • Sounds (volume of the general sounds and alarms) •...
-
Page 63: Plus Menu
Plus menu Depending on the function, there is a possibility to choose extra functionality (after you have chosen a main function and settings in the ‘Function settings mode’) by pressing the ‘plus key’. • A small icon next to the curent time will give an indication about the activated plus menu functions. -
Page 64: Cooking Information
Cooking information The cooking info screen will give more information about the chosen function, like the needed equipment and for what kind of purposes the function is used. Fast preheat There are two different ways to use fast preheat: Activate the fast preheat in the settings menu (to be default on or off) 1. -
Page 65: Delayed Start
Delayed start Use the ‘delayed start’ function to start cooking at a later time, by setting the desired finishing time. 1. Press the plus key (in the ‘Function settings mode’). 2. Select ‘Delayed start’ with the right navigation key. 3. Press the confirm key. The display will show the delay start symbol, the cooking time and the end time. -
Page 66: Go To Manual Cooking
4. To add a stage, select the second stage by pressing the navigation key or rotating the selection knob and to enter the stage for editing, press the confirm key. The display will switch to the oven setting display. 5. Make a selection of all available functions of the appliance. 6. -
Page 67: Egg Timer
• In the settings, first a picture of the dish is visible (not editable), the weight (depending on the dish) (if it is editable), the intensity (not always editable) and the cooking time. If necessary, adjust the intensity and/or the weight. Favourites (see chapter ‘Finish display’) •... -
Page 68: Warming
Warming • Plate warming ▷ This function is used when you want to warm tableware (plates, cups) so that the served food stays hotter for longer. ▷ By choosing this function you can determine the warming up temperature and duration. •... -
Page 69: Cleaning
CLEANING Cleaning the appliance Clean the oven regularly to prevent fat and leftover food from accumulating, especially on the surfaces of the interior and the exterior, the door and the seal. • Activate the key lock (to prevent that the appliance is switched on accidentally). -
Page 70: Removing And Cleaning The Guide Rails
CLEANING Removing and cleaning the guide rails Use conventional cleaning products to clean the guide rails. • Remove the screw using a screwdriver. • Remove the guide rails from the holes in the back wall. Save the guide rail spacers carefully. Return the spacers after cleaning. This prevents sparks being created during use. -
Page 71: Replacing The Oven Lamp
CLEANING Replacing the oven lamp The lamp in this household appliance is only suitable for illumination of this appliance. The lamp is not suitable for household room illumination. The light bulbs (2x) (halogen G9, 230 V, 25 W) are a consumer items and therefore not covered by warranty. -
Page 72: Solving Problems
SOLVING PROBLEMS General If you have problems with your oven, consult the error overview below. Should the problems persist, please contact the Customer Services Department. The food stays raw • Check whether the timer has been set and you have pressed the confirm key. - Page 73 Repairs should only be performed by a qualified service technician. If maintenance is required, take the plug from the socket and contact the Atag customer service. Have the following information to hand when you call: • The model number and serial number (stated on the inside of the oven door) •...
- Page 74 YOUR OVEN AND THE ENVIRONMENT Disposal of the appliance and packaging This product is made from sustainable materials. However, the appliance must be disposed of responsibly at the end of its useful life. The government can provide you with information about this. The packaging of the appliance can be recycled.
- Page 76 Het toestel-identificatieplaatje bevindt zich aan de binnenzijde van het toestel. The appliance identification card is located on the inside of the appliance. Houd, wanneer u contact opneemt met de serviceafdeling, het complete typenummer bij de hand. When contacting the service department, have the complete type number to hand.
Need help?
Do you have a question about the CX4592D and is the answer not in the manual?
Questions and answers