
Related Manuals for Backyard Pro 554OPO40CG


Summary of Contents for Backyard Pro 554OPO40CG
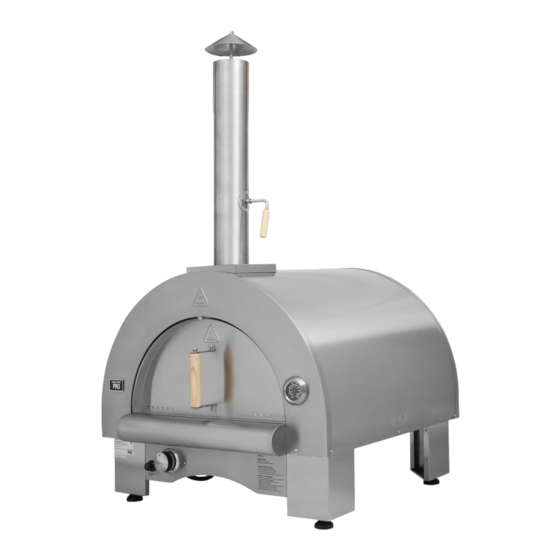
- Page 1 Item No. 554OPO40CG, 554OPO40FG COMMERCIAL GAS OUTDOOR PIZZA OVENS User Manual + Retain this manual for future reference. + Unit must be kept clear of combustibles at all times.
-
Page 2: Table Of Contents
2 |Introduction TABLE OF CONTENTS Introduction Table of Contents ..............................2 Safety Warnings ................................ 3–5 Parts 554OPO40CG ................................6-7 554OPO40FG ................................8-9 NG Parts List ................................10 Assembly Instructions ..............................11–18 Installation and Startup Installation ................................19 Gas Use ..................................19-20 Lighting .................................. -
Page 3: Safety Warnings
Introduction | 3 SAFETY WARNINGS Backyard Pro LP Outdoor Ovens are designed, built, and sold for commercial use and should be operated by trained personnel only. Clearly post all DANGERS, CAUTIONS, WARNINGS, and OPERATING INSTRUCTIONS near each unit to insure proper operation and to reduce the chance of personal injury and/or equipment damage. - Page 4 4 |Safety Warnings CAUTION: 1. This oven is for use with propane gas only (propane gas cylinder not included). 2. Never attempt to attach this oven to the self-contained propane system of a camper trailer, motor home, or house. 3. Never use charcoal or lighter fluid with the gas grill unless using an approved accessory. 4.
- Page 5 Operating Instructions | Safety Warnings | 5 DANGER: Liquid propane gas is flammable and hazardous if handled improperly. Know its characteristics before using any propane product. • Propane Characteristics: Flammable, explosive under pressure, heavier than air, and settles in pools and low areas. •...
-
Page 6: Parts 554Opo40Cg
6 |Parts - 554OPO40CG PARTS LIST ITEM DESCRIPTION ITEM DESCRIPTION Ball Nut 1/4″ Spring Washer Chimney Top 1/4″ Flat Washet Chimney Top Bracket Support Leg Chimney Pipe Chimney Decorative Panel Front Control Panel Net Cover Bellows Bracket Cordierite Refractory Brick 2... - Page 7 Parts - 554OPO40CG | 7...
-
Page 8: 554Opo40Fg
8 |Parts - 554OPO40FG... - Page 9 Parts - 554OPO40FG | 9 ITEM DESCRIPTION ITEM DESCRIPTION Left Leg Assembly Cordierite Refractory Brick 1 Right Leg Assembly Cordierite Refractory Brick 2 Faucet Components Cordierite Refractory Brick 3 Oil Receiving Box Assembly 1/4″ Flat Washer Oil Pan Feet 1 1/4″...
-
Page 10: Ng Parts List
10 |Parts - NG Parts List ITEM DESCRIPTION LP Nozzle Movable Nozzle Connector LP-NG Adjustment Screwdriver NG Regulator NG Regulator Fixed Sheet 5/32″ Large Flat Head Screw NG Gas Pipe Airwrench... - Page 11 Assembly Instructions - 554OPO40CG | 11 STEP 1 Attach two legs (25) to the front plate (26) using the 1/4*14mm screws (18). Then, screw the feet (24) into the bottom of all four legs. STEP 2 Attach the legs to the bottom of the unit (9) using the 1/4*14mm screws (18).
-
Page 12: Assembly Instructions
12 |Assembly Instructions - 554OPO40FG STEP 1 Attach two legs (25) to the front plate (26) using the 1/4*14mm screws (18). Then, screw the feet (24) into the bottom of all four legs. STEP 2 Attach the legs to the bottom of the unit (9) using the 1/4*14mm screws (18). - Page 13 General Assembly Instructions | 13 STEP 3 Install the ash support (28/29) to the bottom of the unit (9) using the 1/4*15mm screws (18). STEP 4 Install the Gas System Assembly () and the Oven Knobs (16) as shown in the figure.
- Page 14 14 |General Assembly Instructions STEP 5 Install the igniter (13). STEP 6 Install the electrode (35) and igniter (13).
- Page 15 General Assembly Instructions | 15 STEP 7 Install the electrode fixed cover and orifice connector. STEP 8 Slide the ash box into the ash support. OIL GATHERING BOX OIL GATHERING BOX AROUND CARD SLOTS STENTS CARD BUCKLE...
- Page 16 16 |General Assembly Instructions STEP 9 Install the door handle (19) to the front of the unit (17) using the 1/4*14mm screws (18), installation mats (20), flat washers (23), spring washers (22), and 1/4” bolts (21). STEP 10 Place the fire bricks and mesh cover (A-H) inside the oven (9) as shown below.
- Page 17 General Assembly Instructions | 17 STEP 11 Install the Chimney Cap. STEP 12 Attach the chimney (4) to the top of the unit (9) using the 1/4*14mm screws (18).
- Page 18 18 |General Assembly Instructions STEP 13 Install the handles on both sides of the unit using the 1/4*15mm screws. STEP 14 Attach hooks to the legs using the 1/4*15mm screws.
-
Page 19: Installation And Startup
14 |Installation and Startup Installation and Startup | 19 INSTALLATION NOTE: Oven must be installed outdoors on a noncombustible stand or surface. Consult local laws and regulations for use of wood-fired cooking equipment. 1. Unpack your oven using two people to lift it out of the box. 2. - Page 20 20 |Installation and Startup • Please follow the instructions for the connection of the regulator. • After a period of non-use, please check for gas leaks or burner obstructions. • Any flammable materials must be at least 100 cm. / 39.3 in. far from the oven. •...
-
Page 21: Lighting
Installation and Startup | 21 LIGHTING Check all gas connections for gas leak before starting your oven. Do not lean over the oven when lighting. Keep your face and body at least 50 cm. / 19.6 in. away from the oven door. When lighing the oven, the oven door must be open. The burner control knob must be in the off position before turning on the LPG cylinder valve. -
Page 22: Liquid Propane Gas Cylinder
22 |Installation and Startup LIQUID PROPANE CYLINDER USAGE Liquid Propane Gas (LPG) is heavier than air. Any LPG leak may collect in low areas and prevent dispersion. The LPG cylinder must be installed, transported, and stored in upright positions. LPG cylinders should not be dropped or handled roughly. Never place the replacement gas cylinder near the gas fired oven. - Page 23 Installation and Startup | 23 TIPS FOR GAS USE 1. Align the base of the gas cylinder with the round hole in the middle of the gas cylinder seat. 2. Adjust the direction of the air port. 3. Rotate the gas cylinder fixing rod clockwise until the gas cylinder cannot be loosened. Align the regulator with the air port of the gas cylinder, turn it clockwise to tighten it.
-
Page 24: Cooking
24 |Installation and Startup COOKING Always preheat your oven before cooking. Heat for 5-10 minutes or until the thermometer reaches 300-300 degrees Celcius / 572- 626 degrees Fahrenheit. Calculate a longer cooking time in cold or windy days or high altitudes. Calculate a shorter cooking time if the external temperature is particularly hot. -
Page 25: Natural Gas Conversion Installation
Installation and Startup | 25 STEP 1 STEP 2 Separate and disassemble gas Use a screwdriver to system (11) and gas hose (14) seperate the pizza oven with a wrench. body and disassemble it. STEP 3 STEP 4 Use 2 M5*8 screws to connect the NG Install the NG Regulator (D), Regulator Regulator Sheet (E) and the NG Regulator Sheet (E), and bellows bracket (27),... - Page 26 26|Installation and Startup STEP 5 Connect the NG Regulator (D) and gas hose (14) with a wrench. Use a wrench to seperate and disassemble the movable STEP 6 nozzle connector (2) from the burner. Use a screwdriver to seperate the LP Nozzle (1) from the movable nozzle connector (2).
- Page 27 Installation and Startup | 27 STEP 7 Seperate the oven knob (16) and the gas valve (12). Use the LP-NG Adjustment Screwdriver (C) to adjust the gas valve (12) as shown in the figure. Put the oven knob (16) back into the gas valve (12). Rotate the adjustment shaft clockwise to the end for NG fires.
-
Page 28: Cooking Instructions
Installation and Startup | 28 Firing Up Your Oven Start the fire in the oven approximatesly one hour prior to cooking. Split wood into small pieces about 10” long by 1/2” thick and place into the center of the oven with kindling and paper. INDIRECT –...
Need help?
Do you have a question about the 554OPO40CG and is the answer not in the manual?
Questions and answers