
Related Manuals for Bissell CLEANVIEW 1837 Series


Summary of Contents for Bissell CLEANVIEW 1837 Series
- Page 1 CLEANVIEW ® Vacuum ___________ USER GUIDE 1837 SERIES More of a video person? Look for this icon and go online for an instructional how-to video at www.BISSELL.com...
- Page 2 This plug will fit in a polarized outlet only one way. If the plug does not fit fully in the outlet, reverse the plug. If it still does not fit, contact a qualified electrician to install a proper outlet. Do not change the plug in any way. www.BISSELL.com...
-
Page 3: Table Of Contents
Thanks for buying a BISSELL vacuum! We love to clean and we’re excited to share one of our innovative products with you. This guide has important instructions on how your new vacuum works, including using (page 6), maintaining (pages 7-9), and if there is a problem, troubleshooting (page 10). -
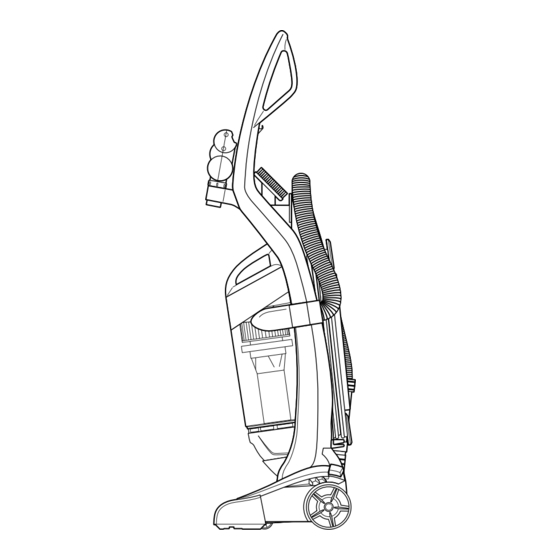
Page 4: Product View
Do not plug in your vacuum until you are familiar with all instructions and operating procedures. Handle Stretch Tank Hose Release Button Carry Handle Pre-Motor Filter Extension (not shown) Wand Clip Dirt Tank Extension Wand Post-Motor Filter Power Pedal Recline Height Pedal Adjustment NOTE: The Crevice Tool is stored inside the Extension Wand. www.BISSELL.com... -
Page 5: Assembly
Store dusting brush above hose wrap in holder. Wrap hose up and around the hose wrap on the handle. Slide end of hose into vacuum base. NOTE: The powerfoot will not suction properly unless the hose is firmly attached. www.BISSELL.com... -
Page 6: Operations
Do not place vacuum close enough to objects to pull them into rotating brush. NOTE: Certain carpets and low humidity conditions may generate small static discharges. Static discharges are entirely harmless and are not associated in any way with the main power supply. www.BISSELL.com... - Page 7 Press press firmly until in and turn clockwise you hear “click”. to lock. NOTE: The dirt tank may be washed in warm water with a mild detergent. Make sure it is completely dry before replacing. www.BISSELL.com...
- Page 8 Firmly pull filter tray out. NOTE: The pleated post-motor filter may NOT be washed with water or detergent. Replace the post-motor filter every 3 to 6 months. www.BISSELL.com...
- Page 9 Inspect until slot appears, Place brush roll with belt back in. for damages and then separate Faceplate will not close properly if all replace if necessary. faceplate. parts are not aligned correctly. www.BISSELL.com...
-
Page 10: Troubleshooting
Adjust powerfoot to correct difficult to push height setting, see page 6 Dirt tank full Empty dirt tank Visible dirt escaping from Filters missing or installed Check pre-motor and post-motor vacuum incorrectly filters for correct installation, see page 8 www.BISSELL.com... -
Page 11: Warranty
Service If your BISSELL product should require service: Contact BISSELL Consumer Care to locate a BISSELL Authorized Service Center in your area. If you need information about repairs or replacement parts, or if you have questions about your warranty, contact BISSELL Consumer Care. -
Page 12: Parts & Supplies
(and millions of your closest friends) For Parts and Supplies, go to BISSELL.com and know what you think! enter your model number in the search field. For cleaning tips and more visit www.BISSELL.com or find us at: BISSELL BISSELLClean BISSELLClean BISSELL BISSELL ©2016 BISSELL Homecare, Inc... - Page 13 CLEANVIEW ® Aspiradora ___________ GUÍA DEL USUARIO SERIE 1837 ¿Prefiere ver videos? Busque este ícono y conéctese para ver un video instructivo en www.BISSELL.com...
- Page 14 Si el enchufe no encaja por completo en el tomacorriente, inviértalo. Si aún no se ajusta, póngase en contacto con un electricista calificado para instalar el tomacorriente apropiado. No cambie el enchufe de ninguna manera. www.BISSELL.com...
- Page 15 ¡Gracias por comprar una aspiradora BISSELL! Nos encanta limpiar y estamos ansiosos por compartir uno de nuestros innovadores productos con usted. Esta guía tiene importantes instrucciones sobre cómo funciona tu nueva aspiradora, lo que incluye el uso (página 6), el mantenimiento (páginas 7 a 9) y si hay un problema, solución de problemas (página 10).
-
Page 16: Vista Del Producto
Sujetador de (no se muestra) la vara de extensión Tanque de suciedad Vara de extensión Filtro Pedal de posmotor encendido Pedal para reclinar Ajuste de altura NOTA: El accesorio para ranuras se almacena dentro de la vara de extensión. www.BISSELL.com... -
Page 17: Ensamblaje
Deslice el extremo de la manguera en la base de la aspiradora. NOTA: El pie de potencia no succionará correctamente a menos que la vara de la manguera se fije de manera firme. www.BISSELL.com... -
Page 18: Funcionamiento
Las descargas estáticas son completamente inofensivas y por ningún motivo están relacionadas con el suministro de electricidad principal. NOTA: El cepillo para pisos giratorio sigue girando mientras se usan los accesorios. No coloque la aspiradora demasiado cerca de los objetos que pudieran aspirarse hacia el cepillo giratorio. www.BISSELL.com... - Page 19 “clic”. NOTA: El tanque de suciedad se puede lavar con agua tibia y detergente suave. Asegúrese de que esté completamente seco antes de reemplazarlo. www.BISSELL.com...
- Page 20 Jale firmemente la bandeja del filtro hacia fuera. NOTA: El filtro posmotor plisado NO se puede lavar con agua ni detergente. Reemplace el filtro posmotor cada 3 a 6 meses. www.BISSELL.com...
- Page 21 Inspeccione que aparezca la ranura; nuevamente en su lugar. si hay daños y haga los luego separe la placa reemplazos si es necesario. La placa frontal no cerrará bien si todas las piezas no frontal. están alineadas correctamente. www.BISSELL.com...
-
Page 22: Solución De Problemas
Vacíe el tanque de suciedad, consulte la página 6. Hay suciedad visible saliendo Los filtros no están instalados o están Revise si el filtro premotor y el filtro posmotor están de la aspiradora instalados de manera incorrecta. instalados correctamente, consulte la página 8. www.BISSELL.com... -
Page 23: Garantía
Si su producto BISSELL necesita un servicio: Póngase en contacto con Atención al Consumidor de BISSELL para ubicar un centro de servicio autorizado de BISSELL en su área. Si necesita información sobre reparaciones o piezas de repuesto o si tiene preguntas sobre la garantía, póngase en contacto con Atención al Consumidor de BISSELL. -
Page 24: Piezas Y Suministros
Visite www.BISSELL.com/registration! Nos encantaría Visítenos por Internet en: BISSELL.com Cuando se ponga en contacto con BISSELL, tenga a mano el número saber de usted. de modelo de la aspiradora. Tenga a bien registrar la número de modelo: __________________________________...
Need help?
Do you have a question about the CLEANVIEW 1837 Series and is the answer not in the manual?
Questions and answers