Bissell Lift-off Multi Cyclonic 89Q9 Series User Manual
Bissell vacuum cleaner user manual
Hide thumbs
Also See for Lift-off Multi Cyclonic 89Q9 Series:
- User manual (21 pages) ,
- User manual (21 pages) ,
- User manual (40 pages)
Table of Contents
Advertisement
Quick Links
Advertisement
Table of Contents

Related Manuals for Bissell Lift-off Multi Cyclonic 89Q9 Series


Summary of Contents for Bissell Lift-off Multi Cyclonic 89Q9 Series
- Page 1 U S E R ’ S G U I D E 89Q9 SERIES Safety Instructions Product View Assembly Operations 10-15 Maintenance and Care 16-17 Troubleshooting Consumer Services Replacement Parts Additional Accessories Warranty DJ68-00250Q REV(0.0)
- Page 2 BISSELL Multi Cyclonic vacuum We’re glad you purchased a BISSELL vacuum. Everything we know about floor care went into the design and construction of this complete, high- tech home cleaning system. By purchasing this product you are helping BISSELL with our commitment to reducing our impact on the environment through an expanding range of sustainable design efforts.
-
Page 3: Important Safety Instructions
Do not pick up toxic material (chlorine bleach, ■ ammonia, drain cleaner, etc.). To reduce the Do not use vacuum cleaner in an enclosed space ■ filled with vapors given off by oil base paint, paint thinner, some moth proofing substances, flammable dust, or other explosive or toxic vapors. -
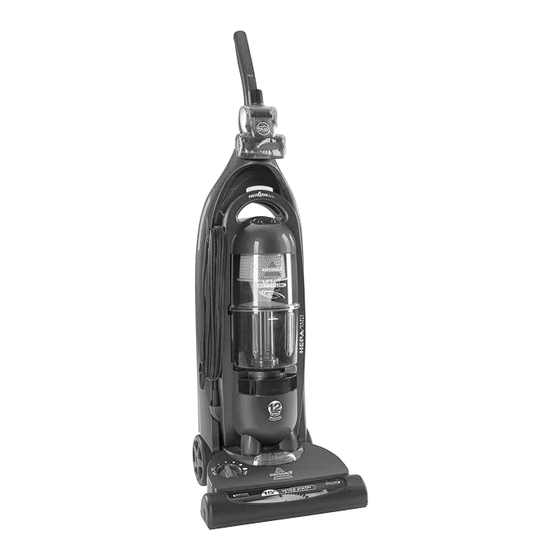
Page 4: Product View
roduct view Handle TurboBrush ™ Power Switch Quick Release Cord Wrap Dirt Container Pre-Motor Filter Headlight Height Adjustment Knob Furniture Powerfoot Protection Guard CAUTIOn: Do not plug in your vacuum cleaner until you are familiar with all instructions and operating procedures. w w w . -
Page 5: How To Use This Guide
Locate and organize all parts before assembly. following this user’s guide will greatly enhance your ability to get the most performance from your BISSELL vacuum for many years. ssembly The only tool you’ll need to assemble your vacuum cleaner is a Philips head screwdriver. -
Page 6: Operation
“Off” (O) for bare floor cleaning or other delicate surfaces. note: your BISSELL Lift-Off Multi Cyclonic vacuum is equipped with a special internal switch that turns the rotating brush off whenever the unit is in the Upright position. -
Page 7: Height Adjustment
Vacuum Hose. CAUTIOn: Always place vacuum cleaner on floor in its fully Upright Position and make sure it is locked into place before removing Canister or when using tools. Placing the... - Page 8 . b i s s e l l . c o m select models only CAUTIOn: Do not press the Release Button while using the Carrying handle to transport the vacuum cleaner. The Canister could detach causing the rest of the vacuum to fall. Buckle...
-
Page 9: Power Cord Storage
Cleaning with the detachable canister The detachable canister feature makes it possible to easily take the powerful cleaning action of your BISSELL Lift-Off Multi Cyclonic to stairways, auto interiors, and other hard-to- reach areas of your home. Before detaching the canister, your vacuum must be in its fully upright position. -
Page 10: Maintenance And Care
aintenance and care To maintain maximum cleaning performance, the following maintenance steps must be performed: Empty the dirt container when the dirt reaches the “Full” line on the front. Check the pre-motor filter at least once a month and clean and replace as needed. Check and relace the HEPA media post-motor filter as needed. - Page 11 aintenance and care Cleaning the secondary cyclone Unplug the cleaner from electrical outlet. The secondary cyclone can be reached by removing the dirt container, reaching underneath the upper tank and turning the rim of the frame to unlock. Pull straight down to remove. The cyclone and screen may be separated for cleaning.
- Page 12 Rotating brush and drive belt maintenance Check your vacuum cleaner’s rotating floor brush and drive belt regularly for debris, wear or damage. Debris can wrap around the brush and hamper its ability to effectively clean your carpet.
- Page 13 aintenance and care Replace light bulb Unplug cleaner from electrical outlet. Remove detachable canister and recline handle of vacuum. Using a screwdriver, remove the one screw as shown and lift off the lens. Remove the bulb from the socket by grasping bulb and pulling straight out.
- Page 14 Cleaning clogs Low suction or poor pickup may be due to a clog in the vacuum cleaner. If you notice a change in the sound of the motor or a reduction in the spinning action, check for clogs.
-
Page 15: Thermal Protector
If the thermal protector continues to activate after following the above steps, your cleaner may need servicing. Call BISSELL Consumer Services, or visit the website. note: The thermal protector controls the main vacuum motor only, not the brush motor. -
Page 16: Troubleshooting
Possible causes Canister is not securely seated Brush switch turned to "OFF" Vacuum is in upright position Vacuum cleaner won't pick up dirt Possible causes Incorrect height adjustment Hose not attached to suction opening Crack or hole in hose... - Page 17 3. Dirt container installed incorrectly Other maintenance or service not included in the manual should be performed by an Thank you for selecting a BISSELL product. w w w . b i s s e l l . c o m Remedies 1.
- Page 18 For information about repairs or replacement parts, or questions about your warranty, please call as follows: Or visit the BISSELL website - www.bissell.com When contacting BISSELL, have model number of unit available. Please record your Model Number: _______________Please record your Purchase Date: ______________ nOTE: Please keep your original sales receipt.
-
Page 19: Additional Accessories
These items are available for purchase as accessories for your BISSELL Lift-Off Multi Cyclonic: To purchase contact your local in country distributor. Item Part no. 203-1063 203-2302 203-1099 203-6624 203-6625 203-2081 203-5542 w w w . b i s s e l l . c o m... -
Page 20: Limited Two-Year Warranty
This warranty gives you specific legal rights, and you may also have other rights which may vary from country to country. If you need additional instruction regarding this warranty or have questions regarding what it may cover, please contact BISSELL Consumer Services by E-mail, telephone, or regular post as described below, or contact your local in country distributor. - Page 21 使用指南 89Q9 系列 安全說明 產品圖示 組裝 操作 10-15 維護保養 16-17 故障排除 消費者服務 可替換之零件 額外配件 保固...
- Page 22 我們集結了全面的地板保護知識, 設計製造出這款完整的高科技家用清潔機器。 購買本產品就是協助 BISSELL 實現承諾, 透過擴展各種永續設計減少對環境的 負面影響。 您的 Lift-Off Multi Cyclonic超旋分離式子母吸塵器品質優良, 並附有兩年的保 ™ 固期限。 我們知識豐富又敬業的消費者服務部也樂於提供售後服務, 萬一您遇到 問題, 將會獲得迅速又周到的協助。 我的曾祖父在 1876 年發明了地板清掃機。 時至今日, BISSELL 引領全球, 精心設 計、 製造和保養高品質的家居用品, 包括您所購買的 Lift-Off Multi Cyclonic超 ™ 旋分離式子母吸塵器。 BISSELL 全體員工再次感謝您的惠顧。 Mark J. Bissell 總裁暨執行長 w w w . b i s s e l l . c o m...
- Page 23 重要安全說明 使用電器時應採取基本的預防措施, 包括以下 各項 : 使用 LIfT-Off MULTI ™ CyCLOnIC超旋分離式子母 吸塵器之前, 請閱讀所有 說明。 務必使用極性插座 (左側插孔比右側插孔寛) 。 不使用以及進行保養之前, 請先將插頭從插座 中拔出。 警告: 為減少火災、 電擊 或受傷危險: 請勿為了要插入非極性插座或延長線而改 ■ 動極性插頭。 吸塵器插電時請勿離開。 ■ 未使用以及進行保養之前, 請先拔掉插頭。 ■ 請勿在戶外或潮濕表面上使用。 ■ 請勿讓兒童操作吸塵器或拿來當玩具使用。 ■ 由兒童使用或是在兒童附近使用時, 請特別 ■ 當心。 請勿用於本 《使用指南》 沒有列出的任何其 ■...
- Page 24 產品圖示 把手 TurboBrush 渦輪刷頭 ™ 電源開關 Quick Release 專利便利 捲線扣 集塵筒 前置馬達 濾網 頭燈 高度調整 旋鈕 傢俱 保護墊 底座動力刷頭 當心: 請先熟讀各項說明和操作程序, 然後再插電使用您的吸塵器。 w w w . b i s s e l l . c o m 電源線夾 釋放開關 清潔刷開/關切換鈕 伸縮長管...
- Page 25 如何使用本指南 本使用指南目的在協助您獲得 意的功效。 本指南包括組裝和操作說明、 安全注意 事項以及維護保養和故障排除說明, 組裝吸塵器 之前請先詳細閱讀。 請特別注意參閱產品圖解、 組裝說明和零件名稱。 組裝之前請先找出全部零件並整理好。 遵循本使用 指南將能使您發揮 BISSELL 吸塵器的最佳性能並延 長使用壽命。 組裝 組裝本吸塵器唯一需要用到的工具是一把十字 螺絲起子。 將把手固定到吸塵器機身 1. 握住吸塵器把手, 然後將黏貼在把手 底座的螺絲釘零件袋取下來。 2. 將吸塵器直立, 然後將把手底座滑入 並扣進機身頂端的溝槽。 3. 檢查把手是否與吸塵器機身緊密接合。 如果前端出現縫隙, 請繼續施力前推, 直到把手與機體密合為止。 4. 從螺絲零件袋取出兩枚螺絲釘插進現有 的洞孔, 然後用螺絲起子轉緊固定。 連接吸塵管和工具 1. 將 Twist n' Snap 旋轉鎖定軟管接頭對著...
- Page 26 組裝 連接吸塵管和工具 (續) 3. 如圖所示, 將可伸縮延長軟管棒、 隙縫 專用吸頭和除塵刷頭/ 傢俱墊襯專用吸 頭工具扣進存放夾。 4. 將TurboBrush 渦輪刷頭扣入把手前端的 ™ 固定架上。 將TurboBrush 渦輪刷頭的底部勾進拉 ™ 環, 並將頂部推入定位, 使TurboBrush 渦輪刷頭固定到架上。 操作 電源開關/清潔刷開關 吸塵器電源開關位於可拆卸吸塵子機正面的把 手正下方。 將吸塵器上的 開關推到 「ON」 (開) ( l ) 位置啟動, 完成清潔後推到 「OFF」 (關) ( 0 )的位置關閉。 清潔刷開關位於可拆卸吸塵子機正面、...
- Page 27 操作 高度調節 本機型有七種高度設定, 用於清潔各種不同 的地板表面。 將底座動力刷頭上的旋鈕轉到 所需的設定。 最低設定——用於清潔短毛地毯或無地毯的地板。 如需吸拾碎屑, 可能需要向上調整一級。 中等設定——用於清潔中毛地毯。 較高設定——用於清潔長毛地毯和大部分粗毛地毯。 注意:為了達到最佳的清潔性能, 請先調到可行的 最低設定。 如果吸塵器難以推動, 再調高設定。 如 果高度調整旋鈕難以轉動, 將吸塵器稍微向後傾 斜, 在旋轉時減輕壓在底座動力刷頭上的重量。 特殊工具 您的吸塵器不只是一台功能強大的地板清潔機, 它 還可以讓您選擇搭配特殊工具, 搖身變成一台用於 樓梯和地板以外的多功能吸塵清潔機。 注意: 這些工具可在吸塵器處於直立位置時 使用, 或搭配可拆卸吸塵子機使用。 1. 握住長管把手後往上抬, 使長管與 把手底座分開。 2. 將工具用力推進吸塵管或可伸縮 延長軟管棒, 以連接到吸塵器。 除塵刷頭/ 傢俱墊襯專用吸頭:...
- Page 28 操作 特殊工具 (續) 渦輪刷頭: TurboBrush™ 利用滾動旋轉的刷掃動作來進行小區域的清潔, 像 是樓梯和傢俱墊襯等等。 注意: 使用 TurboBrush 渦輪刷頭時請向下輕壓, 即 ™ 可獲得最大的清潔功效。 過度施壓可能會導致刷頭 停止旋轉。 樓梯清潔工具 (只限於特定型號) : 用於清潔樓梯、 小地毯和其他鋪地毯的小區域。 本 工具也可用於無地毯的地板。 注意:樓梯清潔工具不存置在機體上。 高級硬式地板專用吸頭 (特定型號) : 用於清潔 硬地板。 旋轉頭可轉向進入狹窄空間和櫃 子下面。 注意: 高級硬式地板專用吸頭不存置在機體上。 您的機型可能沒有包含上述所有工具。 如需更多工 具, 請參閱第 頁訂購。 肩帶 (只限特定型號) : 使用可拆卸吸塵子機進行清潔時,...
- Page 29 操作 以可拆卸吸塵子機清潔 透過可拆卸吸塵子機, Lift-Off Multi Cyclonic超旋 分離式子母吸塵器在清潔樓梯、 汽車內部以及 其他室內較難清理區域時, 可以輕鬆發揮強勁的 清潔效能。 取下可拆卸吸塵子機之前, 必須將吸塵器完全 直立。 無需事先關掉電源。 1. 按下可拆卸吸塵子機把手頂端的釋放按 鈕, 將可拆卸吸塵子機提出來。 2. 從可拆卸吸塵子機背後的長管把手底座 取下吸塵管。 3. 將您想使用的工具安裝到吸塵管末端的 長管把手上。 4. 清潔完畢後, 取下工具, 將長管接回把手 底座上。 5. 將可拆卸吸塵子機前方的 「足」 對準直立 吸塵器底部的隆起, 裝回底座動力刷頭。 將可拆卸吸塵子機推向吸塵器框架, 直到 「喀噠」 一聲鎖好定位。 收好電源線...
- Page 30 維護保養 為保持機器發揮最大的清潔效能, 請務必進行 以下維護保養步驟: 1. 集塵筒內的塵垢累積到筒子前面的 「Full」 (滿) 線時要將筒內的塵垢清空。 2. 每月至少檢查前置馬達濾網一次, 必要時加以清潔更換。 3. 檢查HEPA後置馬達濾網並視需要進行 更換。 注意:如果用吸塵器清潔新地毯、 細粉 塵, 或有過敏情況時, 建議您經常清潔濾 網。 請遵照下幾頁的說明指示來進行這些 簡易的保養步驟。 4. 零件裝回吸塵器之前先使其徹底風乾。 清空集塵筒 當集塵筒內的塵垢累積到達到前面的 「Full」 (滿) 線時, 要將筒內的塵垢清空。 1. 將吸塵器的插頭從插座拔出。 2. 將Lock n' Seal 推桿推到 「解鎖」 位置。 ™...
- Page 31 維護保養 清潔次級氣旋裝置 將吸塵器的插頭從插座中拔出。 1. 如要取出次級氣旋裝置, 先取出集塵 筒, 將手伸進上筒下方, 然後順時鐘 旋轉整個裝置邊緣以解除鎖定。 往下 直拉取出裝置。 2. 氣旋裝置和過濾器可以分開清洗。 只需將過濾器直接拔出。 3. 集塵筒上端也可以用濕布擦拭清潔。 清潔前置馬達與後置馬達濾網 1. 將吸塵器的插頭從插座中拔出。 2. 前置馬達濾網保護馬達, 使前置馬達 濾網不沾染到灰塵微粒。 它位於集 塵筒下方的托盤內。 濾網變髒時, 拉 出托盤, 將濾網取出清潔。 此濾網可 以用冷水加温和洗潔精手洗。 沖洗 乾淨後讓它完全風乾, 然後再放回機 器內。 3. HEPA 後置馬達濾網可以強化過濾功 效, 讓乾淨的空氣回到室內。 HEPA後 置馬達濾網位於吸塵器後方的門後...
- Page 32 維護保養 滾刷和驅動皮帶的維護保養 定期檢查吸塵器的滾筒地板刷與驅動皮帶 是否沾有碎屑、 磨損或損壞的痕跡。 碎屑 可能會包覆清潔刷, 阻礙清潔刷發揮有效 清潔地毯的功能。 1. 將吸塵器的插頭從插座中拔出。 2. 從吸塵器取下可拆卸吸塵子機。 3. 將把手放低, 翻轉吸塵器, 讓機器 底部朝上。 4. 用十字螺絲起子取出六枚螺絲釘, 如圖所示。 取下清潔刷的蓋子。 5. 抬起滾筒地板刷取出。 清除刷子 上的線團、 毛髮和其他碎屑, 特別 注意刷子端部。 6. 檢查空氣通道是否有阻塞, 移除 通道裡的任何碎屑。 7. 清除皮帶輪和驅動皮帶區的碎屑。 8. 仔細檢查驅動皮帶是否有任何地 方出現磨損、 割痕或受壓的痕跡。 如果發現任何損壞, 請將舊的驅動 皮帶丟棄並換上新皮帶。...
- Page 33 維護保養 更換燈泡 1. 將吸塵器的插頭從插座拔出。 2. 取下可拆卸吸塵子機, 將吸塵器把手 放低。 3. 用螺絲起子取出一枚螺絲釘, 取下鏡 片。 4. 握住燈泡, 筆直從插孔拔出。 安裝新 燈泡時, 將燈泡輕輕推入插孔, 直到 燈泡 「喀噠」 一聲鎖好定位。 5. 裝回鏡片, 用一枚螺絲釘轉緊。 TurboBrush 渦輪刷頭保養 請定期檢查 TurboBrush ™ 查看刷子四周是否有東西堵塞或碎屑環繞。 1. 將吸塵器的插頭從插座中拔出。 2. 如果出現堵塞或看到碎屑, 鬆開 渦輪刷頭背後的兩顆螺 TurboBrush ™ 絲釘, 取下面板清除堵塞。 3.
- Page 34 維護保養 清除阻塞 當吸塵器吸力變小或塵屑無法吸拾時, 可能 是因為裡面有阻塞。 如果您發現馬達的聲音 有異, 或機器旋轉的力度減弱, 請檢查是否 有阻塞。 1. 將吸塵器的插頭從插座中拔出。 2. 清空集塵筒。 3. 檢查集塵筒之上筒內是否有堆積或 阻塞。 4. 取出次級氣旋裝置, 檢查吸入口是否 阻塞。 5. 握住長管把手並抬高, 使它與吸入口 分開。 檢查底座或管子是否有阻塞。 6. 將Twist n' Snap ™ 使它與機器分開。 將管子拉直, 然後 用掃帚柄之類的細長物體來清除管內 的阻塞。 7. 如果吸力仍弱, 請遵照第 11 頁的 「檢 查滾筒刷」...
- Page 35 垢堆積。 3. 參閱 「清除阻塞」 一節。 4. 馬達冷卻大約30分鐘後, 熱能保護裝 置會自動重設, 即可繼續清潔。 如果 執行上述步驟後熱能保護裝置持續 啟動, 就表示您的吸塵器可能需要送 修。 請致電 BISSELL 消費者服務部, 或瀏覽本公司網站。 注意:熱能保護裝置只控制主吸塵器 馬達, 不會控制清潔刷馬達。 熱能保 護裝置啟動後, 清潔刷會繼續正常運 轉, 但是不會進行任何吸拾。 w w w . b i s s e l l . c o m 當心:...
- Page 36 故障排除 吸塵器無法啟動 可能原因 電源線沒插緊 保險絲燒斷/跳電 熱能保護裝置啟動 滾筒地板刷沒有電 可能原因 可拆卸吸塵子機沒有裝好 清潔刷開關在 「OFF」 (關) 位置 吸塵器呈直立狀態 吸塵器無法吸塵 可能原因 高度調整不正確 長管未裝到吸入開口 長管有裂縫或孔洞 傳動帶斷裂、 磨損或脫離馬達皮帶輪 滾筒地板刷鬃毛磨損 滾筒地板刷卡住 吸塵器阻塞 集塵筒已滿 集塵筒或次級氣旋裝置未安裝好 濾網髒污 吸塵器難以推動 可能原因 高度調整不正確 w w w . b i s s e l l . c o m 警告: 為減少電擊的危險,...
- Page 37 故障排除 看見吸塵器內的塵垢溢出 可能原因 集塵筒已滿 濾網或次級氣旋裝置沒在機器裡或未安裝好 集塵筒未安裝好 本手冊沒有包含在上述說明的維護保養或服務,應由授權服務代表進行。 感謝您選用 BISSELL 產品。 w w w . b i s s e l l . c o m 解決辦法 清空集塵筒 檢查次級氣旋裝置、 前置馬達及後置 馬達的濾網是否正確安裝 拉出集塵筒, 重新裝好...
- Page 38 – www.bissell.com BISSELL 或瀏覽 網站 BISSELL 聯絡 時, 請提供產品型號。 請記錄您的型號: _______________ 請記錄您的購買日期: ______________ 注意:請妥善保存原始收據, 以便申請保固理賠時作為購買證明。 可替換之零件 如需可替換之零件, 請向零售商、 BISSELL消費者服務部洽詢購買。 項目 零件編號 3200 203-1297 203-2073 203-2085 3290 3091 203-2445 203-2444 w w w . b i s s e l l . c o m 0800 365 588 上午...
- Page 39 額外配件 如需額外配件, 請向零售商、 BISSELL消費者服務部洽詢購買。 項目 零件編號 203-1063 203-2302 203-1099 203-6624 203-6625 203-2081 203-5542 w w w . b i s s e l l . c o m 零件名稱 隙縫專用吸頭 渦輪刷頭 TurboBrush ™ 除塵刷頭/ 傢俱墊襯專用吸頭 樓梯清潔專用吸頭 (僅限特定型號) 可伸縮軟管棒 高級硬式地板專用吸頭 (僅限特定型號)...
- Page 40 保固 本保固賦予您特定的法律權利, 您也可能享有因國家而異的其他權利。 如果您需要關於本 保固的其他說明或是對保固內容有疑問, 請按以下方式透過電子郵件、 電話或一般郵件與 BISSELL 消費者服務部聯絡, 或洽詢您當地的國內經銷商。 兩年保固期限 根據以下規定的* 「例外與除外責任」 , BISSELL Homecare, Inc. 將在原始購買者購買之日 起兩年內, 由 BISSELL 在收到產品後選擇免費修理或更換 (使用全新或再製造的零件或產 品) 缺陷或故障的零件。 請看以下 「如果您的 BISSELL 產品需要維修服務」 的資訊。 本保固適用於個人使用產品而非商業或租賃服務。 本保固不適用於風扇或例行維護零件, 如濾網、 帶子或刷頭。 本保固不適用由於疏忽、 濫用、 忽略、 未經授權的修理或任何其他未 遵守 《使用指南》 之使用而造成的損壞或故障。...
Need help?
Do you have a question about the Lift-off Multi Cyclonic 89Q9 Series and is the answer not in the manual?
Questions and answers