Fluance Ai61 - Powered 6.5" Bookshelf Speakers Manual
- Manual (21 pages) ,
- Quick start manual (13 pages)
Advertisement
- 1 What's Included
- 2 Front & Back Panel Layout
- 3 Product Setup
- 4 Turning On/Off Unit
- 5 Source Selection
- 6 RCA Input
- 7 Bluetooth Pairing
- 8 Optical Input
- 9 USB Input
- 10 Subwoofer Output
- 11 Volume Adjustment
- 12 EQ Adjustment
- 13 Adjusting Source LED Brightness
- 14 Frequently Asked Questions
- 15 Troubleshooting
- 16 Specifications
- 17 Documents / Resources
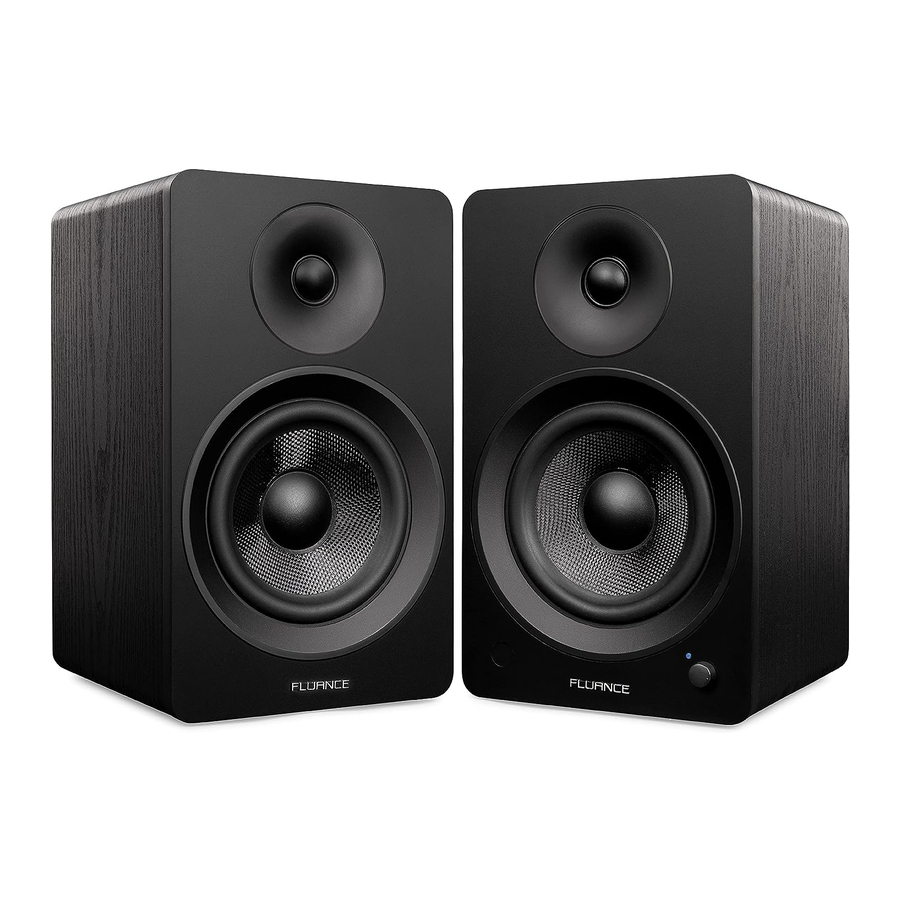
What's Included

Front & Back Panel Layout
Active Speaker - Front

- Control Knob
- Volume
- Input Selection
- Power ON/OFF
- Source LED
- Blue (Solid) - Bluetooth® Paired
- Blue (Flashing) - Bluetooth® Pairing Mode
- Green (Solid) - RCA
- White (Solid) - Optical
- Purple (Solid) - USB
- Red (Solid) - Standby Mode
- Red (Flashing) - Mute
- Red (Flash x2) - Volume Set to Max
- Red (Flash x2) - Bass/Treb Set to -5 or +5
- Source Color: Blue/Green/White/Purple (Flash x2) - Bass/Treb Set to 0
- IR Sensor
Active Speaker - Back

- Bluetooth ® Reset Pairing
- USB Input (Audio Playback Only)
- Optical Input
- RCA Input
- Subwoofer Output
- Left Speaker Output
- DC Input
- Power Switch
Passive Speaker - Back

- Speaker Input
Remote Control Layout

- Power ON/OFF
- Volume UP/DOWN
- Source
- Treble UP/DOWN
- Mute
- Play/Pause & Bluetooth Pairing Reset*
*To enable Bluetooth Pairing Reset, press + hold for 3 seconds. - Forward/Back
- LED Brightness - (100% > 25% > OFF)
- Bass UP/DOWN
Product Setup
- Position the speakers with the Active Speaker on the right and the Passive Speaker on the left.

NOTE: If placing the speakers in a cabinet or on a shelf, position the front of the speakers as close as possible to the front edge of the shelf for optimum audio performance. - Connect one end of the speaker wire to the binding posts on the back of the
Active Speaker and connect the other end of speaker wire to the binding posts on the back of the Passive Speaker.
![]()
Ensure the same color wire is connected to the same color binding posts on each speaker.
NOTE: The included speaker wire is 8ft. If placing your speakers further than 8ft apart it is recommended to use standard 18 gauge speaker wire to connect the speakers over the longer distance. - Connect the power adapter to the back of the Active Speaker and set the power switch to the ON position.
![]()
Loosen the binding post
![]()
Insert speaker wire through hole
![]()
Tighten the binding post


Turning On/Off Unit

Press the Control Knob to turn on the unit. Hold to turn off the unit.
OR

Press ![]() on the Remote to turn the unit on/off.
on the Remote to turn the unit on/off.
Source Selection

Press the Control Knob to cycle through the audio inputs.
OR

Press on the remote to cycle through the audio inputs.
The Source LED will show the below color for each source:
 (Blue) Bluetooth
 (Green) RCA
 (White) Optical
 (Purple) USB
RCA Input
- Connect the RCA cable to your source device (Turntable, Smartphone, Computer...).
- Connect the other end of the RCA cable to back of the Active Speaker.

- Press the Control Knob to select the RCA input (Green LED).

- Adjust volume on Ai61 as well as source device.


NOTE: When connecting a turntable to the Ai61, a phono preamplifier (preamp) must be used. Some turntables include a built-in preamp but others, without one, would require an external preamp.
Visit Fluance.com for more information on our phono preamplifier, the PA10.
Bluetooth Pairing
- Press the Control Knob to select the Bluetooth input (Blue LED).

- Pair to "Fluance Ai61" on your source device.
NOTE: Unit will attempt to auto-pair to the last paired device.

- Use the Remote to control playback on your source device.
NOTE: Adjust Volume on the source device as well as the Ai61

- If your device cannot find "Fluance Ai61", you can reset Bluetooth pairing:
- Press and hold for 3 seconds to reset Bluetooth pairing.
OR - Press the Bluetooth Pairing Reset Button on the back of the unit.

- Press and hold for 3 seconds to reset Bluetooth pairing.


NOTE: How you access your device's Bluetooth settings may vary from one manufacturer to another. Maximum line of + + sight for Bluetooth range is 33ft. Obstacles may decrease transmission distance.
Optical Input
- Connect the Optical cable to your source device (TV, Computer, Game Console...). Ensure protective caps are removed from the ends of the Optical cable.
- Connect the other end of the Optical cable to the back of the Active Speaker.

- Press the Control Knob to select the Optical Input (White LED).

- Adjust the volume on Ai61 as well as source device.


Optical Audio Signal Compatibility
The Ai61 does not support Dolby Digital Audio or DTS Audio. Locate the audio output settings on your source device and ensure Dolby Digital is turned off. The correct audio output setting is commonly referred to as PCM or Stereo.
Some TVs also require that audio output be enabled. This setting may be referred to as External Speakers. Ensure this is selected as your speaker/audio output.
For instructions on a specific device, please consult the device's user manual.
USB Input
- Connect the USB cable to your source device (Laptop, Desktop...).
- Connect the other end of the USB cable to USB-C port on the back of the Active Speaker.
![]()
The USB input on the Ai61 is for USB audio playback and not for USB charging.

- Press the Control Knob to select the USB input (Purple LED)

- Adjust volume on Ai61 as well as source device. You may also need to adjust volume in the different programs on the source device.


USB Audio Output Settings
You may need to enable USB audio output on your source device. Here are the directions for most Windows® and Apple® Computers.
Windows®: Control Panel > Sound > USB Audio
Apple®: System Preferences > Sound > Output > USB
It is also important to check that any sound enhancements, effects, or EQ settings are disabled on your source device.
Subwoofer Output

When a subwoofer cable is connected, the Ai61 will automatically cut frequencies below 80Hz to optimize performance. The subwoofer cable must be removed to resume full frequency playback.
- Connect the Subwoofer cable to your powered subwoofer.
- Connect the other end of the Subwoofer cable to the back of the Active Speaker.
- Adjust the volume on the Subwoofer for the best listening experience.

*Subwoofer cable not included

Fluance offers matching subwoofers for the ultimate audio experience.
For more information visit:
Fluance.com/subwoofer
Volume Adjustment
Turn the Control Knob or use the Remote to increase or decrease volume.
EQ Adjustment
Use the Bass/Treble buttons on the Remote to adjust each from -5 to +5.
LED Behavior:
 Red (Flash 2x) – Bass/Treble Set to -5 or +5
 Bluetooth: Blue (Flash 2x) – Bass/Treble set to 0*
 RCA: Green (Flash 2x) – Bass/Treble set to 0*
 Optical: White (Flash 2x) – Bass/Treble set to 0*|
 USB: Purple (Flash 2x) – Bass/Treble set to 0*
*NOTE: The Status LED will flash the input color when Bass/Treble is set to 0.
Adjusting Source LED Brightness
Use the LED Brightness Button ![]() on the Remote to cycle between 100%, 25%, and OFF brightness levels.
on the Remote to cycle between 100%, 25%, and OFF brightness levels.
NOTE: When set to OFF, the LED will turn on for 5 seconds when power is turned on or new Source is selected, before turning off again.
Frequently Asked Questions
What is ˝auto-pairing˝ and how does it work?
Auto-pairing is a convenient connection feature included in all Fluance Bluetooth Speakers. If the connected Bluetooth-enabled device leaves the connection range of the Ai61 and returns at a later time, the device will automatically connect. If the device's Bluetooth function is disabled and then enabled at a later time, the device will automatically connect as well.
NOTE: The Fluance Ai61 will only auto-pair to the last device that it was connected to.
Another Bluetooth® device is connected to my Fluance Ai61 and I want to connect my device.
You can reset any Bluetooth connection by pressing the Bluetooth Pairing Reset button on the back of the Active Speaker. You can also press and hold "Play/Pause" on the Remote for 3 seconds.
What RCA devices can be connected to the Ai61?
Any RCA device will work with the Ai61. Common devices would be TV's, Turntables, Smartphones, or Tablets.
How can I increase the volume when using the Ai61 with a turntable?
If turntable audio is too quiet you may need to add a preamplifier. Some turntables have built in preamps which can be turned on or off. The Fluance PA10 preamplifier is a great match for Fluance powered speakers and turntables.
Why is the volume from each input different on the Ai61?
Ensure that any volume and EQ settings on your source devices are set to similar levels. The different signal types used by each input means they are processed differently by the Ai61. The Optical Input uses a digital signal while the RCA Input uses an analog signal.
These differences can result in slight variances in the output volume of the Ai61.
What is the range of my Bluetooth Connection?
The Fluance Ai61 operates with Power Class 2 Bluetooth devices, which have a range of approximately 33 feet (line of sight).
What is the break-in period for Fluance speakers?
The break-in period for your Fluance Ai61 speakers is about 10 hours of playing time at normal listening volumes. After this period, the drivers will have had enough movement to perform at their peak level.
Troubleshooting
No Power
- Ensure the LED Brightness is not set to OFF
- Check all connections on power adapter and ensure fully inserted
No Audio
- Check volume on Ai61 and ensure it is above 0
- Check volume on source device and ensure it is above 0
- Confirm Ai61 is set to correct source
- Ensure all cables are connected properly and fully inserted
No Audio from Passive Speaker
- Check speaker wire connections between speakers and ensure securely connected to binding posts
Poor Audio
- Ensure the colored wires are connected to the corresponding colored binding posts on each speaker
- Test with another audio source device to determine source of issue
Hissing Noise
- Ensure the colored wires are connected to the corresponding colored binding posts on each speaker
- Test using different RCA or optical cables
- If using with a turntable, ensure the ground cable is connected properly
Specifications
| SPEAKER CONFIGURATION | 2 Way – 2 Driver Bookshelf Speaker System with Integrated Amplifier |
| BLUETOOTH | Yes; BT 5.0 |
| INPUTS | RCA L/R, Digital Toslink Optical, USB C |
| TWEETER | 1 inch Silk Soft Dome Ferrofluid Cooled |
| WOOFER | 6.5 inch Woven, Glass Fiber Composite Drivers with Butyl Rubber Surrounds |
| AMPLIFIER POWER | Class D 120 Watts Continuous Average Output (2x 60 watts) |
| FREQUENCY RESPONSE | 32Hz – 20KHz (DSP Virtual Sound) |
| CROSSOVER FREQUENCY | 2600Hz Phase Coherent – PCB Mounted Circuitry |
| TOTAL HARMONIC DISTORTION (THD) | <0.3% (THD+N 1%) |
| POWER | Input: 100-240V 50Hz/60Hz |
| SPEAKER WEIGHT | Active Speaker: 14.03 lbs (6.36 kg) Passive Speaker: 13.14 lbs (5.96 kg) |
| DIMENSIONS (HxWxD) | 13.1 x 7.8 x 9.2 inches 33.3 x 19.8 x 23.4 cm |

Documents / Resources
References
![fluance.com]() Turntables, Home Theater Surround Sound Speaker Systems and Home Audio Products | Fluance
Turntables, Home Theater Surround Sound Speaker Systems and Home Audio Products | Fluance![fluance.com]() Powered Subwoofers | Fluance
Powered Subwoofers | Fluance
Download manual
Here you can download full pdf version of manual, it may contain additional safety instructions, warranty information, FCC rules, etc.
Download Fluance Ai61 - Powered 6.5" Bookshelf Speakers Manual
Advertisement


Need help?
Do you have a question about the Ai61 and is the answer not in the manual?
Questions and answers