Table of Contents
Advertisement
Quick Links
Advertisement
Table of Contents

Related Manuals for Omega OSI604


Summary of Contents for Omega OSI604
- Page 1 OSI604 14 place settings...
- Page 2 You are welcoming an Omega appliance into your place and you can be sure it'll always serve you well. For important information about your Omega such as warranty registration, online manuals, specifications and catalogues, please visit...
- Page 3 For detailed operating method read the corresponding content on the instruction manual. Switch on the appliance Open the door, p ress the On/Off button to switch on the appliance. For each wash cycle. Fill the detergent dispenser For programs with pre-wash only. (Follow the user instructions) Check the rinse aid level Electric indicator on control panel (if provided).
- Page 5 When using your dishwasher, follow the precautions listed below: This appliance must be grounded. In the event of a Improper connection of the equipment-grounding malfunction or breakdown, grounding will reduce conductor can result in the risk of an electric shock. the risk of an electric shock by providing a path of Check with a qualified electrician or service least resistance of electric current.
- Page 6 To get the best performance from your dishwasher, read all operating instructions before using it for the first time. Glass 90Min 1.On/Off Button: To turn on/off the power supply. Rapid 2.Delay Button : Press the button to set a delay time. Rinse detergent need to be refilled.
-
Page 7: How To Fill The Rinse Aid Dispenser
Before using your dishwasher for the first time: Fill the rinse aid dispenser Fill in detergent Filling the Rinse Aid Dispenser Rinse Aid Dispenser The rinse aid is released during the final rinse to prevent water from forming droplets on your dishes, which can leave spots and streaks. -
Page 8: Adjusting Rinse Aid Dispenser
Clean up any rinse aid spilled while during filling with an absorbent cloth to avoid excessive foaming during the next wash. Don't forget to replace the cap before you close dishwasher door. Adjusting Rinse Aid Dispenser The rinse aid dispenser has six or four settings. Always start with the dispenser set on "4". -
Page 9: Fill In Detergent
Adding detergent to dispenser Fill in Detergent Fill the detergent dispenser with detergent. The marking indicates the dosing levels , as illustrated on the right: The place of main wash cycle detergent placed. The place of pre-wash cycle detergent placed. Please observe the manufacturers dosing and storage Recommendations as stated on the detergent packaging. - Page 10 Consider buying utensils which are identified as dishwasher-proof. Use a mild detergent that is described as 'kind to dishes'. If necessary, seek further information from the detergent manufacturers. For particular items, select a program with as low temperature as possible. To prevent damage, do not take glass and cutlery out of the dishwasher immediately after the program has ended.
-
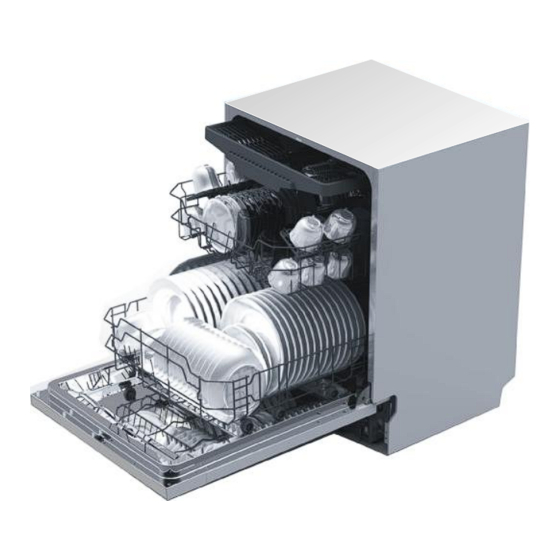
Page 11: Loading The Lower Basket
The Method Loading Normal Dishware Loading the Lower Basket Loading the Upper Basket The upper basket is designed to hold more delicate and We suggest that you place large items and the most lighter dishware such as glasses, coffee and tea cups difficult to clean items are to be placed into the lower basket: such as pots, pans, lids, serving dishes and and saucers, as well as plates, small bowls and shallow... - Page 12 Cutlery tray could be have 5 positions: Mode 1 Position one: lift the left basket up, both left and right baskets are slanting. Mode 2 Position two: adjust the left basket to lower position, left basket is flat and right basket is slanting. Mode 3 Position three: lift the right basket up, both left and right baskets are flat.
-
Page 13: Wash Cycle Table
Wash Cycle Table Means: need to fill rinse aid into the Rinse-Aid Dispenser. 。 Pre-wash(50 ) For heaviest soiled crockery, 。 Intensive 、 Wash (60 and normally soiled pots 5/27.5g Rinse 、 pans dishes etc with dried 17.5 (Or All in1) Rinse 。... -
Page 14: Switch Off The Dishwasher
Premise: A cycle that is underway can only be modified if it has only been running for a short time. Otherwise, the detergent may have already been released, and the appliance may have already drained the wash water. If this is the case, the detergent dispenser must be refilled (see the section entitled " Loading the Detergent "... -
Page 15: Filter Assembly
The filter prevents larger remnants of food or other objects from getting inside the pum. The residues may block the filter, in this case they must be removed. The filter system consists of a coarse filter, a flat (Main filter) and a microfilter(Fine filter). -
Page 16: Cleaning The Filter
Notes: - Inspect the filters for blocking after every time the dishwasher has been used. - By unscrewing the coarse filter, you can remove the filter system. Remove any food remnants and clean the filters under running water. The entire filter assembly should be cleaned once a week. Cleaning the Filter To clean the coarse filter and the fine filter, use a cleaning brush. - Page 17 After Every Wash When not in Use for a LongTime It is recommend that you run a wash cycle with the After every wash, turn off the water supply to the dishwasher empty and then remove the plug from the appliance and leave the door slightly open so that socket, turn off the water supply and leave the door of moisture and odours are not trapped inside.
-
Page 18: Please Carefully Read The Installation Instruction
Please carefully read the installation instruction. Illustrations of cabinet dimensions and installation position of the dishwasher Preparations should be made before moving the dishwasher to the installation place. Choose a place near the sink to facilitate the installation of inlet and drain hoses (see figure 1). - Page 19 Tension adjustment of the door spring ● The door springs are set at the factory to the proper tension for the outer door. If aesthetic wooden panel are installed, you will have to adjust the door spring tension. Rotate the adjusting screw to drive the adjustor to strain or relax the steel cable (see figure 5).
-
Page 20: Dishwasher Installation Steps
Dishwasher installation steps ● Install the furniture door to the outer door of the dishwasher using the brackets provided. Refer to the template for positioning of the brackets. Adjust the tension of the door springs by using an Allen key turning in a clockwise motion to tighten the left and right door springs. - Page 21 Dishwasher must be level for proper dish rack operation and wash performance. Place a spirit level on door and rack track inside the tub as shown to check that the dishwasher is level. level the dishwasher by adjusting the three levelling legs individually. When level the dishwasher, please pay attention not to let the dishwasher tip over.
-
Page 22: Positioning The Appliance
Connect the cold water supply hose to a threaded 3/4(inch) connector and make sure that it is fastened tightly in place. If the water pipes are new or have not been used for an extended period of time, let the water run to make sure that the water is clear. -
Page 23: Before Calling For Service
Before Calling for Service Fuse blown, or the Replace fuse or reset circuit breaker. Remove any other circuit breaker acted appliances sharing the same circuit with the dishwasher Power supply is not Make sure the dishwasher is turned on and the door is turned on closed securely. -
Page 24: Error Codes
The dishes were not See notes in " Loading the Dishwasher Baskets ". loaded correctly. The program was Select a more intensive programme. not powerful enough. See" Wash Cycle Table ". Not enough detergent Use more detergent, or change your detergent. was dispensed. -
Page 25: Technical Information
Technical Information Height : 815mm Width : 598 mm (with the door closed) Depth : 570mm Water pressure: 0.04-1.0MPa Power supply: see rating label Capacity: 14 place settings...
Need help?
Do you have a question about the OSI604 and is the answer not in the manual?
Questions and answers